Seeed Studio vient de présenter le reTerminal E1002, un appareil prêt à l’emploi doté d’un boîtier métallique robuste et d’un écran e-paper couleur de 7,3″ affichant en 800×480 pixels. Basé sur un microcontrôleur ESP32-S3, il intègre plusieurs fonctionnalités matérielles : trois boutons, un buzzer, une LED de statut (en plus de la LED d’alimentation), un capteur de température et de pression, un microphone ainsi qu’un lecteur de carte MicroSD. L’ensemble est alimenté par une batterie interne de 2000 mAh offrant jusqu’à trois mois d’autonomie.
Cet appareil est particulièrement bien adapté pour l’affichage des données issues du capteur Zigbee que j’ai développé dans mon tutoriel Créer un capteur de température Zigbee sur batterie avec un ESP32C6 et que j’ai intégré à Home Assistant.
Le reTerminal E1002 peut être configuré et personnalisé en adoptant trois approches distinctes :
- Approche 1 : Visuelle (drag & drop), avec SenseCraft HMI
- Approche 2 : Par configuration déclarative (fichiers YAML), comme dans mon tutoriel Intégrer un reTerminal E1002 dans Home Assistant avec ESPHome
- Approche 3 : Par programmation (IDE Arduino, C/C++)
C’est cette dernière approche que je vais utiliser dans cet article, car elle a l’avantage de ne pas vous imposer les limites des deux autres approches.
Configuration de l’IDE Arduino pour le reTerminal E1002
Il faut tout d’abord intégrer le support pour les microcontrôleurs ESP32 dans l’IDE Arduino, en ajoutant l’URL suivante dans le champ Additional Boards Manager URLs du menu File > Preferences :
https://espressif.github.io/arduino-esp32/package_esp32_index.json
Il faut ensuite installer le package ESP32, via le menu Tools > Board > Boards Manager, en recherchant “esp32” et installant le package esp32 by Espressif Systems (disponible sur github espressif).
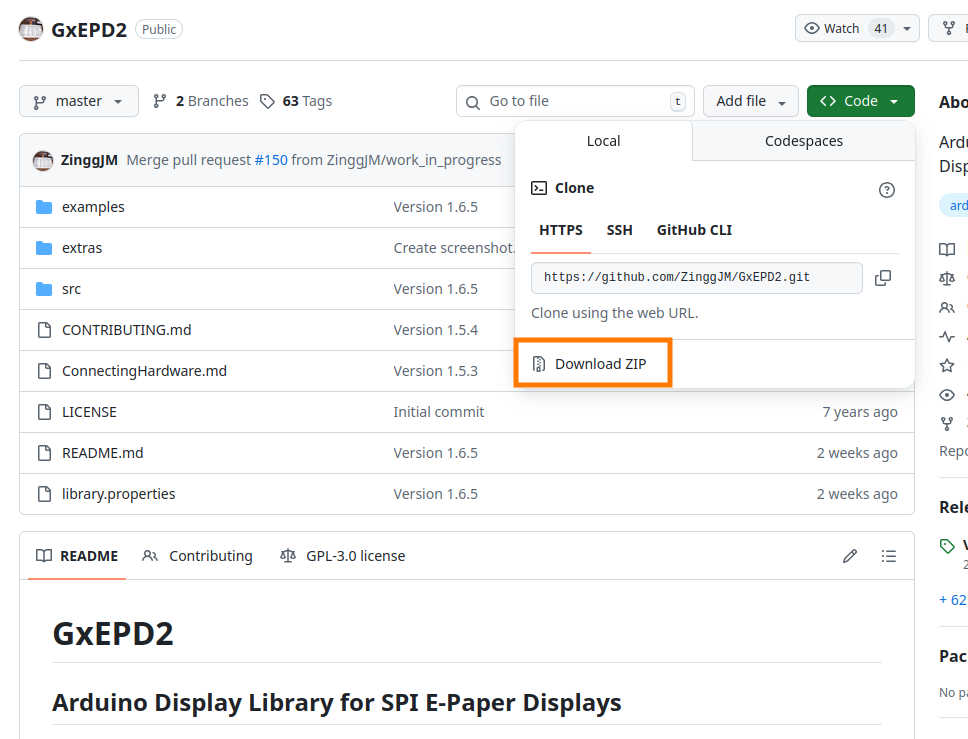
Téléchargez ensuite la librairie GxEPD2 dans son format ZIP :
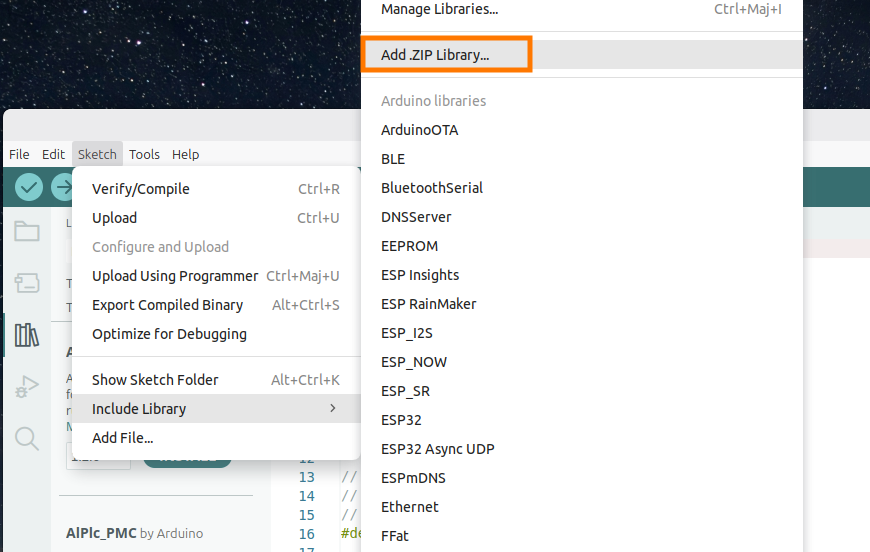
Et l’ajouter à l’IDE Arduino via le menu Sketch > Include Library > Add .ZIP Library…
Et pour finir, installer cette librairie GxEPD2 by Jean-Marc Zingg via le menu Tools > Manage libraries.
Premier programme “Hello World”
Voici le code qui affiche le célèbre “Hello World” sur l’écran du reTerminal E1002, qu’il faut installer sur l’appareil après avoir sélectionné la carte XIAO_ESP32S3 via le menu Tools > Board > ESP32 Arduino et choisi le port sur lequel le reTerminal est connecté.
/**
 * @file hello_world.ino
 * @brief Display "Hello World!" on Seeed reTerminal E1002 e-paper.
 *
 *   https://tutoduino.fr/
 */
#include <GxEPD2_7C.h> // Include library for 7-color ePaper display management
#include <Fonts/FreeMonoBold12pt7b.h> // Include a bold monospaced font at 12pt (for text display)
// Define SPI connection pins between the microcontroller and the ePaper display
#define EPD_SCK_PIN  7     // SPI clock pin
#define EPD_MOSI_PIN 9     // SPI data pin (MOSI)
#define EPD_CS_PIN   10    // SPI Chip Select for the ePaper display
#define EPD_DC_PIN   11    // Data/Command control pin
#define EPD_RES_PIN  12    // Display Reset pin
#define EPD_BUSY_PIN 13    // Display Busy status pin
// Define the ePaper display driver and class (for a 7.3" color model)
#define GxEPD2_DISPLAY_CLASS GxEPD2_7C
#define GxEPD2_DRIVER_CLASS GxEPD2_730c_GDEP073E01 // Specific to the 7.3" Color display
// Set up a maximum display buffer size for RAM management
#define MAX_DISPLAY_BUFFER_SIZE 16000
// Macro to compute the maximum height, given display size and RAM constraints
#define MAX_HEIGHT(EPD) \
    (EPD::HEIGHT <= MAX_DISPLAY_BUFFER_SIZE / (EPD::WIDTH / 8) \
         ? EPD::HEIGHT \
         : MAX_DISPLAY_BUFFER_SIZE / (EPD::WIDTH / 8))
// Instantiate the ePaper display object with the chosen driver and pinouts
GxEPD2_DISPLAY_CLASS<GxEPD2_DRIVER_CLASS, MAX_HEIGHT(GxEPD2_DRIVER_CLASS)>
    display(GxEPD2_DRIVER_CLASS(/*CS=*/EPD_CS_PIN, /*DC=*/EPD_DC_PIN,
                                /*RST=*/EPD_RES_PIN, /*BUSY=*/EPD_BUSY_PIN));
// Create a dedicated SPI bus object for display communication
SPIClass hspi(HSPI);
/**
 * @brief Draws "Hello World!" in red at coordinates (100, 100) on the ePaper display.
 */
void helloWorld()
{
  display.setRotation(0);  // No rotation, natural orientation
  display.setFont(&FreeMonoBold12pt7b); // Use the bold 12pt monospace font
  display.setTextColor(GxEPD_RED);      // Set text color to red (one of supported display colors)
  display.setFullWindow();              // Use the full display area for drawing
  display.firstPage();                  // Start first drawing page (paged drawing saves RAM)
  do
  {
    display.fillScreen(GxEPD_WHITE);    // Fill the screen with white (background)
    display.setCursor(100, 100);        // Set the cursor to (100, 100) for text position
    display.print("Hello World!");      // Print "Hello World!" on the screen
  }
  while (display.nextPage());           // Continue until all pages are rendered (for paged displays)
}
/**
 * @brief Arduino setup function. Initializes the display and shows "Hello World!".
 */
void setup()
{
  pinMode(EPD_RES_PIN, OUTPUT);      // Configure reset pin as output
  pinMode(EPD_DC_PIN, OUTPUT);       // Configure data/command pin as output
  pinMode(EPD_CS_PIN, OUTPUT);       // Configure chip-select pin as output
  // Initialize SPI bus for display with specified pins, speed, and settings
  hspi.begin(EPD_SCK_PIN, -1, EPD_MOSI_PIN, -1);
  display.epd2.selectSPI(hspi, SPISettings(2000000, MSBFIRST, SPI_MODE0));
  // Initialize the ePaper display hardware and driver
  display.init(0);
  // Display "Hello World!" message
  helloWorld();
  // Put the display into low-power (hibernate) mode after rendering
  display.hibernate();
}
// No loop code needed. The display only updates once at startup in this demo.
void loop() {};
Voici le résultat après téléversement sur le reTerminal :

Récupération d’une donnée depuis le serveur Home Assistant
L’objectif de ce tutoriel est d’afficher sur le reTerminal E1002 la température du capteur qui est disponible dans le serveur Home Assistant. Cette donnée sera récupérée via l’API RESTful du serveur Home Assistant disponible via l’URL http://ADRESSE_IP_HA:8123/api/. Cette API accepte et renvoie uniquement les objets codés en JSON. Nous utiliserons pour cela la librairie Arduinojson by Benoit Blanchon, que nous installons depuis le menu Tools > Manage Libraries de l’IDE Arduino.
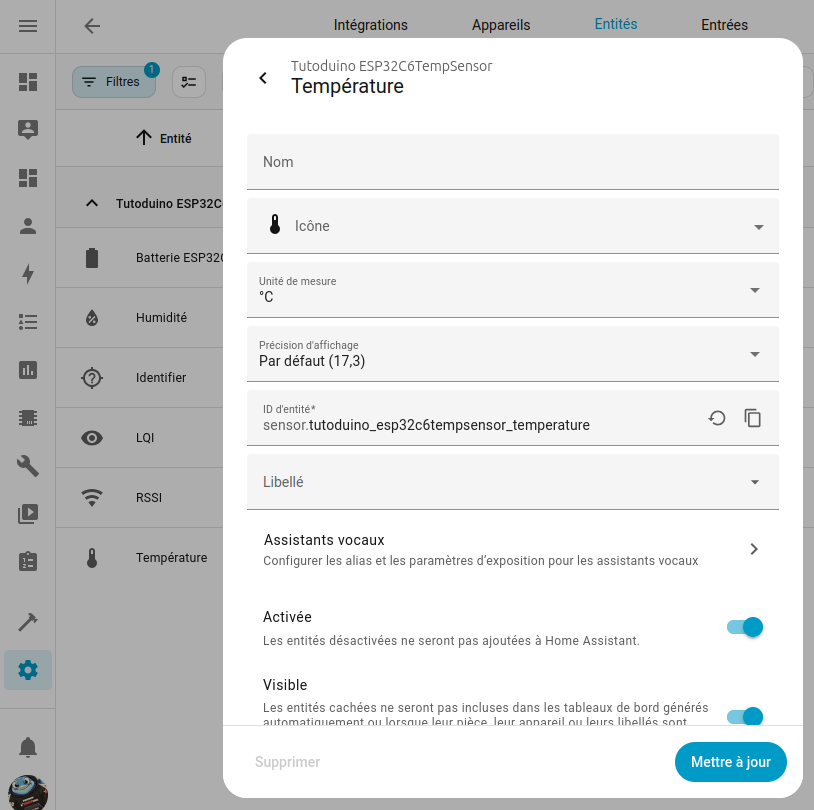
Il faut récupérer, depuis la page web de Home Assistant, l’ID de l’entité que nous souhaitons afficher sur le reTerminal. Ici par exemple, la température du capteur correspond à l’entité dont l’ID est : sensor.tutoduino_esp32c6tempsensor_temperature.
Pour pouvoir récupérer des données de Home Assistant, notre programme va avoir besoin d’un jeton (Token) de Home Assistant afin de pouvoir l’interroger via son API. Il faut le faire à partir de la page web de votre serveur Home Assistant, en allant sur la page de votre profile et en cliquant sur le bouton Créer un jeton depuis le menu Sécurité.
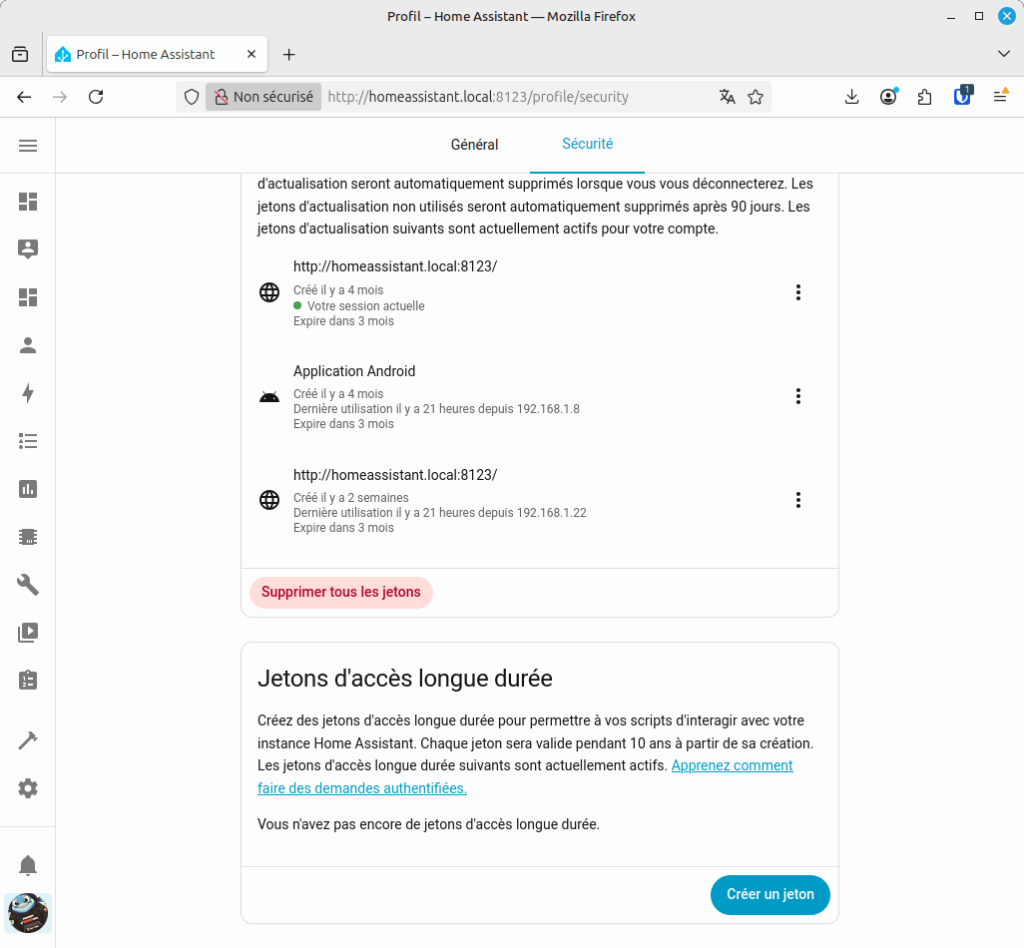
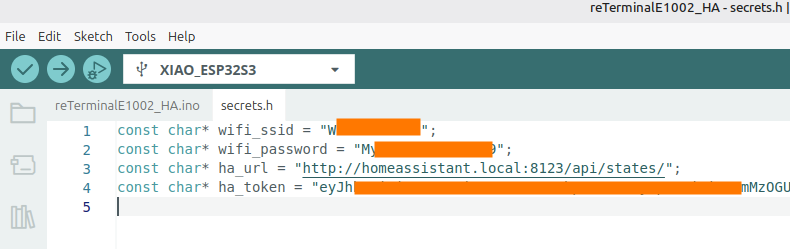
Une fois le jeton créé, il suffit de l’indiquer dans votre programme sous l’IDE Arduino. Je recommande toujours de stocker vos secrets (mot de passe wifi, jeton home assistant…) dans un fichier secret.h qui sera inclus dans votre programme C. Cela évite par exemple de les faire fuiter sur Github après un copier-coller malencontreux…
Voici un exemple de programme qui va récupérer via l’API Home Assistant la température de notre capteur et l’afficher sur l’écran du reTerminal E1002. Notez que la lecture sur le serveur Home Assistant se fait toutes les 10 minutes et qu’entre deux lectures, le reTerminal se met en veille profonde afin d’économiser sa batterie. Il est cependant possible de réveiller à tout moment le reTerminal en cliquant sur son bouton vert.
/**
 * @file TemperatureDisplay.ino
 * @brief Fetches temperature data from a Home Assistant server and displays it on a reTerminal E1002 e-paper screen.
 *        The device can enter deep sleep and wake up via a button press or timer.
 */
#include <WiFi.h>           // Wi-Fi library for ESP32
#include <HTTPClient.h>     // HTTP client for making requests
#include <ArduinoJson.h>    // JSON parsing library
#include <GxEPD2_7C.h>      // E-paper display library for 7-color displays
#include <Fonts/FreeMonoBold12pt7b.h>  // Custom font for the display
#include "secrets.h"       // Custom file containing sensitive data (Wi-Fi credentials, API tokens)
// --- Pin Definitions ---
// Serial1 communication pins for debugging
#define SERIAL_RX 44
#define SERIAL_TX 43
// SPI pins for e-paper display communication
#define EPD_SCK_PIN  7   // SPI Clock pin
#define EPD_MOSI_PIN 9   // MOSI (Master Out Slave In) pin
#define EPD_CS_PIN   10  // Chip Select pin
#define EPD_DC_PIN   11  // Data/Command pin
#define EPD_RES_PIN  12  // Reset pin
#define EPD_BUSY_PIN 13  // Busy pin
// Button pin definitions according to the hardware schematic
#define GREEN_BUTTON 3   // KEY0 - GPIO3, connected to the green button
// --- E-paper Display Configuration ---
// Display class for 7.3" color e-paper
#define GxEPD2_DISPLAY_CLASS GxEPD2_7C
#define GxEPD2_DRIVER_CLASS GxEPD2_730c_GDEP073E01
// Maximum display buffer size in bytes (limits memory usage)
#define MAX_DISPLAY_BUFFER_SIZE 16000
// Calculate the maximum display height based on the buffer size
#define MAX_HEIGHT(EPD) \
  (EPD::HEIGHT <= (MAX_DISPLAY_BUFFER_SIZE * 8) / EPD::WIDTH ? EPD::HEIGHT : (MAX_DISPLAY_BUFFER_SIZE * 8) / EPD::WIDTH)
// --- Device Initialization ---
// Initialize SPI interface for the display (HSPI = Host SPI)
SPIClass hspi(HSPI);
// Initialize the display object with the specified driver and buffer size
GxEPD2_DISPLAY_CLASS<GxEPD2_DRIVER_CLASS, MAX_HEIGHT(GxEPD2_DRIVER_CLASS)>
  display(GxEPD2_DRIVER_CLASS(EPD_CS_PIN, EPD_DC_PIN, EPD_RES_PIN, EPD_BUSY_PIN));
/**
 * @brief Displays the temperature on the e-paper screen.
 * @param temperature A string representing the temperature to display.
 */
void displayTemperature(const char* temperature) {
  Serial1.print("Temperature to display: ");
  Serial1.println(temperature);
  // Configure display settings
  display.setRotation(0);  // Set display orientation to default (0 degrees)
  display.setFont(&FreeMonoBold12pt7b);  // Set font to FreeMonoBold12pt7b
  display.setTextColor(GxEPD_RED);  // Set text color to red
  display.setFullWindow();  // Use the full display window for rendering
  // Start the display update process
  display.firstPage();
  do {
    display.fillScreen(GxEPD_WHITE);  // Clear the screen with white background
    display.setCursor(100, 100);  // Set cursor position to (100, 100)
    display.print("Temperature = ");
    display.print(temperature);  // Print the temperature value
    display.print(" C");  // Print the degree symbol and 'C' for Celsius
  } while (display.nextPage());  // Repeat until the display update is complete
}
/**
 * @brief Fetches the temperature from the Home Assistant server.
 * @return A dynamically allocated string containing the temperature or "Error" on failure.
 * @note The caller is responsible for freeing the returned string using free().
 */
char* getTemperature() {
  // Check if Wi-Fi is connected
  if (WiFi.status() != WL_CONNECTED) {
    Serial1.println("ERROR: Wi-Fi not connected.");
    return strdup("Error");  // Return an error message
  }
  // Initialize HTTP client and configure the request
  HTTPClient http;
  http.begin(ha_url);  // Set the target URL from secrets.h
  http.addHeader("Authorization", "Bearer " + String(ha_token));  // Add authorization header
  http.addHeader("Content-Type", "application/json");  // Set content type to JSON
  // Send a GET request to the Home Assistant API
  int httpCode = http.GET();
  if (httpCode != HTTP_CODE_OK) {
    Serial1.print("HTTP Error: ");
    Serial1.println(httpCode);
    Serial1.println(http.getString());  // Print the error response
    http.end();  // Close the connection
    return strdup("Error");  // Return an error message
  }
  // Read the server response
  String payload = http.getString();
  Serial1.println("Server response:");
  Serial1.println(payload);
  // Parse the JSON response
  DynamicJsonDocument doc(1024);  // Create a JSON document with a capacity of 1024 bytes
  DeserializationError error = deserializeJson(doc, payload);
  http.end();  // Close the HTTP connection
  if (error) {
    Serial1.print("JSON parsing error: ");
    Serial1.println(error.c_str());
    return strdup("Error");  // Return an error message if JSON parsing fails
  }
  // Check if the "state" field exists in the JSON response
  if (!doc.containsKey("state")) {
    Serial1.println("ERROR: 'state' field missing in JSON response.");
    return strdup("Error");  // Return an error message if "state" is missing
  }
  const char* state = doc["state"];  // Extract the temperature value from the JSON
  Serial1.print("Temperature = ");
  Serial1.println(state);
  // Return a dynamically allocated copy of the temperature string
  return strdup(state);
}
/**
 * @brief Prints the reason for waking up from deep sleep.
 */
void printWakeupReason() {
  esp_sleep_wakeup_cause_t wakeupReason = esp_sleep_get_wakeup_cause();
  switch (wakeupReason) {
    case ESP_SLEEP_WAKEUP_EXT0:
      Serial1.println("Wakeup caused by external signal (EXT0 - button press)");
      break;
    case ESP_SLEEP_WAKEUP_EXT1:
      Serial1.println("Wakeup caused by external signal (EXT1)");
      break;
    case ESP_SLEEP_WAKEUP_TIMER:
      Serial1.println("Wakeup caused by timer");
      break;
    case ESP_SLEEP_WAKEUP_TOUCHPAD:
      Serial1.println("Wakeup caused by touchpad");
      break;
    default:
      Serial1.printf("Wakeup not caused by deep sleep: %d\n", wakeupReason);
      break;
  }
}
/**
 * @brief Initial system setup. Runs once at startup.
 */
void setup() {
  // Initialize Serial1 for debugging
  Serial1.begin(115200, SERIAL_8N1, SERIAL_RX, SERIAL_TX);
  delay(1000);  // Wait for serial port to initialize
  Serial1.println("System starting...");
  printWakeupReason();  // Print the reason for waking up
  // Configure the green button as an input with pull-up resistor
  pinMode(GREEN_BUTTON, INPUT_PULLUP);
  // Enable wakeup from deep sleep when the button is pressed (LOW signal)
  esp_sleep_enable_ext0_wakeup((gpio_num_t)GREEN_BUTTON, LOW);
  // Configure display control pins as outputs
  pinMode(EPD_RES_PIN, OUTPUT);
  pinMode(EPD_DC_PIN, OUTPUT);
  pinMode(EPD_CS_PIN, OUTPUT);
  // Initialize SPI interface for the display
  hspi.begin(EPD_SCK_PIN, -1, EPD_MOSI_PIN, -1);
  display.epd2.selectSPI(hspi, SPISettings(2000000, MSBFIRST, SPI_MODE0));
  // Connect to Wi-Fi
  WiFi.begin(wifi_ssid, wifi_password);
  Serial1.print("Connecting to Wi-Fi");
  while (WiFi.status() != WL_CONNECTED) {
    delay(500);
    Serial1.print(".");
  }
  Serial1.println("\nConnected to Wi-Fi");
  // Initialize the e-paper display
  display.init(0);
}
/**
 * @brief Main loop. Runs repeatedly after setup().
 */
void loop() {
  // Fetch the temperature from Home Assistant
  char* temperature = getTemperature();
  if (temperature != nullptr) {
    displayTemperature(temperature);  // Display the temperature
    free(temperature);  // Free the dynamically allocated memory
  } else {
    Serial1.println("ERROR: Failed to get temperature.");
    displayTemperature("Error");  // Display an error message
  }
  // Put the display into hibernation to save power
  display.hibernate();
  delay(1000);  // Wait for 1 seconds before entering deep sleep
  // Configure deep sleep wakeup after 10 minutes
  esp_sleep_enable_timer_wakeup(10 * 60 * 1000000);  // 10 minutes in microseconds
  esp_deep_sleep_start();  // Enter deep sleep mode
}
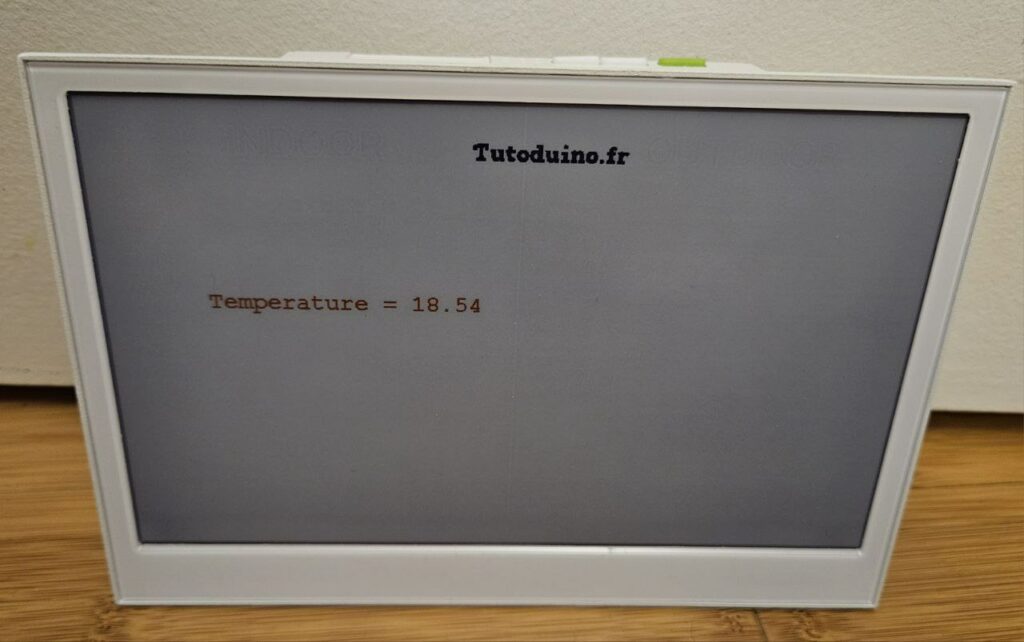
Voici le rendu sur le reTerminal E1002
Récupération de données sur Internet à l’aide d’une API RESTful
Grâce aux bibliothèques Wi-Fi, HTTP et JSON installées, il est très simple de récupérer des données sur Internet via l’API RESTful.
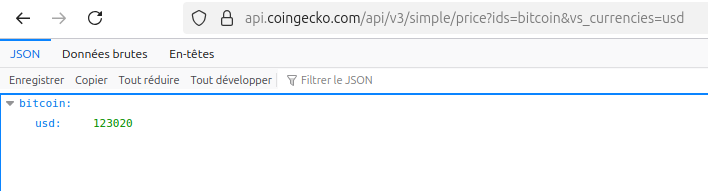
Voici un exemple pour obtenir la valeur d’un Bitcoin en USD :
// Bitcoin URL should be stored in secret.h header file
const char* btc_url = "https://api.coingecko.com/api/v3/simple/price?ids=bitcoin&vs_currencies=usd";
/**
 * @brief Get Bitcoin price (USD) from CoinGecko API.
 * @return Bitcoin price as integer, 0 if not available.
 */
int getBTC() {
  int btc = 0;
  if (WiFi.status() == WL_CONNECTED) {
    HTTPClient http;
    http.begin(btc_url);
    int httpCode = http.GET();
    if (httpCode == HTTP_CODE_OK) {
      DynamicJsonDocument doc(1024);
      if (!deserializeJson(doc, http.getString()))
        btc = doc["bitcoin"]["usd"].as<int>();
    }
    http.end();
  }
  return btc;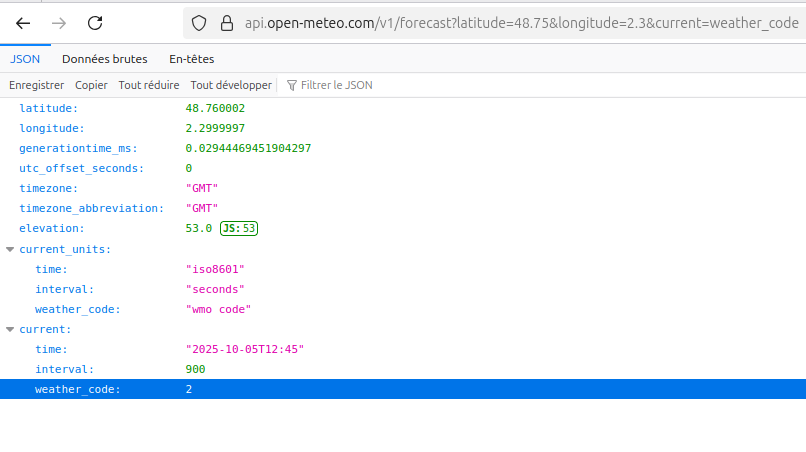
}Vous pouvez tester l’API au préalable. Copiez/collez simplement l’URL dans votre navigateur et le résultat s’affichera directement au format JSON :
Affichage des icônes météo sur le reTerminal
J’ai décidé de télécharger des icônes météo depuis Internet et de les inclure directement dans l’IDE Arduino sous forme de tableau de caractères non signés stocké en mémoire programme (PROGMEM) afin d’optimiser l’utilisation de la RAM. Ces données restent dans la mémoire flash du microcontrôleur plutôt que dans la RAM volatile. J’ai utilisé l’excellent outil en ligne image2cpp pour convertir les images en tableaux d’octets.
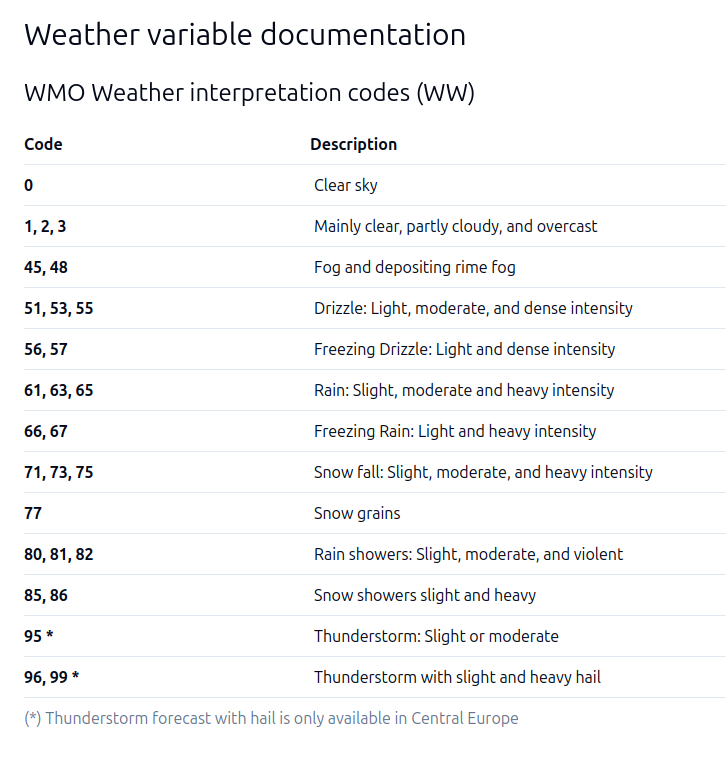
Pour déterminer quelle icône météo doit être affichée, il faut utiliser le code météo renvoyé par l’API (ici weather_code = 2).
Vous devez ensuite afficher l’icône correspondante en fonction des codes d’interprétation météorologique de l’OMM fournis dans la documentation open-Meteo.
Je crée la fonction suivante pour cette interprétation :
/**
 * @brief Maps Open-Meteo weather code to icon index.
 * @param weatherCode Open-Meteo code
 * @return Icon bitmap index
 */
int weatherCodeToIcon(int weatherCode) {
  switch (weatherCode) {
    case 0: return 8;  // Sun
    case 1:
    case 2: return 3;  // Some clouds
    case 3: return 5;  // Cloudy
    case 45:
    case 48: return 2;  // Fog
    case 51:
    case 53:
    case 55:
    case 56:
    case 57: return 7;  // Drizzle
    case 61:
    case 63:
    case 65:
    case 66:
    case 67: return 1;  // Rain
    case 71:
    case 73:
    case 75:
    case 77: return 4;  // Snow
    case 80:
    case 81:
    case 82: return 6;  // Showers
    case 85:
    case 86: return 4;  // Snow
    case 95:
    case 96:
    case 99: return 0;  // Thunderstorm
    default: return 5; // Default to Cloudy
  }
}
const unsigned char* epd_bitmap_allArray[] = {
epd_bitmap_icon1_thunderstorm,
epd_bitmap_icon2_rain,
epd_bitmap_icon3_fog,
epd_bitmap_icon4_partly_cloudy,
epd_bitmap_icon5_snow,
epd_bitmap_icon6_cloudy,
epd_bitmap_icon7_showers,
epd_bitmap_icon8_drizzle,
epd_bitmap_icon9_sun
};
Il est alors facile de dessiner l’icône 50×50 sur l’écran du reTerminal à la position x,y :
display.drawBitmap(x, y, epd_bitmap_allArray[iconNb], 50, 50, GxEPD_BLACK);
Affichage du caractère degré (°) sur le reTerminal avec les polices GFX
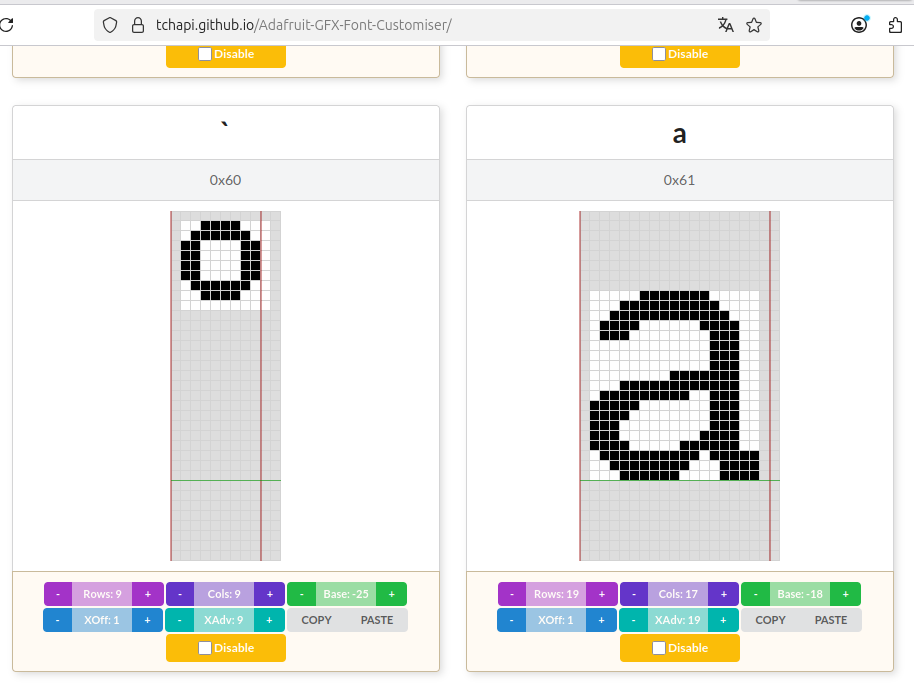
Par défaut, le caractère « degré » n’existe pas sur les polices GFX. J’ai trouvé une discussion à ce sujet, mais seule la police 12 points était disponible. J’ai donc décidé d’approfondir mes recherches et trouvé cet excellent outil de personnalisation de polices en ligne : https://tchapi.github.io/Adafruit-GFX-Font-Customiser. Grâce à cet outil, j’ai remplacé le caractère «`» (0x60) par « ° » dans les polices FreeSans 18 et 17 points.
Il est simple d’afficher 25.4° sur l’écran du reTerminal en ajoutant ‘`’ ou 0x60 pour afficher le caractère ‘°’, voici un exemple avec la police FreeSans12pt7b modifiée :
display.setFont(&FreeSans12pt7b);
display.setCursor(x, y);
display.print("25.4");
display.write(0x60);Récupération du capteur de température interne du reTerminal
Le reTerminal Série E intègre un capteur de température et d’humidité SHT4x connecté via I2C. Vous devez installer la bibliothèque Sensirion I2C SHT4x via le gestionnaire de bibliothèques Arduino (Outils > Gérer les bibliothèques).
Les valeurs de température et d’humidité peuvent ensuite être obtenues à l’aide du code suivant :
#include <Wire.h>
#include <SensirionI2cSht4x.h>
// I2C pins for reTerminal E Series
#define I2C_SDA 19
#define I2C_SCL 20
// Object to manage onboard SHT4x sensor (I2C temperature/humidity)
SensirionI2cSht4x sht4x;
void setup() {
// Initialize I2C with custom pins
Wire.begin(I2C_SDA, I2C_SCL);
uint16_t error;
// Initialize the sensor
sht4x.begin(Wire, 0x44);
}
void loop() {
uint16_t error;
float temperature;
float humidity;
// Measure temperature and humidity with medium precision
error = sht4x.measureMediumPrecision(temperature, humidity);
}
Récupération du niveau de batterie du reTerminal
La série reTerminal E permet de surveiller la tension de la batterie via son convertisseur analogique-numérique (ADC) connectée à un circuit diviseur de tension. Le niveau de charge interne de la batterie peut être mesuré à l’aide du code suivant :
// Battery monitoring pins
#define BATTERY_ADC_PIN 1 // GPIO1 - Battery voltage ADC
#define BATTERY_ENABLE_PIN 21 // GPIO21 - Battery monitoring enable
/**
* @brief Calculates the battery charge percentage based on the measured voltage.
* @param batteryVoltage Measured battery voltage in volts.
* @return Estimated battery charge percentage (0 to 100%).
*/
int getBatteryPercent(float batteryVoltage) {
if (batteryVoltage > 4.20)
return 100;
else if (batteryVoltage > 3.96)
return 90;
else if (batteryVoltage > 3.91)
return 80;
else if (batteryVoltage > 3.85)
return 70;
else if (batteryVoltage > 3.80)
return 60;
else if (batteryVoltage > 3.75)
return 50;
else if (batteryVoltage > 3.60)
return 40;
else if (batteryVoltage > 3.40)
return 20;
else if (batteryVoltage > 3.20)
return 10;
else if (batteryVoltage > 3.00)
return 5;
else
return 0;
}
/**
* @brief Read actual battery voltage from ADC.
* @return Battery voltage in Volts.
*/
float getBatteryVoltage() {
digitalWrite(BATTERY_ENABLE_PIN, HIGH);
delay(5);
int mv = analogReadMilliVolts(BATTERY_ADC_PIN);
digitalWrite(BATTERY_ENABLE_PIN, LOW);
return ((mv / 1000.0) * 2); // Correction for voltage divider
}
void setup() {
// Configure battery monitoring
pinMode(BATTERY_ENABLE_PIN, OUTPUT);
digitalWrite(BATTERY_ENABLE_PIN, HIGH); // Enable battery monitoring
// Configure ADC for battery
analogReadResolution(12); // 12-bit ADC
analogSetPinAttenuation(BATTERY_ADC_PIN, ADC_11db);
}
void loop() {
uint8_t vBatPercentage;
float vBat;
// Measure battery voltage
vBat = getBatteryVoltage();
vBatPercentage = getBatteryPercent(vBat);
}
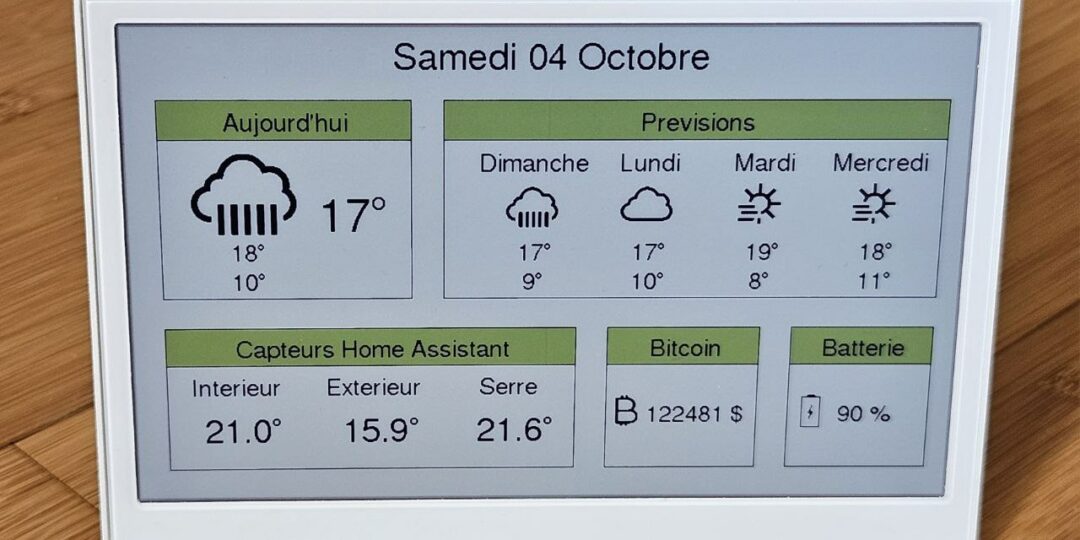
Programme complet
Grâce à toutes les fonctionnalités décrites dans cet article, j’ai construit une station météo, programmée avec l’IDE Arduino et affichée sur l’écran e-paper couleur de 7,3″ du reTerminal E1002.
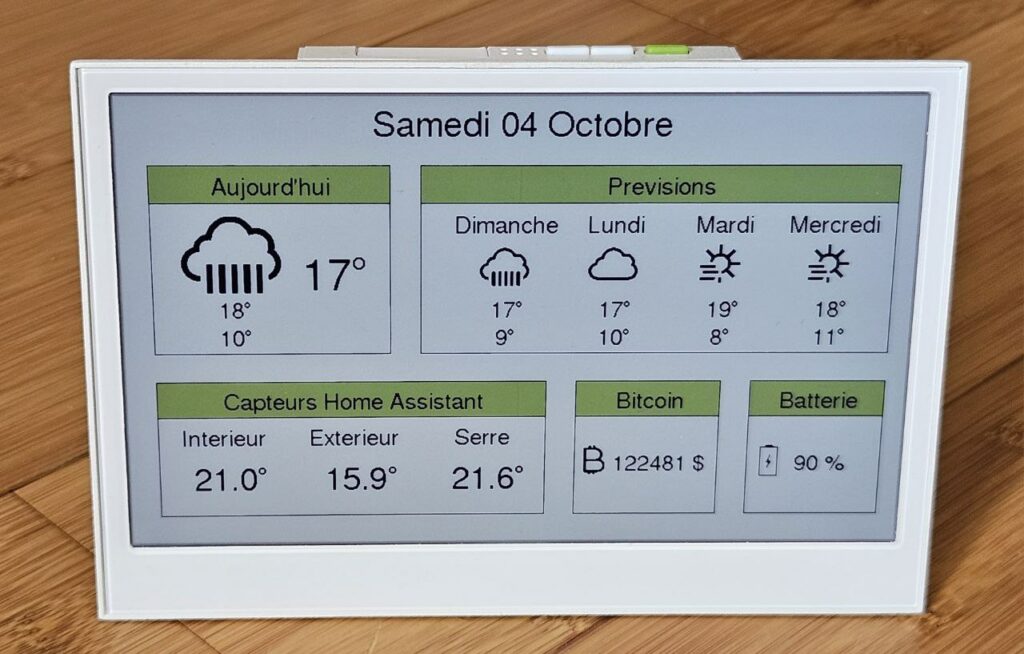
Ce projet transforme le reTerminal E1002 en une station de données multi-sources, combinant les relevés de capteurs locaux avec des API en ligne :
- Récupère les prévisions météorologiques depuis l’API Open-Meteo (url dans le fichier secret.h)
- Lit les capteurs de température de Home Assistant via son API REST.
- Récupère le cours du Bitcoin (USD) depuis CoinGecko.
- Surveille le niveau de batterie, la température interne et l’humidité du reTerminal grâce à des capteurs intégrés.
- Affiche toutes les informations avec des icônes et du texte clairs sur l’écran couleur haute résolution.
- Met en veille prolongée pour économiser l’énergie, avec réveil déclenché par une simple pression sur un bouton ou une minuterie.
/**
* @file reTerminalE1002_HA.ino
* @brief Weather, Home Assistant, and Bitcoin dashboard on Seeed reTerminal E1002 e-paper.
*
* - Fetches weather data from Open-Meteo API.
* - Fetches Home Assistant sensor temperatures via REST API.
* - Fetches Bitcoin and Ethereum price in USD from CoinGecko.
* - Displays all data on reTerminal E1002 7.3" color e-paper.
* - Handles deep sleep and wake-up via button or timer.
* https://tutoduino.fr/
*/
#include <WiFi.h>
#include <HTTPClient.h>
#include <ArduinoJson.h>
#include <GxEPD2_7C.h>
#include <GxEPD2_BW.h>
#include <FreeSans12pt7b_mod.h>
#include <FreeSans18pt7b_mod.h>
#include <FreeSans24pt7b_mod.h>
#include <Fonts/FreeSans9pt7b.h>
#include <Wire.h>
#include <SensirionI2cSht4x.h>
#include "icons_50x50.h"
#include "icons_100x100.h"
#include "icons.h"
#include "secrets.h"
#include "language.h"
#define uS_TO_S_FACTOR 1000000ULL /* Conversion factor for micro seconds to seconds */
// Battery monitoring pins
#define BATTERY_ADC_PIN 1 // GPIO1 - Battery voltage ADC
#define BATTERY_ENABLE_PIN 21 // GPIO21 - Battery monitoring enable
// Serial communication pins for debugging
#define SERIAL_RX 44
#define SERIAL_TX 43
// SPI pinout for ePaper display (verify for your hardware)
#define EPD_SCK_PIN 7
#define EPD_MOSI_PIN 9
#define EPD_CS_PIN 10
#define EPD_DC_PIN 11
#define EPD_RES_PIN 12
#define EPD_BUSY_PIN 13
#define GREEN_BUTTON 3 // Deep sleep wake-up button
// I2C pins for reTerminal E Series
#define I2C_SDA 19
#define I2C_SCL 20
// Select the ePaper driver to use
// 0: reTerminal E1001 (7.5'' B&W)
// 1: reTerminal E1002 (7.3'' Color)
#define EPD_SELECT 0
#if (EPD_SELECT == 0)
#define GxEPD2_DISPLAY_CLASS GxEPD2_BW
#define GxEPD2_DRIVER_CLASS GxEPD2_750_GDEY075T7
#define BOX_TEXT_COLOR GxEPD_WHITE
#define BOX_FILL_COLOR GxEPD_BLACK
#elif (EPD_SELECT == 1)
#define GxEPD2_DISPLAY_CLASS GxEPD2_7C
#define GxEPD2_DRIVER_CLASS GxEPD2_730c_GDEP073E01
#define BOX_TEXT_COLOR GxEPD_WHITE
#define BOX_FILL_COLOR GxEPD_GREEN
#endif
#define MAX_DISPLAY_BUFFER_SIZE 16000
#define MAX_HEIGHT(EPD) \
(EPD::HEIGHT <= MAX_DISPLAY_BUFFER_SIZE / (EPD::WIDTH / 8) \
? EPD::HEIGHT \
: MAX_DISPLAY_BUFFER_SIZE / (EPD::WIDTH / 8))
GxEPD2_DISPLAY_CLASS<GxEPD2_DRIVER_CLASS, MAX_HEIGHT(GxEPD2_DRIVER_CLASS)>
display(GxEPD2_DRIVER_CLASS(/*CS=*/EPD_CS_PIN, /*DC=*/EPD_DC_PIN,
/*RST=*/EPD_RES_PIN, /*BUSY=*/EPD_BUSY_PIN));
// Global variable for SPI communication
SPIClass hspi(HSPI);
// Global weather variables
int D0MinTemp, D0MaxTemp, D1MinTemp, D1MaxTemp, D2MinTemp, D2MaxTemp, D3MinTemp, D3MaxTemp, D4MinTemp, D4MaxTemp;
int D0Code, D1Code, D2Code, D3Code, D4Code;
String localTime = "2025-01-01 00:00";
int currentTemp;
int g_x_start, g_y_start;
// Object to manage onboard SHT4x sensor (I2C temperature/humidity)
SensirionI2cSht4x sht4x;
const float sht4xCalibration = -1; // SHT4x calibration offset
/**
* @brief Fetch temperature from Home Assistant REST API.
* @param entityId - Home Assistant sensor entity (e.g., "sensor.lumi_lumi_weather_temperature")
* @return Temperature value or 0.0 if error.
*/
float getHomeAssistantSensorState(String entityId) {
if (WiFi.status() != WL_CONNECTED) {
Serial1.println("ERROR: Wi-Fi not connected.");
return 0.0;
}
HTTPClient http;
String url = String(ha_url) + entityId;
http.begin(url);
http.addHeader("Authorization", "Bearer " + String(ha_token));
http.addHeader("Content-Type", "application/json");
int httpCode = http.GET();
if (httpCode != HTTP_CODE_OK) {
Serial1.print("HTTP Error: ");
Serial1.println(httpCode);
Serial1.println(http.getString());
http.end();
return 0.0;
}
DynamicJsonDocument doc(1024);
DeserializationError error = deserializeJson(doc, http.getString());
http.end();
if (error) {
Serial1.print("JSON parsing error: ");
Serial1.println(error.c_str());
return 0.0;
}
if (!doc.containsKey("state")) {
Serial1.println("ERROR: 'state' field missing in JSON response.");
return 0.0;
}
float state = doc["state"].as<float>();
return state;
}
/**
* @brief Fetch weather data from Open-Meteo API (current and next 4 days).
* @return 0 on success, <0 on error.
*/
int fetchWeatherData() {
if (WiFi.status() != WL_CONNECTED) {
Serial1.println("WiFi not connected");
return -1;
}
HTTPClient http;
http.begin(weather_url);
int httpCode = http.GET();
if (httpCode != HTTP_CODE_OK) {
Serial1.print("HTTP Error: ");
Serial1.println(httpCode);
Serial1.println(http.getString());
http.end();
return -2;
}
DynamicJsonDocument doc(1024);
DeserializationError error = deserializeJson(doc, http.getString());
http.end();
if (error) {
Serial1.print("JSON parsing error: ");
Serial1.println(error.c_str());
return -3;
}
localTime = doc["current"]["time"].as<String>();
D0Code = doc["current"]["weather_code"].as<int>();
currentTemp = doc["current"]["temperature"].as<int>();
D0MinTemp = doc["daily"]["temperature_2m_min"][0].as<int>();
D0MaxTemp = doc["daily"]["temperature_2m_max"][0].as<int>();
D1MinTemp = doc["daily"]["temperature_2m_min"][1].as<int>();
D1MaxTemp = doc["daily"]["temperature_2m_max"][1].as<int>();
D1Code = doc["daily"]["weather_code"][1].as<int>();
D2MinTemp = doc["daily"]["temperature_2m_min"][2].as<int>();
D2MaxTemp = doc["daily"]["temperature_2m_max"][2].as<int>();
D2Code = doc["daily"]["weather_code"][2].as<int>();
D3MinTemp = doc["daily"]["temperature_2m_min"][3].as<int>();
D3MaxTemp = doc["daily"]["temperature_2m_max"][3].as<int>();
D3Code = doc["daily"]["weather_code"][3].as<int>();
D4MinTemp = doc["daily"]["temperature_2m_min"][4].as<int>();
D4MaxTemp = doc["daily"]["temperature_2m_max"][4].as<int>();
D4Code = doc["daily"]["weather_code"][4].as<int>();
return 0;
}
/**
* @brief Get Bitcoin price (USD) from CoinGecko API.
* @return Bitcoin price as integer, 0 if not available.
*/
int getBTC() {
int btc = 0;
if (WiFi.status() == WL_CONNECTED) {
HTTPClient http;
http.begin(btc_url);
int httpCode = http.GET();
if (httpCode == HTTP_CODE_OK) {
DynamicJsonDocument doc(1024);
if (!deserializeJson(doc, http.getString()))
btc = doc["bitcoin"]["usd"].as<int>();
}
http.end();
}
return btc;
}
/**
* @brief Get Ethereum price (USD) from CoinGecko API.
* @return Ethereum price as integer, 0 if not available.
*/
int getETH() {
int eth = 0;
if (WiFi.status() == WL_CONNECTED) {
HTTPClient http;
http.begin(eth_url);
int httpCode = http.GET();
if (httpCode == HTTP_CODE_OK) {
DynamicJsonDocument doc(1024);
if (!deserializeJson(doc, http.getString()))
eth = doc["ethereum"]["usd"].as<int>();
}
http.end();
}
return eth;
}
/**
* @brief Zeller's congruence to compute day of week (0=Sunday).
* @param y Year
* @param m Month
* @param d Day
* @return Weekday index
*/
int dayOfTheWeek(int y, int m, int d) {
if (m < 3) {
m += 12;
y -= 1;
}
int K = y % 100;
int J = y / 100;
int h = (d + 13 * (m + 1) / 5 + K + K / 4 + J / 4 + 5 * J) % 7;
return ((h + 6) % 7); // 0=Sunday
}
/**
* @brief Formats ISO date string as US date for display.
* @param dateStr "YYYY-MM-DD HH:MM"
* @return "Saturday, October 4, 2025" style string.
*/
String formatDateEN(String dateStr) {
int y = dateStr.substring(0, 4).toInt();
int m = dateStr.substring(5, 7).toInt();
int d = dateStr.substring(8, 10).toInt();
int wday = dayOfTheWeek(y, m, d);
return String(String(days[wday]) + ", " + String(months[m - 1]) + " " + String(d) + ", " + String(y));
}
/**
* @brief Formats ISO date string as French date for display.
* @param dateStr "YYYY-MM-DD HH:MM"
* @return "Samedi 04 Octobre" style string.
*/
String formatDateFR(String dateStr) {
int y = dateStr.substring(0, 4).toInt();
int m = dateStr.substring(5, 7).toInt();
int d = dateStr.substring(8, 10).toInt();
int wday = dayOfTheWeek(y, m, d);
return String(days[wday]) + " " + (d < 10 ? "0" : "") + String(d) + " " + months[m - 1];
}
/**
 * @brief Maps Open-Meteo weather code to icon index.
 * @param weatherCode Open-Meteo code
 * @return Icon bitmap index
 */
int weatherCodeToIcon(int weatherCode) {
  switch (weatherCode) {
    case 0: return 8;  // Sun
    case 1:
    case 2: return 3;  // Some clouds
    case 3: return 5;  // Cloudy
    case 45:
    case 48: return 2;  // Fog
    case 51:
    case 53:
    case 55:
    case 56:
    case 57: return 7;  // Drizzle
    case 61:
    case 63:
    case 65:
    case 66:
    case 67: return 1;  // Rain
    case 71:
    case 73:
    case 75:
    case 77: return 4;  // Snow
    case 80:
    case 81:
    case 82: return 6;  // Showers
    case 85:
    case 86: return 4;  // Snow
    case 95:
    case 96:
    case 99: return 0;  // Thunderstorm
    default: return 5; // Default to Cloudy
  }
}
/**
* @brief Display forecast for one day at (x, y) with weather icon.
*/
void displayForecast(int x, int y, int day, int min, int max, int iconNb) {
int16_t x1, y1;
uint16_t w, h;
display.drawBitmap(x + 30, y + 50, epd_bitmap_allArray[iconNb], 50, 50, GxEPD_BLACK);
display.setFont(&FreeSans12pt7b);
display.getTextBounds(days[day], x, y, &x1, &y1, &w, &h);
display.setCursor(x + 55 - w / 2, y + 40);
display.print(days[day]);
display.setFont(&FreeSans12pt7b);
display.getTextBounds(String(max) + "`", x, y, &x1, &y1, &w, &h);
display.setCursor(x + 55 - w / 2, y + 130);
display.print(max, 0);
display.write(0x60);
display.getTextBounds(String(min) + "`", x, y, &x1, &y1, &w, &h);
display.setCursor(x + 55 - w / 2, y + 160);
display.print(min, 0);
display.write(0x60);
}
/**
* @brief Displays today's weather with large icon and temperature.
*/
void displayCurrent(int x, int y, float current, int min, int max, int iconNb) {
int16_t x1, y1;
uint16_t w, h;
display.drawBitmap(x + 30, y + 50, epd_bitmap2_allArray[iconNb], 100, 100, GxEPD_BLACK);
display.setFont(&FreeSans24pt7b);
display.setCursor(x + 150, y + 130);
display.print(current, 0);
display.write(0x60);
display.setFont(&FreeSans12pt7b);
display.getTextBounds(String(max) + "`", 0, 0, &x1, &y1, &w, &h);
display.setCursor(x + 80 - w / 2, y + 170);
display.print(max, 0);
display.write(0x60);
display.getTextBounds(String(min) + "`", 0, 0, &x1, &y1, &w, &h);
display.setCursor(x + 80 - w / 2, y + 200);
display.print(min, 0);
display.write(0x60);
}
/**
* @brief Read actual battery voltage from ADC.
* @return Battery voltage in Volts.
*/
float getBatteryVoltage() {
digitalWrite(BATTERY_ENABLE_PIN, HIGH);
delay(5);
int mv = analogReadMilliVolts(BATTERY_ADC_PIN);
digitalWrite(BATTERY_ENABLE_PIN, LOW);
return ((mv / 1000.0) * 2); // Correction for voltage divider
}
/**
* @brief Calculates the battery charge percentage based on the measured voltage.
* @param batteryVoltage Measured battery voltage in volts.
* @return Estimated battery charge percentage (0 to 100%).
*/
int getBatteryPercent(float batteryVoltage) {
if (batteryVoltage > 4.20)
return 100;
else if (batteryVoltage > 3.96)
return 90;
else if (batteryVoltage > 3.91)
return 80;
else if (batteryVoltage > 3.85)
return 70;
else if (batteryVoltage > 3.80)
return 60;
else if (batteryVoltage > 3.75)
return 50;
else if (batteryVoltage > 3.60)
return 40;
else if (batteryVoltage > 3.40)
return 20;
else if (batteryVoltage > 3.20)
return 10;
else if (batteryVoltage > 3.00)
return 5;
else
return 0;
}
/**
* @brief Arduino setup: serial, display, WiFi, sensors.
*/
void setup() {
Serial1.begin(115200, SERIAL_8N1, SERIAL_RX, SERIAL_TX);
delay(500);
pinMode(GREEN_BUTTON, INPUT_PULLUP);
// Prepare deep sleep wake-up on button press
esp_sleep_enable_ext0_wakeup((gpio_num_t)GREEN_BUTTON, LOW);
// SPI and display initialization
hspi.begin(EPD_SCK_PIN, -1, EPD_MOSI_PIN, -1);
display.epd2.selectSPI(hspi, SPISettings(2000000, MSBFIRST, SPI_MODE0));
display.init(0);
display.setRotation(0);
// Connect to WiFi
WiFi.begin(wifi_ssid, wifi_password);
Serial1.print("Connecting to WiFi...");
unsigned long start = millis();
while (WiFi.status() != WL_CONNECTED && (millis() - start) < 15000) {
delay(500);
Serial1.print(".");
}
if (WiFi.status() != WL_CONNECTED) {
Serial1.println("[ERROR] WiFi connection failed, restart required.");
ESP.restart();
}
// Initialize I2C with custom pins
Wire.begin(I2C_SDA, I2C_SCL);
// Initialize onboard SHT4x sensor
sht4x.begin(Wire, 0x44);
// Configure battery monitoring
pinMode(BATTERY_ENABLE_PIN, OUTPUT);
digitalWrite(BATTERY_ENABLE_PIN, HIGH); // Enable battery monitoring
// Configure ADC for battery
analogReadResolution(12); // 12-bit ADC
analogSetPinAttenuation(BATTERY_ADC_PIN, ADC_11db);
}
/**
* @brief Main loop: fetch sensors, display dashboard, go to deep sleep.
*/
void loop() {
int x, y;
int x_ha_box, y_ha_box, ha_box_w, ha_box_h; // home assistant box
int x_current_box, y_current_box, current_box_w, current_box_h; // current weather box
int x_forecast_box, y_forecast_box, forecast_box_w, forecast_box_h; // forecast box
int x_bitcoin_box, y_bitcoin_box, bitcoin_box_w, bitcoin_box_h; // bitcoin box
int x_battery_box, y_battery_box, battery_box_w, battery_box_h; // battery box
int16_t x1, y1;
uint16_t w, h;
esp_err_t esp_error;
float internalTemperatureSensor, externalTemperatureSensor, greenHouseTemperature;
float min, max;
String icon;
float sht4xTemperature, sht4xHumidity;
uint8_t vBatPercentage;
float vBat;
// Measure reTerminal internal SHT4 sensor
uint16_t error = sht4x.measureMediumPrecision(sht4xTemperature, sht4xHumidity);
sht4xTemperature += sht4xCalibration;
// Measure battery voltage
vBat = getBatteryVoltage();
vBatPercentage = getBatteryPercent(vBat);
// Get Bitcoind value
int btc = getBTC();
int eth = getETH();
// Fetch weather data for current and next 4 days
if (fetchWeatherData() != 0) {
Serial1.print("fetchWeatherData failed!");
return;
}
#ifdef LANGUAGE_FR
String date = formatDateFR(localTime); // French formatted date
#else
String date = formatDateEN(localTime); // French formatted date
#endif
int today = dayOfTheWeek(localTime.substring(0, 4).toInt(), localTime.substring(5, 7).toInt(), localTime.substring(8, 10).toInt());
// Fetch Home Assistant sensor states
internalTemperatureSensor = getHomeAssistantSensorState("sensor.tutoduino_esp32c6tempsensor_temperature");
externalTemperatureSensor = getHomeAssistantSensorState("sensor.lumi_lumi_weather_temperature");
greenHouseTemperature = getHomeAssistantSensorState("sensor.lumi_lumi_weather_temperature_2");
display.setFullWindow();
display.firstPage();
do {
display.fillScreen(GxEPD_WHITE);
// Display the timestamp of the last weather update
display.setTextColor(GxEPD_BLACK);
display.setFont(&FreeSans9pt7b);
display.setCursor(600, 470);
display.print(localTime);
// Display date on top
display.setFont(&FreeSans18pt7b);
display.getTextBounds(date, 0, 2, &x1, &y1, &w, &h);
display.setCursor(400 - w / 2, 40);
display.print(date);
// Current weather box
x_current_box = 30;
y_current_box = 60;
current_box_w = 240;
current_box_h = 210;
display.fillRect(x_current_box, y_current_box, current_box_w, 40, BOX_FILL_COLOR);
display.drawRect(x_current_box, y_current_box, current_box_w, current_box_h, GxEPD_BLACK);
display.drawRect(x_current_box, y_current_box, current_box_w, 40, GxEPD_BLACK);
display.setFont(&FreeSans12pt7b);
display.getTextBounds(today_text, 0, 0, &x1, &y1, &w, &h);
display.setCursor(x_current_box + current_box_w / 2 - w / 2, y_current_box + 30);
display.setTextColor(BOX_TEXT_COLOR);
display.print(today_text);
display.setTextColor(GxEPD_BLACK);
displayCurrent(x_current_box, y_current_box, currentTemp, D0MinTemp, D0MaxTemp, weatherCodeToIcon(D0Code));
// Forecast box for next 4 days
x_forecast_box = 300;
y_forecast_box = 60;
forecast_box_w = 480;
forecast_box_h = 210;
display.fillRect(x_forecast_box, y_forecast_box, forecast_box_w, 40, BOX_FILL_COLOR);
display.drawRect(x_forecast_box, y_forecast_box, forecast_box_w, forecast_box_h, GxEPD_BLACK);
display.drawRect(x_forecast_box, y_forecast_box, forecast_box_w, 40, GxEPD_BLACK);
display.setFont(&FreeSans12pt7b);
display.getTextBounds(forecast_text, 0, 0, &x1, &y1, &w, &h);
display.setCursor(x_forecast_box + forecast_box_w / 2 - w / 2, y_forecast_box + 30);
display.setTextColor(BOX_TEXT_COLOR);
display.print(forecast_text);
display.setTextColor(GxEPD_BLACK);
displayForecast(x_forecast_box + 10, y_forecast_box + 40, (today + 1) % 7, D1MinTemp, D1MaxTemp, weatherCodeToIcon(D1Code));
displayForecast(x_forecast_box + 120, y_forecast_box + 40, (today + 2) % 7, D2MinTemp, D2MaxTemp, weatherCodeToIcon(D2Code));
displayForecast(x_forecast_box + 240, y_forecast_box + 40, (today + 3) % 7, D3MinTemp, D3MaxTemp, weatherCodeToIcon(D3Code));
displayForecast(x_forecast_box + 360, y_forecast_box + 40, (today + 4) % 7, D4MinTemp, D4MaxTemp, weatherCodeToIcon(D4Code));
// Home Assistant sensors box
x_ha_box = 30;
y_ha_box = 300;
ha_box_w = 400;
ha_box_h = 150;
display.fillRect(x_ha_box, y_ha_box, ha_box_w, 40, BOX_FILL_COLOR);
display.drawRect(x_ha_box, y_ha_box, ha_box_w, ha_box_h, GxEPD_BLACK);
display.drawRect(x_ha_box, y_ha_box, ha_box_w, 40, GxEPD_BLACK);
display.setFont(&FreeSans12pt7b);
display.getTextBounds(ha_sensor_text, 0, 0, &x1, &y1, &w, &h);
display.setCursor(x_ha_box + ha_box_w / 2 - w / 2, y_ha_box + 30);
display.setTextColor(BOX_TEXT_COLOR);
display.print(ha_sensor_text);
display.setTextColor(GxEPD_BLACK);
// Internal temperature from SHT4
display.setFont(&FreeSans12pt7b);
display.getTextBounds(indoor_text, 0, 0, &x1, &y1, &w, &h);
display.setCursor(x_ha_box + ha_box_w / 6 - w / 2, y_ha_box + 70);
display.print(indoor_text);
display.setFont(&FreeSans18pt7b);
display.getTextBounds(String(sht4xTemperature, 1) + "`", 0, 0, &x1, &y1, &w, &h);
display.setCursor(x_ha_box + ha_box_w / 6 - w / 2, y_ha_box + 120);
display.print(sht4xTemperature, 1);
display.write(0x60);
// Outdoor temperature (Home Assistant)
display.setFont(&FreeSans12pt7b);
display.getTextBounds(outdoor_text, 0, 0, &x1, &y1, &w, &h);
display.setCursor(x_ha_box + ha_box_w / 2 - w / 2, y_ha_box + 70);
display.print(outdoor_text);
display.setFont(&FreeSans18pt7b);
display.getTextBounds(String(externalTemperatureSensor, 1) + "`", 0, 0, &x1, &y1, &w, &h);
display.setCursor(x_ha_box + ha_box_w / 2 - w / 2, y_ha_box + 120);
display.print(externalTemperatureSensor, 1);
display.write(0x60);
// Greenhouse temperature (Home Assistant)
display.setFont(&FreeSans12pt7b);
display.getTextBounds(other_text, 0, 0, &x1, &y1, &w, &h);
display.setCursor(x_ha_box + 5 * ha_box_w / 6 - w / 2, y_ha_box + 70);
display.print(other_text);
display.setFont(&FreeSans18pt7b);
display.getTextBounds(String(greenHouseTemperature, 1) + "`", 0, 0, &x1, &y1, &w, &h);
display.setCursor(x_ha_box + 5 * ha_box_w / 6 - w / 2, y_ha_box + 120);
display.print(greenHouseTemperature, 1);
display.write(0x60);
// Bitcoin price box
x_bitcoin_box = 460;
y_bitcoin_box = 300;
bitcoin_box_w = 150;
bitcoin_box_h = 150;
display.fillRect(x_bitcoin_box, y_bitcoin_box, bitcoin_box_w, 40, BOX_FILL_COLOR);
display.drawRect(x_bitcoin_box, y_bitcoin_box, bitcoin_box_w, bitcoin_box_h, GxEPD_BLACK);
display.drawRect(x_bitcoin_box, y_bitcoin_box, bitcoin_box_w, 40, GxEPD_BLACK);
display.setFont(&FreeSans12pt7b);
display.getTextBounds(crypto_text, 0, 0, &x1, &y1, &w, &h);
display.setCursor(x_bitcoin_box + bitcoin_box_w / 2 - w / 2, y_bitcoin_box + 30);
display.setTextColor(BOX_TEXT_COLOR);
display.print(crypto_text);
display.setTextColor(GxEPD_BLACK);
// Bitcoin
display.drawBitmap(x_bitcoin_box + 10, y_bitcoin_box + 60, epd_bitmap3_allArray[0], 30, 30, GxEPD_BLACK);
display.setFont(&FreeSans12pt7b);
display.setCursor(x_bitcoin_box + 40, y_bitcoin_box + 80);
display.print(btc);
display.print(" $");
// Ethereum
display.drawBitmap(x_bitcoin_box + 10, y_bitcoin_box + 95, epd_bitmap3_allArray[2], 30, 30, GxEPD_BLACK);
display.setFont(&FreeSans12pt7b);
display.setCursor(x_bitcoin_box + 40, y_bitcoin_box + 120);
display.print(eth);
display.print(" $");
// Battery percentage box
x_battery_box = 640;
y_battery_box = 300;
battery_box_w = 140;
battery_box_h = 150;
display.fillRect(x_battery_box, y_battery_box, battery_box_w, 40, BOX_FILL_COLOR);
display.drawRect(x_battery_box, y_battery_box, battery_box_w, battery_box_h, GxEPD_BLACK);
display.drawRect(x_battery_box, y_battery_box, battery_box_w, 40, GxEPD_BLACK);
display.setFont(&FreeSans12pt7b);
display.getTextBounds(battery_text, 0, 0, &x1, &y1, &w, &h);
display.setCursor(x_battery_box + battery_box_w / 2 - w / 2, y_battery_box + 30);
display.setTextColor(BOX_TEXT_COLOR);
display.print(battery_text);
display.setTextColor(GxEPD_BLACK);
display.drawBitmap(x_battery_box + 10, y_battery_box + 70, epd_bitmap3_allArray[1], 40, 40, GxEPD_BLACK);
display.setFont(&FreeSans12pt7b);
display.setCursor(x_battery_box + 50, y_battery_box + 80);
display.print(vBatPercentage);
display.print(" %");
display.setCursor(x_battery_box + 50, y_battery_box + 120);
display.print(vBat);
display.print(" V");
} while (display.nextPage());
display.hibernate();
delay(1000);
uint64_t sleepTime = 60 * 60 * uS_TO_S_FACTOR; // 60 minutes
esp_error = esp_sleep_enable_timer_wakeup(sleepTime);
if (esp_error != ESP_OK) {
Serial1.print("Error to enter deep sleep: ");
Serial1.println(esp_error);
} else {
Serial1.println("Enter deep sleep for 60min...");
esp_deep_sleep_start();
}
}
Le code source complet est disponible sur mon GitHub, y compris les icônes et les polices utilisées dans cet exemple.
Le code fonctionne sur le reTerminal E1002 (écran couleur) mais également le sur reTerminal E1001 (écran noir & blanc). L’avantage du reTerminal E1001 est la rapidité du rafraîchissement de son écran.
Je vous recommande également la lecture de mon tutoriel Home Assistant : Afficher les données Météo-France sur un reTerminal E1001 avec ESPHome.
J’espère que cet article vous aura intéressé. N’hésitez pas à donner votre avis en cliquant sur les étoiles ci-dessous.