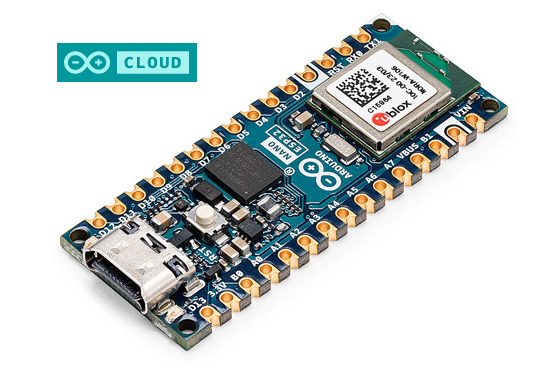
Arduino makes it very easy to get started with the development of connected objects (IoT – Internet of Things) thanks to its Arduino Cloud platform. In this tutorial you will be able to create your first project based on an Arduino Nano ESP32 board. With its Bluetooth and Wifi connectivity, this card is indeed very well suited to the development of IoT for educational purposes.
Creating an Arduino account
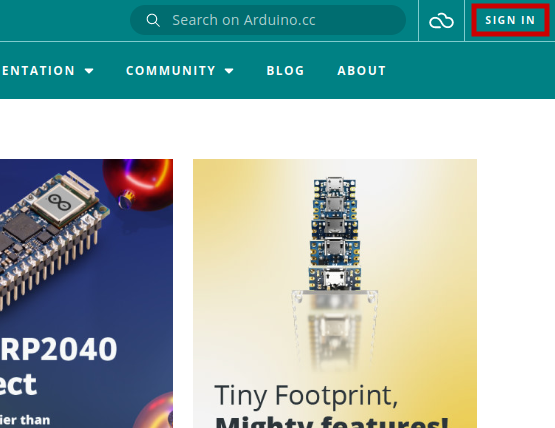
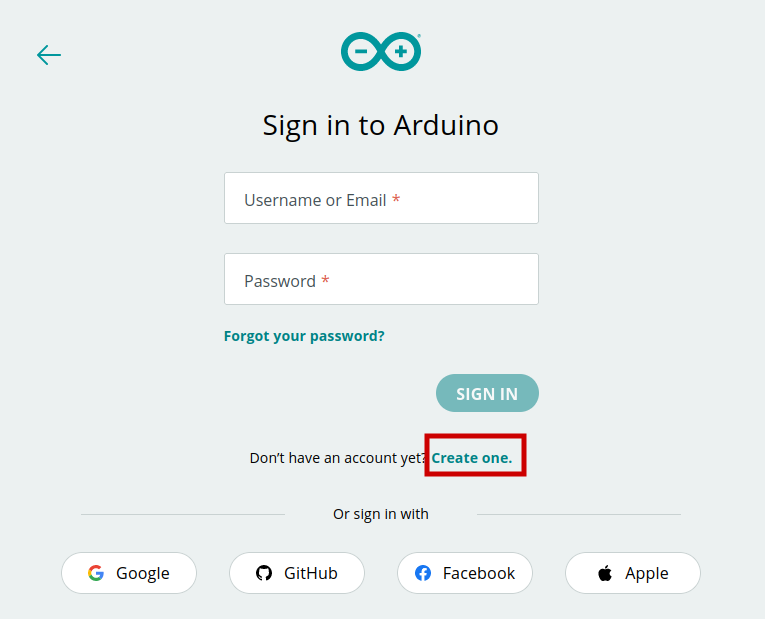
If you do not yet have an Arduino account, you must create one on the site https://www.arduino.cc/.
Installing Arduino Create Agent
This agent will allow you to upload sketches from your web browser directly to Arduino boards connected to your computer via a USB cable.
Follow the installation procedure at https://create.arduino.cc/getting-started/plugin/welcome to download and install the agent.
Once the agent is installed, connect your Arduino Nano ESP32 board to a USB port on your computer. The agent should then automatically detect this card.

Creating your first sketch
First you can create a standalone sketch (which will simply run on the Arduino without any link to Arduino Cloud) on the site https://app.arduino.cc/.
At this stage, the objective is only to verify that you can create the sketch from the Arduino website and then successfully upload it to your Arduino Nano ESP32 board from your web browser.
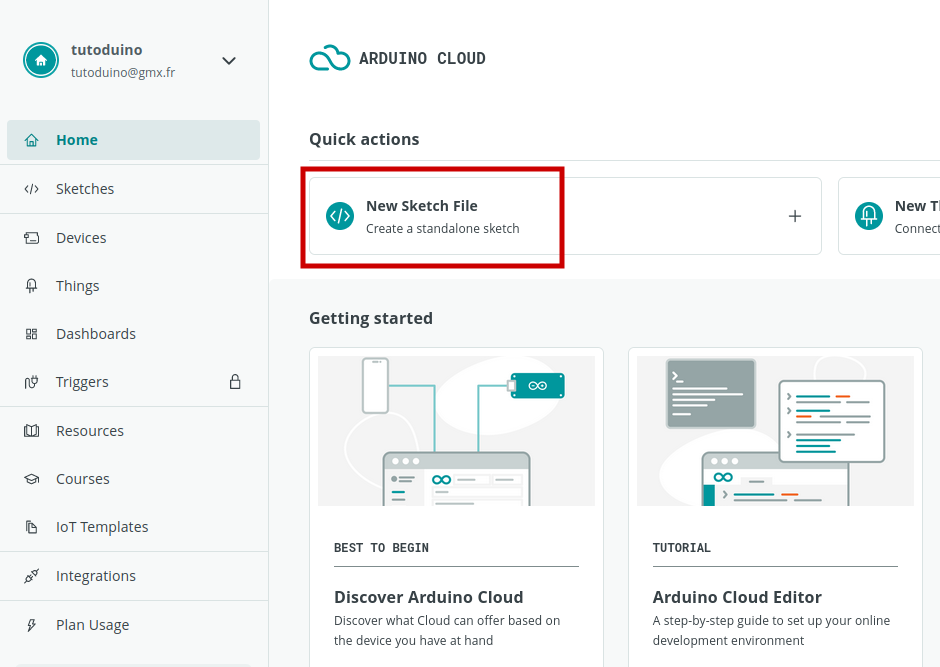
I suggest you create a very simple sketch that flashes the internal LED of the card.
// Exemple de croquis cree sous Arduino Cloud pour Arduino Nano ESP32
// https://tutoduino.fr/
// Copyleft 2023
// la fonction setup s'execute au demarrage et après reset de la carte
void setup() {
// configure la broche LED_BUILTIN (LED interne) en tant que sortie
pinMode(LED_BUILTIN, OUTPUT);
}
// la fonction loop boucle infiniment
void loop() {
digitalWrite(LED_BUILTIN, HIGH); // allume la LED interne
delay(1000); // attend une seconde
digitalWrite(LED_BUILTIN, LOW); // eteint la LED interne
delay(1000); // attend une seconde
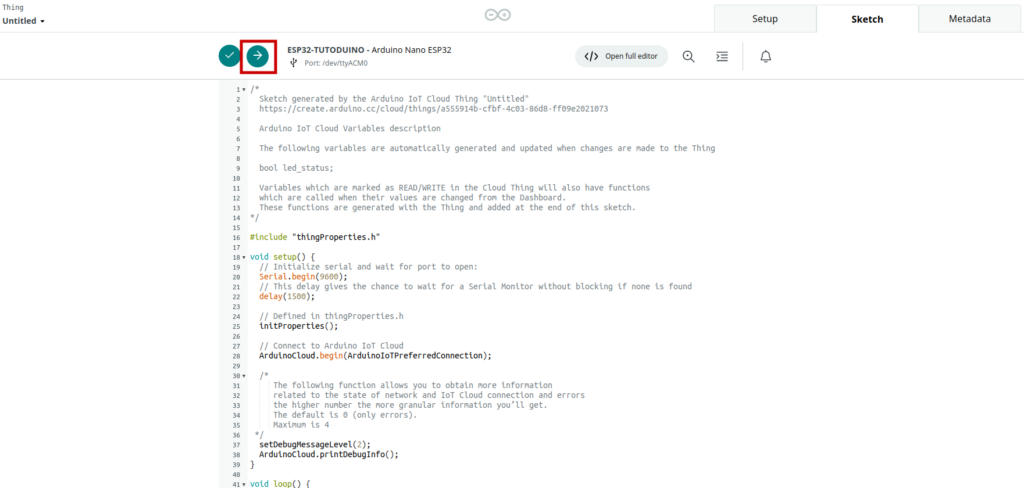
}You must select the Arduino Nano ESP32 board and the port to which it is connected. If everything goes normally, your card should be automatically detected on the correct port. Then simply upload the sketch to the map by clicking on the arrow button.
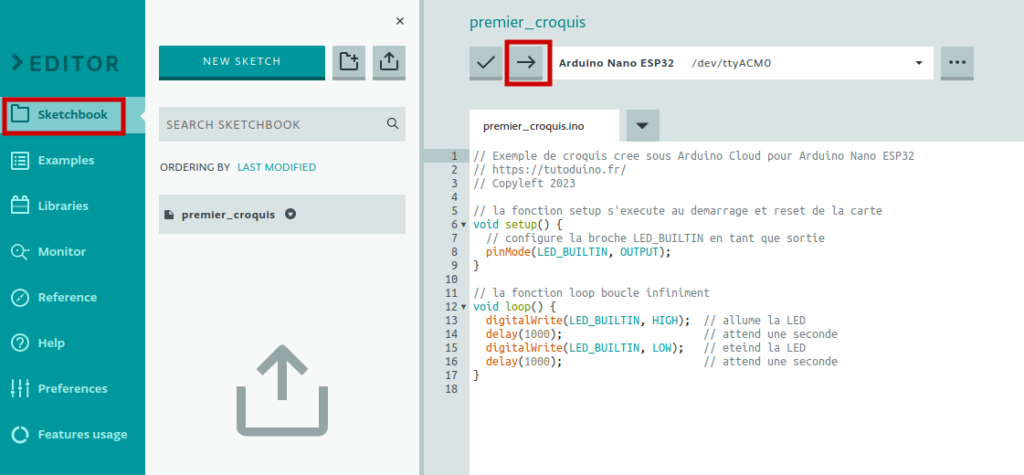
If everything goes normally, after uploading the sketch to the card, its internal LED should flash every second.
The first part of the tutorial is over, let’s get down to business 😉
Adding Arduino Nano ESP32 board to Arduino Cloud
You will now add your Arduino Nano ESP32 board into the Arduino Cloud platform. This will allow you to interact with your board from the Arduino cloud via a computer or smartphone.
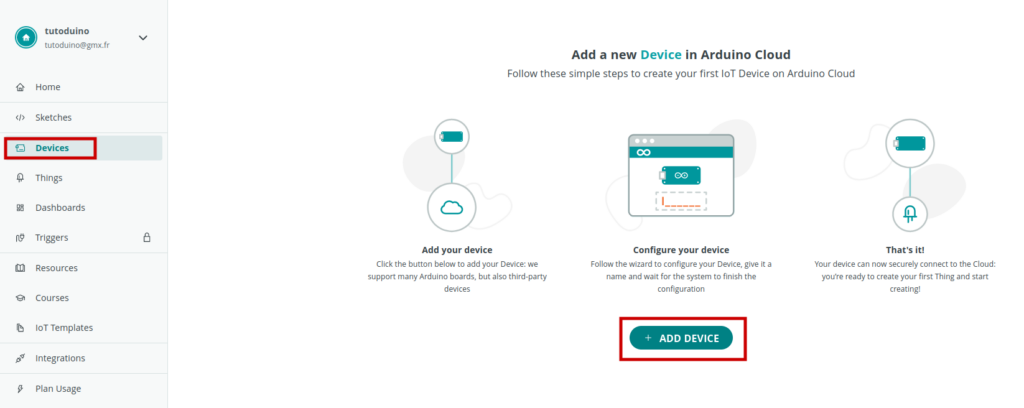
On the Devices menu, click ADD DEVICE.
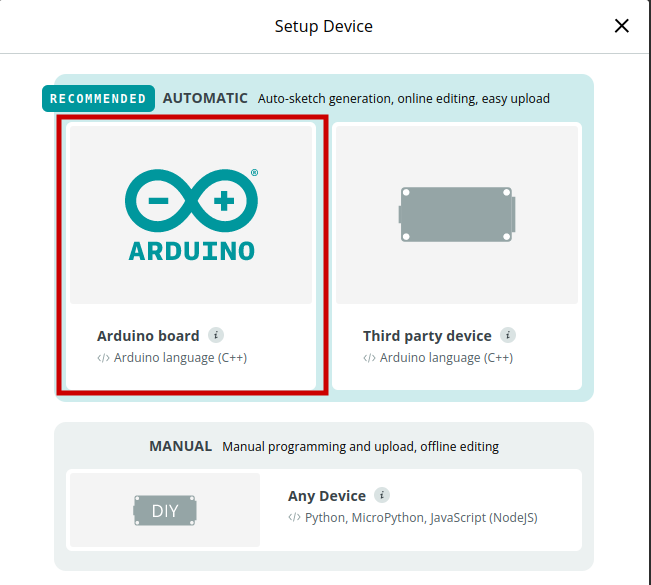
Select automatic card configuration:
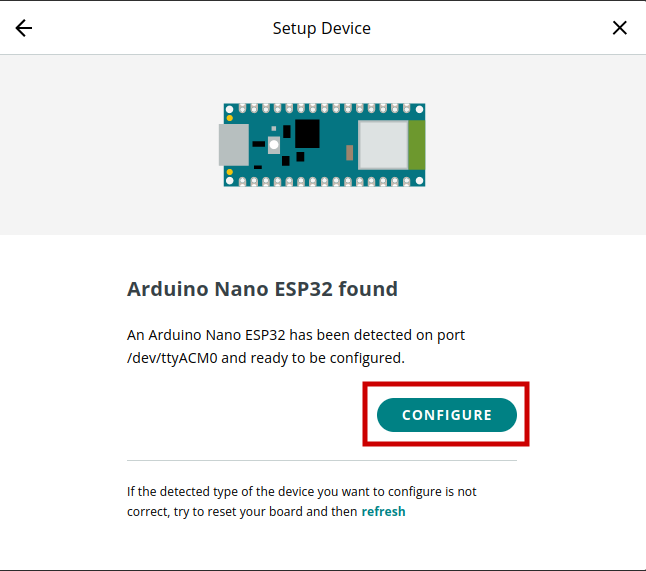
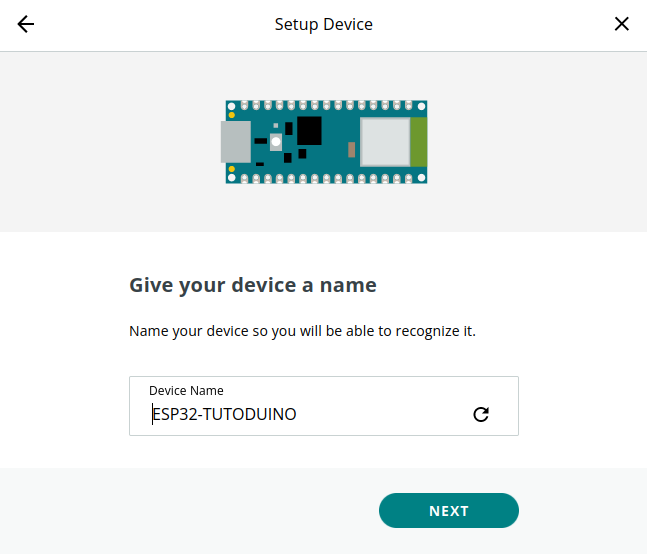
And once the card is identified, you just have to give it a name:
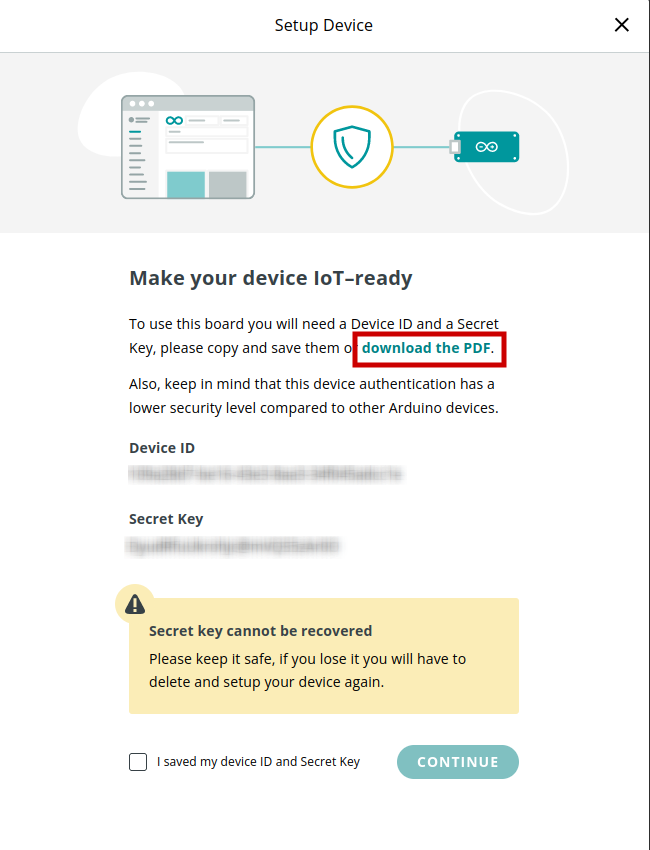
Once configured, an identifier (Device ID) and a secret key (Secret Key) are generated. You must save them carefully because the secret key cannot in fact be recovered later if you lose it. I recommend that you print this information in a PDF file as suggested by the menu.
Configuring an thing associated with the board
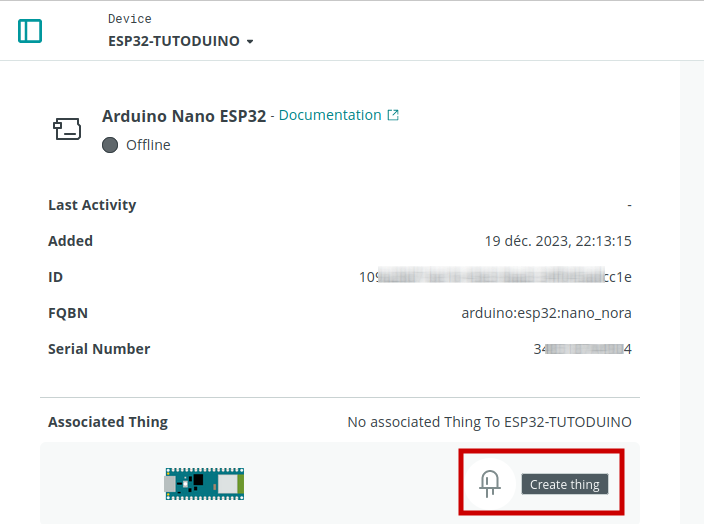
You will now be able to create your first object (thing) associated with your Arduino Nano ESP32 board by clicking on the Create thing button!
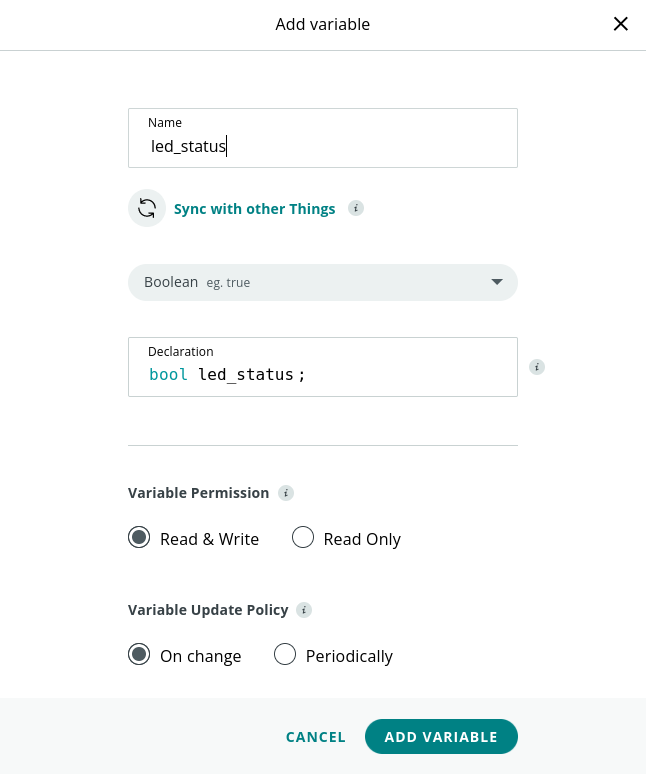
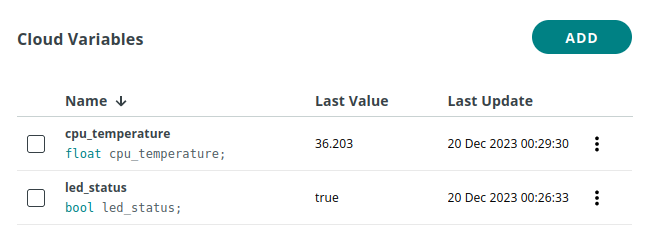
Once the object has been created, you must add variables to it which will allow reading and/or writing interaction with your Arduino card.
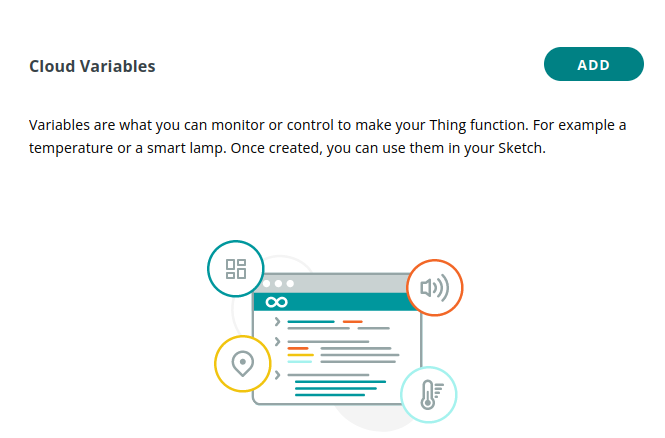
As we want to control the internal LED of the board, we will create the boolean variable led_status in read and write mode (Read & Write).
Once the variables have been created, you must associate the board with the object:
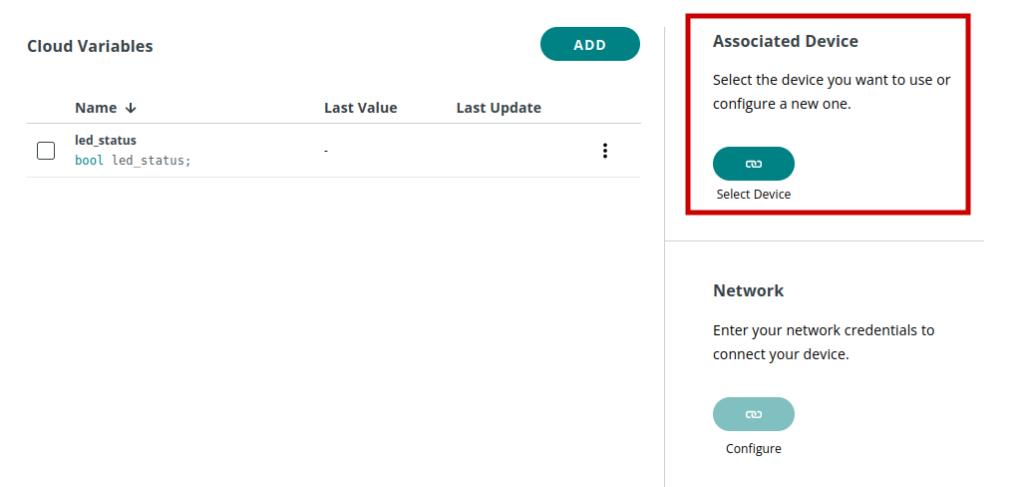
Select the Arduino Nano ESP32 board and associate it:

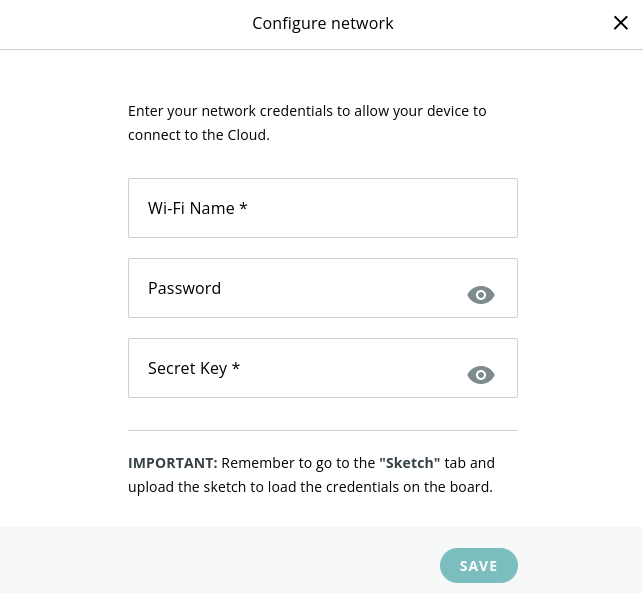
The last step is to configure the network access of your Arduino Nano ESP32 board. It must in fact be connected to your Wifi network to communicate with the Arduino cloud.
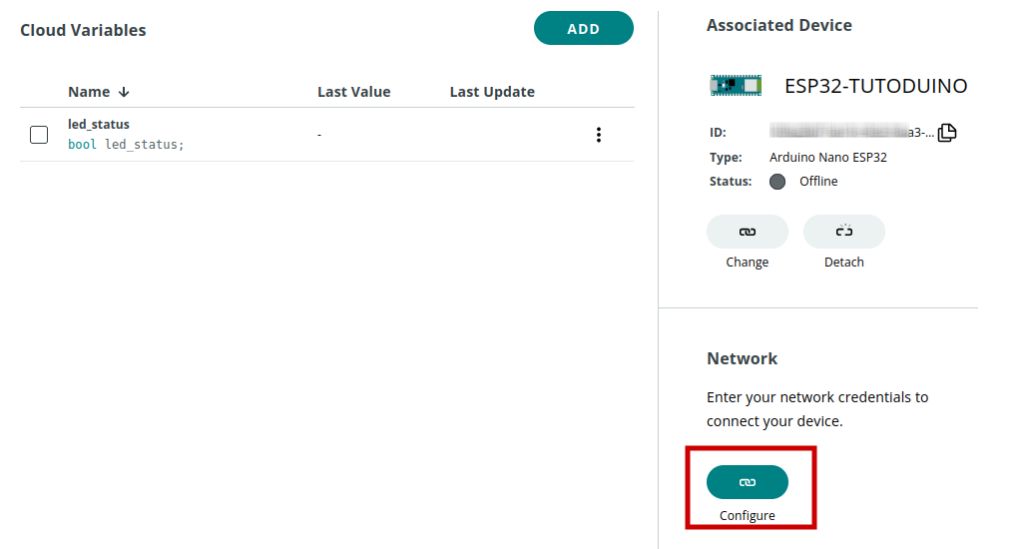
You must indicate the name of your Wifi network (SSID), its password (WEP, WPA or WPA2 key) as well as the secret key of your Arduino card (Secret Key) generated in the previous step.
Once the configuration of the object is complete, you must upload the auto-generated sketch to your Arduino Nano ESP32 board. This sketch is available in the Sketch tab of the object and only allows you to configure the connection of the board to Arduino Cloud through your Wifi network.
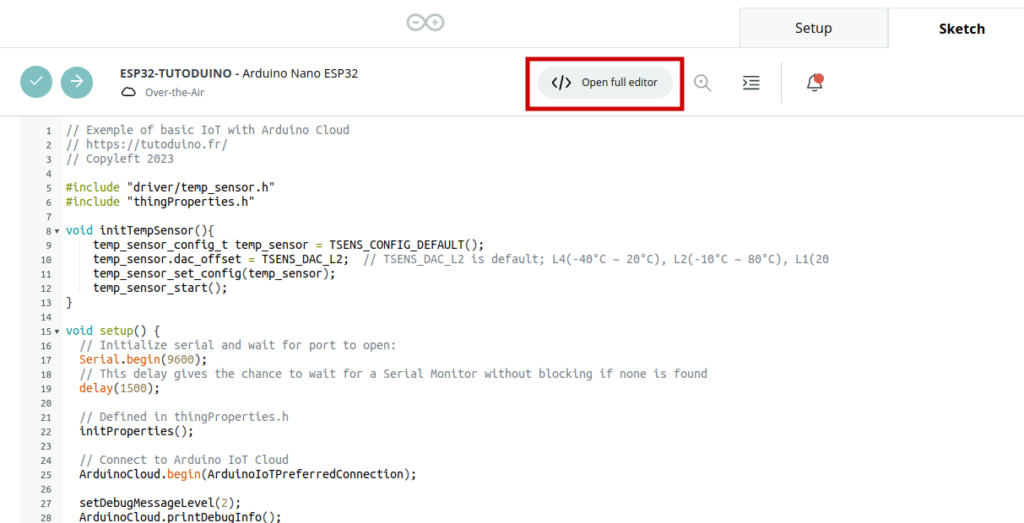
You need to add your application code in this sketch. To do this, I advise you to edit your sketch with the editor by clicking on Open full editor:
We will therefore add the code that controls the state of the internal LED so that it turns on or off depending on the value of the led_status variable defined previously in Arduino Cloud.
Simply declare the internal LED pin as an output in the setup function and position the output with the value of the led_status variable in the onLedStatusChange function:
// Exemple of basic IoT with Arduino Cloud
// https://tutoduino.fr/
// Copyleft 2023
#include "thingProperties.h"
void setup() {
  // Initialize serial and wait for port to open:
  Serial.begin(9600);
  // This delay gives the chance to wait for a Serial Monitor without blocking if none is found
  delay(1500);
  // Defined in thingProperties.h
  initProperties();
  // Connect to Arduino IoT Cloud
  ArduinoCloud.begin(ArduinoIoTPreferredConnection);

  setDebugMessageLevel(2);
  ArduinoCloud.printDebugInfo();

  pinMode(LED_BUILTIN, OUTPUT);
}
void loop() {
  ArduinoCloud.update();
}
/*
  Since LedStatus is READ_WRITE variable, onLedStatusChange() is
  executed every time a new value is received from IoT Cloud.
*/
void onLedStatusChange()  {
  // Turn LED ON or OFF depending on led_status variable
    digitalWrite(LED_BUILTIN, led_status);
}
Creating a dashboard
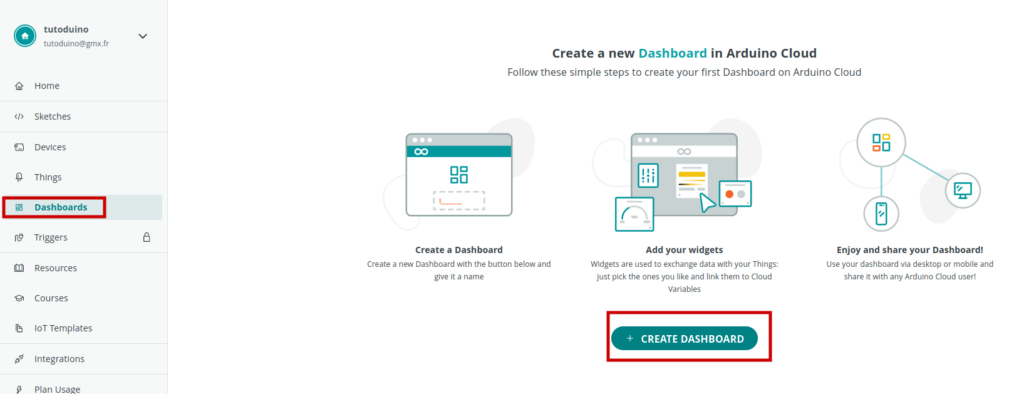
The last step is to create a dashboard so you can control your object from Arduino Cloud.
In this dashboard we will simply add a button (Switch) which will control the ON/OFF value of the led_status variable and therefore the state of the card’s internal LED.
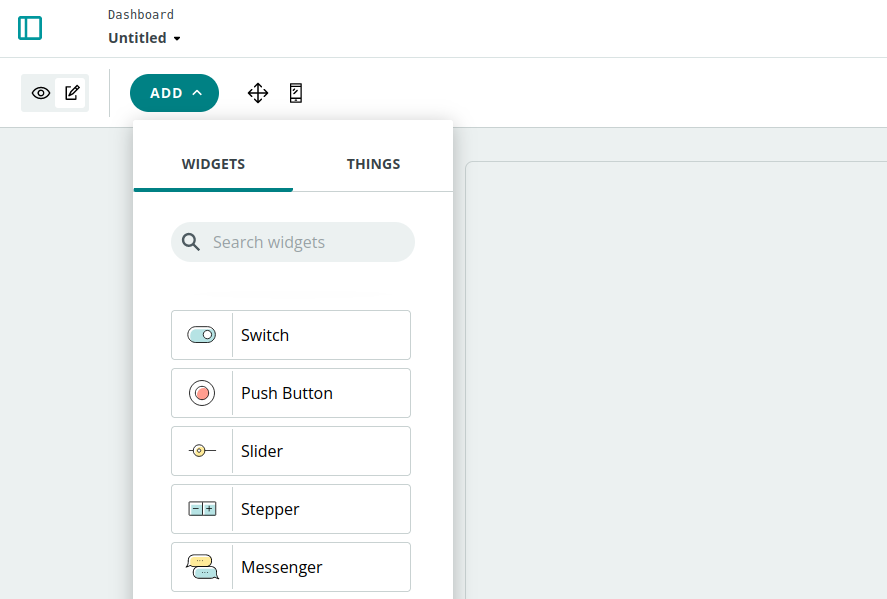
Add a Switch type widget:
You can rename it:
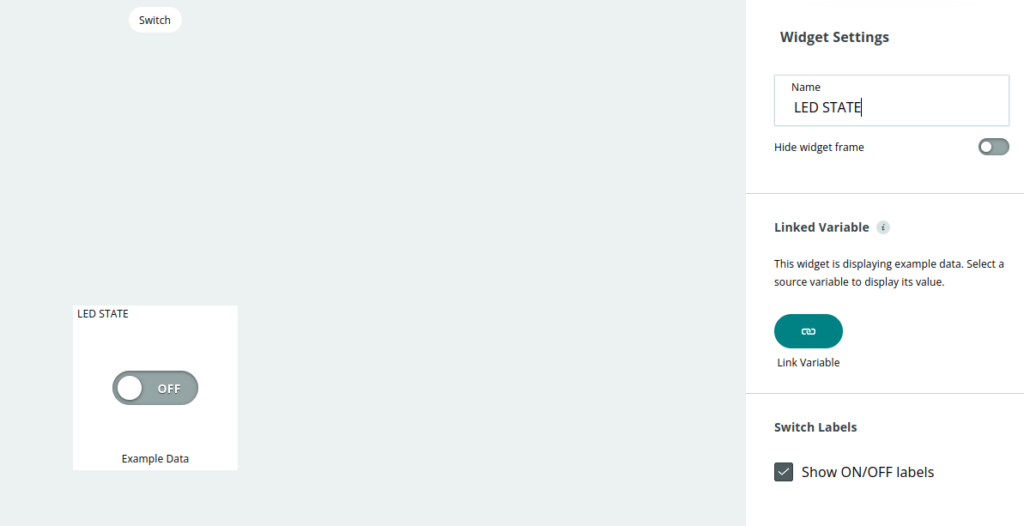
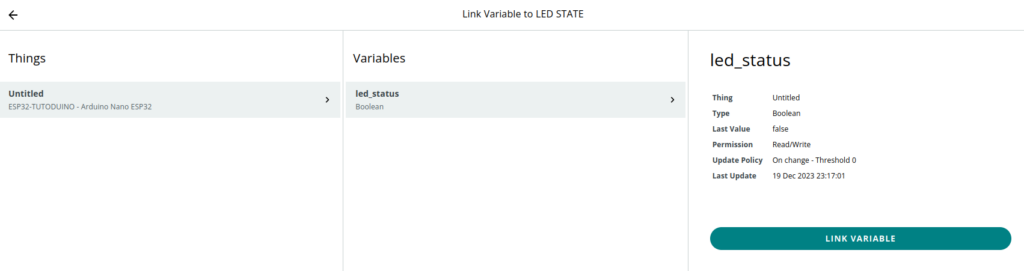
And finally associate the led_status variable with this widget:
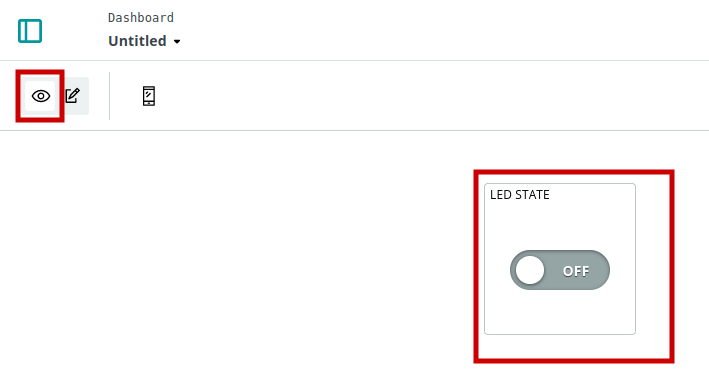
Exit the edit mode of your dashboard by clicking on the eye icon.
And there you have it, you can now click on your LED STATE button and the internal LED of your card should turn on or off depending on its ON/OFF value. Magical, no? 🙂
Control your Arduino Nano ESP32 board from your Smartphone
You can also install the Arduino IoT Cloud Remote application on your Smartphone.
This allows you to control your object easily from your Smartphone!
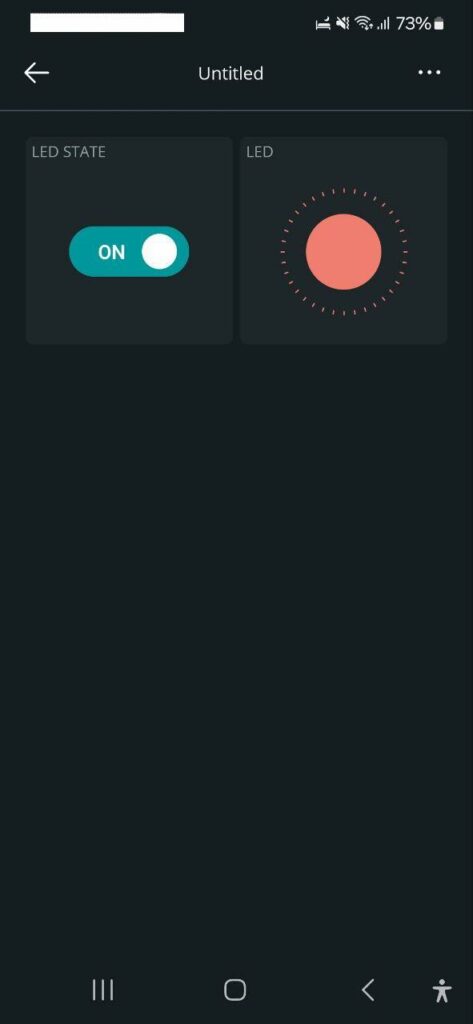
For design purposes, I added an LED widget to my dashboard, associated with the led_status variable. This allows you to view the status of the card’s LED. Totally useless in our case, but it shows that you can of course associate inputs from the Arduino Nano ESP32 board with variables and display them on the dashboard.
For example, you can modify the sketch to read the temperature of the microcontroller and associate it with a variable to display it on the dashboard.
Add the cpu_temperature variable of type float to your object:
Modify the sketch to read the CPU temperature and store it in this new variable:
// Exemple of basic IoT with Arduino Cloud
// https://tutoduino.fr/
// Copyleft 2023
#include "driver/temp_sensor.h"
#include "thingProperties.h"
void initTempSensor(){
temp_sensor_config_t temp_sensor = TSENS_CONFIG_DEFAULT();
temp_sensor.dac_offset = TSENS_DAC_L2; // TSENS_DAC_L2 is default; L4(-40°C ~ 20°C), L2(-10°C ~ 80°C), L1(20°C ~ 100°C), L0(50°C ~ 125°C)
temp_sensor_set_config(temp_sensor);
temp_sensor_start();
}
void setup() {
// Initialize serial and wait for port to open:
Serial.begin(9600);
// This delay gives the chance to wait for a Serial Monitor without blocking if none is found
delay(1500);
// Defined in thingProperties.h
initProperties();
// Connect to Arduino IoT Cloud
ArduinoCloud.begin(ArduinoIoTPreferredConnection);
setDebugMessageLevel(2);
ArduinoCloud.printDebugInfo();
pinMode(LED_BUILTIN, OUTPUT);
initTempSensor();
}
void loop() {
ArduinoCloud.update();
temp_sensor_read_celsius(&cpu_temperature);
}
/*
Since LedStatus is READ_WRITE variable, onLedStatusChange() is
executed every time a new value is received from IoT Cloud.
*/
void onLedStatusChange() {
// Turn LED ON or OFF depending on led_status variable
digitalWrite(LED_BUILTIN, led_status);
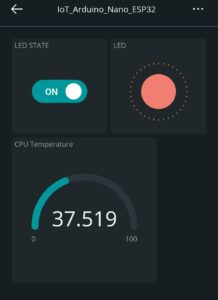
}Add a gauge type widget to your dashboard and associate it with this new variable. The CPU temperature will now be displayed on your Smartphone!
This tutorial is finished, I hope it will make you want to go further into the world of connected objects.
Do not hesitate to give a rating to this tutorial (stars below) and add a comment so that I can know your opinion and improve it if necessary.