In this tutorial we will discover FreeRTOS on an ESP32 using the official Espressif framework ESP-IDF (IoT Development Framework) which is based on the FreeRTOS kernel.
FreeRTOS (Wikipedia) is an open source real-time operating system for microcontrollers. An operating system allows you to abstractly manage hardware resources (CPU, memory, I/O, etc.). A real-time system is a system that respects time constraints by delivering the results of a process within prescribed deadlines. For example the maximum time between an input stimulus and an output response is precisely determined. In general, a real-time operating system is multitasking, meaning that it allows several tasks (computer processes) to be executed simultaneously.
The ESP-IDF framework documentation is available on the Espressif website: https://docs.espressif.com/projects/esp-idf/en/stable/esp32/index.html
Creation of our first project
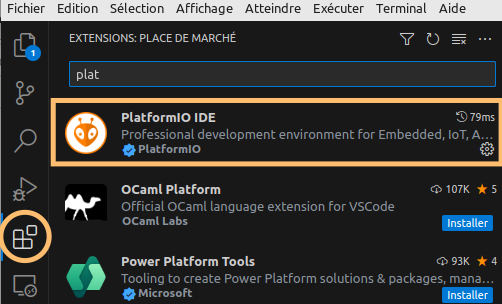
To program the ESP32 we will use the Visual Studio Code editor and the PlatformIO platform.
Install Visual Studio Code and add the PlatformIO IDE extension.
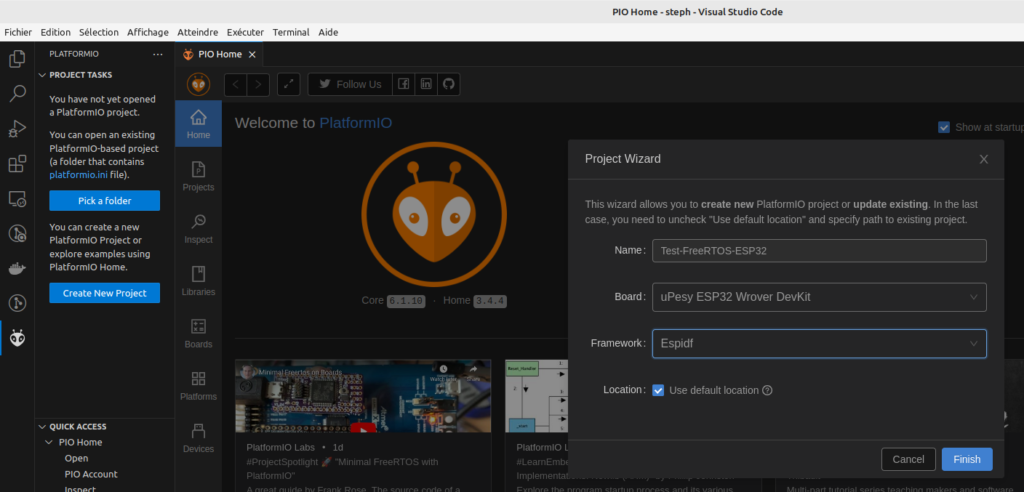
Create a new PlatformIO project by selecting your ESP32 board (I’m using the uPesy ESP32 Wrover DevKit board in this tutorial) and the Espidf Framework:
The PlatformIO project configuration file is created automatically, we only add the speed of the serial monitor in order to be able to display traces on the Visual Studio Code terminal.

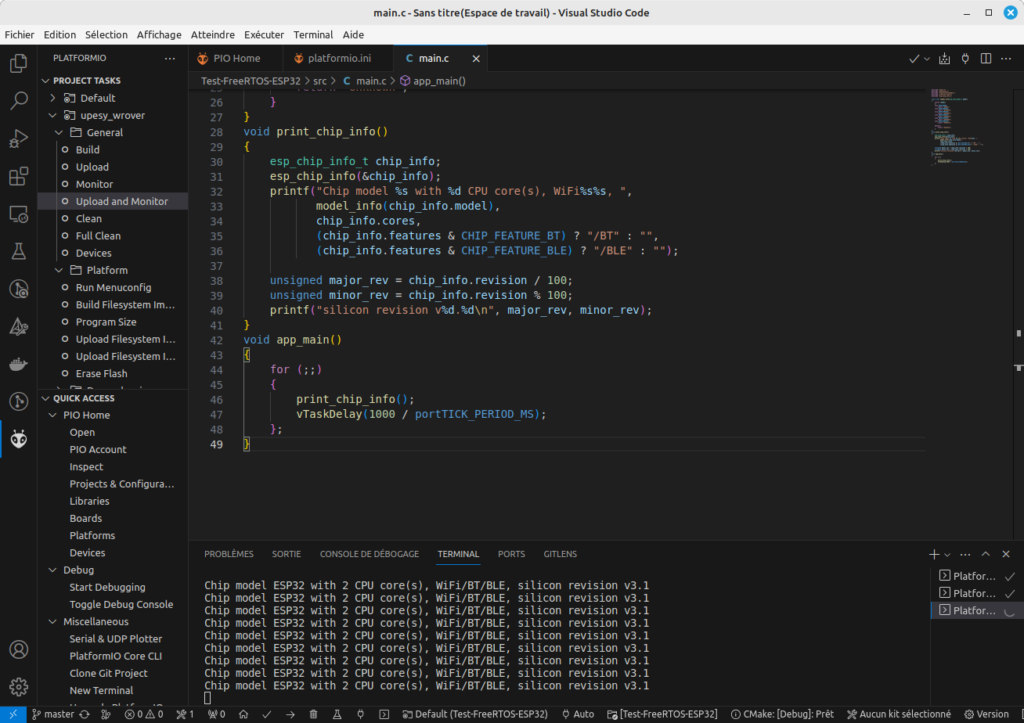
Our first program displays the microcontroller information on the serial monitor, looping infinitely with a 1 second wait between each loop.
#include <stdio.h>
#include "sdkconfig.h"
#include "freertos/FreeRTOS.h"
#include "freertos/task.h"
#include "esp_chip_info.h"
const char *model_info(esp_chip_model_t model)
{
    switch (model)
    {
    case CHIP_ESP32:
        return "ESP32";
    case CHIP_ESP32S2:
        return "ESP32S2";
    case CHIP_ESP32S3:
        return "ESP32S3";
    case CHIP_ESP32C3:
        return "ESP32C3";
    case CHIP_ESP32H2:
        return "ESP32H2";
    case CHIP_ESP32C2:
        return "ESP32C2";
    default:
        return "Unknown";
    }
}
void print_chip_info()
{
    esp_chip_info_t chip_info;
    esp_chip_info(&chip_info);
    printf("Chip model %s with %d CPU core(s), WiFi%s%s, ",
           model_info(chip_info.model),
           chip_info.cores,
           (chip_info.features & CHIP_FEATURE_BT) ? "/BT" : "",
           (chip_info.features & CHIP_FEATURE_BLE) ? "/BLE" : "");
    unsigned major_rev = chip_info.revision / 100;
    unsigned minor_rev = chip_info.revision % 100;
    printf("silicon revision v%d.%d\n", major_rev, minor_rev);
}
void app_main()
{
    for (;;)
    {
        print_chip_info();
        vTaskDelay(1000 / portTICK_PERIOD_MS);
    };
}
The vTaskDelay function offered by FreeRTOS is described in the online documentation available on the OS website https://www.freertos.org/a00127.html. This function specifies the number of ticks the task waits for, this number is passed as a parameter. If we want to count the waiting time in ms, simply divide the number of Ticks by the constancy portTICK_PERIOD_MS.
Once the code above is copied to the main.c file, you can upload it to your ESP32 and see the traces display in the serial monitor.
Multitasking
As I indicated above, FreeRTOS is a multitasking OS. It is therefore able to execute several tasks simultaneously. We will create a program whose main function app_main will create 2 tasks. We will thus have 3 tasks which will execute simultaneously: the main task in which the main function app_main is executed and the 2 other tasks Task1 and Task2 created by app_main.
To create the tasks we will use the xTaskCreate function by passing the task input function as a parameter as well as other arguments detailed in the code.
#include <stdio.h>
#include "sdkconfig.h"
#include "freertos/FreeRTOS.h"
#include "freertos/task.h"
const UBaseType_t taskPriority = 1;
void vTask1(void *pvParameters)
{
    for (;;)
    {
        // Display the core on which the task is running
        printf("Task1 is running on core %d\n", xPortGetCoreID());
        // Wait 3 seconds
        vTaskDelay(3000 / portTICK_PERIOD_MS);
    }
}
void vTask2(void *pvParameters)
{
    for (;;)
    {
        // Display the core on which the task is running
        printf("Task2 is running on core %d\n", xPortGetCoreID());
        // Wait 2 seconds
        vTaskDelay(2000 / portTICK_PERIOD_MS);
    }
}
void app_main()
{
    xTaskCreate(vTask1,       // Entry function of the task
                "Task1",      // Name of the task
                10000,        // The number of words to allocate for use as the task's stack (arbitrary size enough for this task)
                NULL,         // No parameter passed to the task
                taskPriority, // Priority of the task
                NULL);        // No handle
    xTaskCreate(vTask2,       // Entry function of the task
                "Task2",      // Name of the task
                10000,        // The number of words to allocate for use as the task's stack (arbitrary size enough for this task)
                NULL,         // No parameter passed to the task
                taskPriority, // Priority of the task
                NULL);        // No handle
    for (;;)
    {
        // Display the core on which the main function is running
        printf("app_main() is running on core %d\n", xPortGetCoreID());
        // Wait 1 seconds
        vTaskDelay(1000 / portTICK_PERIOD_MS);
    };
}
In our example, each task displays the core number of the microcontroller on which it is running. Because we will see right after, the ESP32 Wrover is a dual-core. It will therefore be possible to ensure that 2 tasks can run on 2 different cores.
We have positioned different wait times in each task. Also the serial monitor will successively display the traces of each task (every second for the main program, every 4 seconds for Task1 and every 2 seconds for Task2):
app_main() is running on core 0
Task2 is running on core 0
app_main() is running on core 0
app_main() is running on core 0
Task1 is running on core 0
Task2 is running on core 0
app_main() is running on core 0
app_main() is running on core 0
Task2 is running on core 0
app_main() is running on core 0
app_main() is running on core 0
Task1 is running on core 0
Task2 is running on core 0
app_main() is running on core 0
app_main() is running on core 0
Task2 is running on core 0
app_main() is running on core 0
We see that all tasks are running on core 0 and core 1 is not used. To make a task run on a specific core, the ESP-IDF framework function xTaskCreatePinnedToCore can be used.
#include <stdio.h>
#include "sdkconfig.h"
#include "freertos/FreeRTOS.h"
#include "freertos/task.h"
const UBaseType_t taskPriority = 1;
void vTask1(void *pvParameters)
{
    for (;;)
    {
        // Display the core on which the task is running
        printf("Task1 is running on core %d\n", xPortGetCoreID());
        // Wait 2 seconds
        vTaskDelay(2000 / portTICK_PERIOD_MS);
    }
}
void vTask2(void *pvParameters)
{
    for (;;)
    {
        // Display the core on which the task is running
        printf("Task2 is running on core %d\n", xPortGetCoreID());
        // Wait 2 seconds
        vTaskDelay(2000 / portTICK_PERIOD_MS);
    }
}
void app_main()
{
    TaskHandle_t xHandle1 = NULL;
    TaskHandle_t xHandle2 = NULL;
    xTaskCreatePinnedToCore(vTask1,       // Entry function of the task
                            "Task1",      // Name of the task
                            10000,        // The number of words to allocate for use as the task's stack (arbitrary size enough for this task)
                            NULL,         // No parameter passed to the task
                            taskPriority, // Priority of the task
                            &xHandle1,    // Handle to the created task
                            0);           // Task must be executed on core 0
    xTaskCreatePinnedToCore(vTask2,       // Entry function of the task
                            "Task2",      // Name of the task
                            10000,        // The number of words to allocate for use as the task's stack (arbitrary size enough for this task)
                            NULL,         // No parameter passed to the task
                            taskPriority, // Priority of the task
                            &xHandle2,    // Handle to the created task
                            1);           // Task must be executed on core 1
    for (;;)
    {
        // Display the core on which the main function is running
        printf("app_main() is running on core %d\n", xPortGetCoreID());
        // Wait 1 seconds
        vTaskDelay(1000 / portTICK_PERIOD_MS);
    };
}
We can clearly see in the serial monitor that the main task (app_main function) and Task1 are executing on core 0 while Task2 is executing on core 1:
app_main() is running on core 0
app_main() is running on core 0
Task1 is running on core 0
Task2 is running on core 1
app_main() is running on core 0
app_main() is running on core 0
Task1 is running on core 0
Task2 is running on core 1
app_main() is running on core 0
app_main() is running on core 0
Task1 is running on core 0
Task2 is running on core 1
Please note, the xTaskCreatePinnedToCore function is specific to the ESP-IDF framework. It’s best to let the core choose which core each task runs on. For example, it is useless to run both cores when only one core is sufficient to run your application. I recommend reading the chapter Symmetric Multiprocessing (SMP) with FreeRTOS
Timers
Another interesting feature of real-time OS is the use of timers. It is indeed possible to execute a function after a defined time. The function called when the timer expires is called callback.
The xTimerCreate function allows you to create a timer by giving as parameters the period, the callback and indicating whether the timer is of the one-shot or repetitive type:
- A “one-shot” timer will only execute its callback once. It can be restarted manually, but it will not restart automatically.
- Once started, an “auto-reload” timer will automatically restart after each execution of its callback, leading to its periodic execution.
#include <stdio.h>
#include "sdkconfig.h"
#include "freertos/FreeRTOS.h"
#include "freertos/timers.h"
void autoReloadTimerCallback(TimerHandle_t xTimer)
{
    printf("Timer callback\n");
}
void app_main()
{
    TimerHandle_t xAutoReloadTimer;
    xAutoReloadTimer = xTimerCreate("AutoReloadTimer",        // Name of the timer
                                    pdMS_TO_TICKS(500),       // The period of the timer specified in ticks (500)
                                    pdTRUE,                   // The timer will auto-reload when it expires
                                    0,                        // Identifier of the timer
                                    autoReloadTimerCallback); // Callback function
    xTimerStart(xAutoReloadTimer, 0);
    for (;;)
    {
        // Display the core on which the main function is running
        printf("app_main() is running on core %d\n", xPortGetCoreID());
        // Wait 1 seconds
        vTaskDelay(1000 / portTICK_PERIOD_MS);
    };
}
We clearly observe in the serial monitor that the callback is called when the timer expires every 500ms:
app_main() is running on core 0
Timer callback
Timer callback
app_main() is running on core 0
Timer callback
Timer callback
app_main() is running on core 0
Timer callback
Timer callback
Interrupts
An interrupt is a temporary suspension of the execution of a program by the microcontroller in order to execute a priority program (called an interrupt service).
In the following example we will configure the GPIO32 pin of our ESP32 as an input and count how many times this input has gone from low to high in the last second. We will configure the GPIO32 pin so that an interrupt routine is called when it goes from low to high (rising edge = GPIO_INTR_POSEDGE).
#include <stdio.h>
#include "sdkconfig.h"
#include "freertos/FreeRTOS.h"
#include "freertos/task.h"
#include "driver/gpio.h"
#define INPUT_PIN GPIO_NUM_32
uint32_t cpt = 0;
static void IRAM_ATTR gpio_interrupt_handler(void *args)
{
    // Interrupt is raised, increase the counter
    cpt++;
}
void app_main()
{
    // Configure INPUT_PIN as input
    gpio_set_direction(INPUT_PIN, GPIO_MODE_INPUT);
    // Enable the pull-down for INPUT_PIN
    gpio_pulldown_en(INPUT_PIN);
    // Disable the pull-up for INPUT_PIN
    gpio_pullup_dis(INPUT_PIN);
    // An interrupt will be triggered when the the state of the INPUT_PIN changes from LOW to HIGH
    gpio_set_intr_type(INPUT_PIN, GPIO_INTR_POSEDGE);
    // Install the GPIO ISR service, which allows per-pin GPIO interrupt handlers
    gpio_install_isr_service(0);
    // Configure gpio_interrupt_handler function has ISR handler for INPUT_PIN
    gpio_isr_handler_add(INPUT_PIN, gpio_interrupt_handler, (void *)INPUT_PIN);
    for (;;)
    {
        // Display the number of time the interrupt was called during last second
        printf("Counter = %lu\n", cpt);
        // Reset the counter
        cpt = 0;
        // Wait 1 seconds
        vTaskDelay(1000 / portTICK_PERIOD_MS);
    };
}
When we connect pin 32 to pin 3.3V to make it high, we see in the serial monitor that the counter indicates that there have been many interrupts. This is normal because we bind the wire by hand, which creates many transitions from low to high state.
Counter = 0
Counter = 0
Counter = 0
Counter = 7
Counter = 40
Counter = 0
The objective of this tutorial is not to deepen the concept of real-time operating systems, but only to make you want to go further with ESP-IDF and FreeRTOS with an ESP32. Have fun with ESP32!