This tutorial will allow you to discover Bluetooth® Low Energy (BLE) technology through examples based on an Arduino Nano ESP32. This ESP32 microcontroller-based card is indeed very well suited to the development of connected objects using Bluetooth® or Wifi technologies.
The BLE standard allows wireless communication in the 2.4 GHz band. It allows a throughput of around Mbit/s over a distance of a few tens of meters. Its enormous advantage compared to “classic” Bluetooth® is its very low power consumption. Which makes it very well suited for the communication of connected objects (IoT) powered by batteries.
Example 1: Controlling the status of the Arduino’s internal LED via BLE
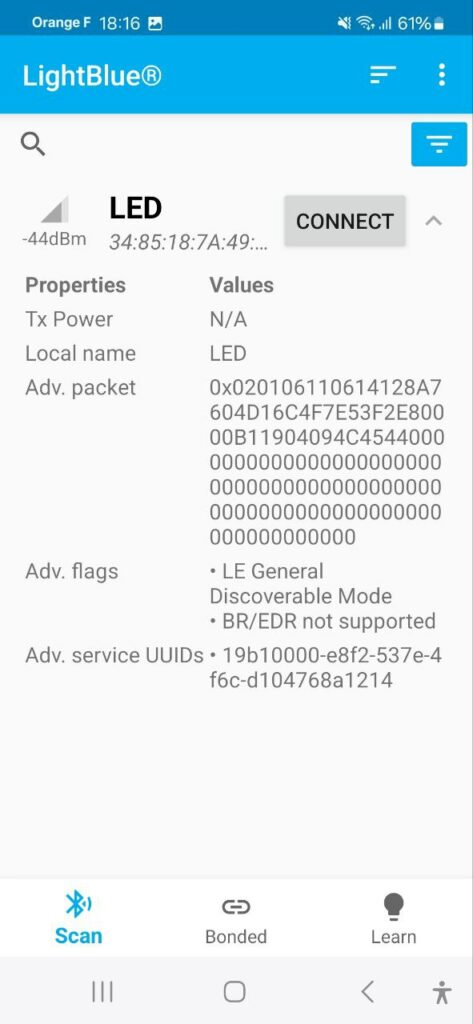
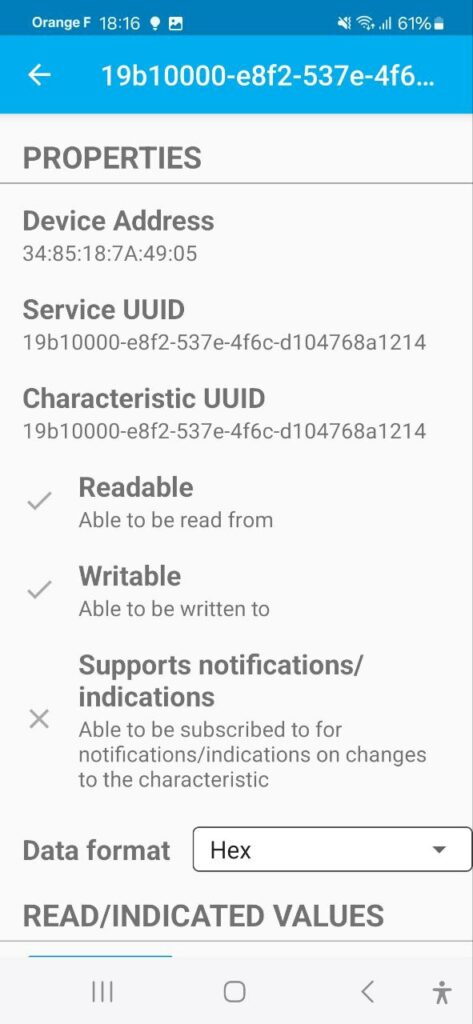
In this first example, we will check the state of the internal LED of the Arduino Nano ESP32. The Arduino will expose a service having as characteristic the state of the LED authorized in read/write. The name of the BLE device will be “LED”. The UUID of the service and feature is chosen arbitrarily with the value “19b10000-e8f2-537e-4f6c-d104768a1214”.
Here is the sketch of the BLE peripheral device that will run on the Arduino Nano ESP32:
// Turns an Arduino Nano ESP32 into a Bluetooth® Low Energy peripheral.
// This BLE peripheral is providing a service that allows a BLE central
// to switch on and off the internal LED of the Arduino Nano ESP32.
// https://tutoduino.fr/
// Copyleft 2023
#include <ArduinoBLE.h>
BLEService ledService("19b10000-e8f2-537e-4f6c-d104768a1214"); // Bluetooth® Low Energy LED Service
// Bluetooth® Low Energy LED Switch Characteristic - custom 128-bit UUID, read and writable by central
BLEByteCharacteristic switchCharacteristic("19b10000-e8f2-537e-4f6c-d104768a1214", BLERead | BLEWrite);
const int ledPin = LED_BUILTIN; // internal LED pin
void setup() {
  Serial.begin(9600);
  // set LED pin to output mode
  pinMode(ledPin, OUTPUT);
  // BLE initialization
  if (!BLE.begin()) {
    Serial.println("starting Bluetooth® Low Energy module failed!");
    while (1);
  }
  // set advertised local name and service UUID:
  BLE.setLocalName("LED");
  BLE.setAdvertisedService(ledService);
  // add the characteristic to the service
  ledService.addCharacteristic(switchCharacteristic);
  // add service
  BLE.addService(ledService);
  // set the initial value for the characeristic:
  switchCharacteristic.writeValue(0);
  // start advertising
  BLE.advertise();
  Serial.println("BLE LED Peripheral");
}
void loop() {
  // wait for a Bluetooth® Low Energy central
  BLEDevice central = BLE.central();
  // check if a central is connected to this peripheral
  if (central) {
    Serial.print("Connected to central: ");
    // print the central's MAC address:
    Serial.println(central.address());
    // while the central is still connected to peripheral:
    while (central.connected()) {
      // if the remote device wrote to the characteristic,
      // use the value to control the LED:
      if (switchCharacteristic.written()) {
        if (switchCharacteristic.value()) {   // any value other than 0
          Serial.println("LED on");
          digitalWrite(ledPin, HIGH);         // will turn the LED on
        } else {                              // a 0 value
          Serial.println(F("LED off"));
          digitalWrite(ledPin, LOW);          // will turn the LED off
        }
      }
    }
    // the central has disconnected
    Serial.println("Disconnected from central: ");
  }
}
To interact with the Arduino via Bluetooth, you can for example use this little Python program on a PC. This program will be a BLE central (BLE Central) and it will scan the BLE peripherals (BLE Peripheral) and look for the one with the name “LED” in order to connect to it. Then the program will start a client which will use the service exposed by the device to flash the internal LED 5 times:
#!/usr/bin/python3
# -*- coding: utf8 -*-
# Copyleft https://tutoduino.fr/
import argparse
import asyncio
from bleak import BleakScanner
from bleak import BleakClient
LED_UUID = '19b10000-e8f2-537e-4f6c-d104768a1214'
async def main():
print("Searching Arduino Nano ESP32 'LED' device, please wait...")
# Scan BLE devices for timeout seconds and return discovered devices with advertising data
devices = await BleakScanner.discover(timeout=5,
return_adv=True)
for ble_device, adv_data in devices.values():
if ble_device.name == 'LED':
print("Device found")
# Connect to Arduino Nano ESP 32 device
async with BleakClient(ble_device.address) as client:
print("Connected to device")
for i in range(5):
print("Turning internal LED on...")
val = await client.write_gatt_char(LED_UUID, b"\x01")
await asyncio.sleep(1.0)
print("Turning internal LED off..")
val = await client.write_gatt_char(LED_UUID, b"\x00")
await asyncio.sleep(1.0)
if __name__ == "__main__":
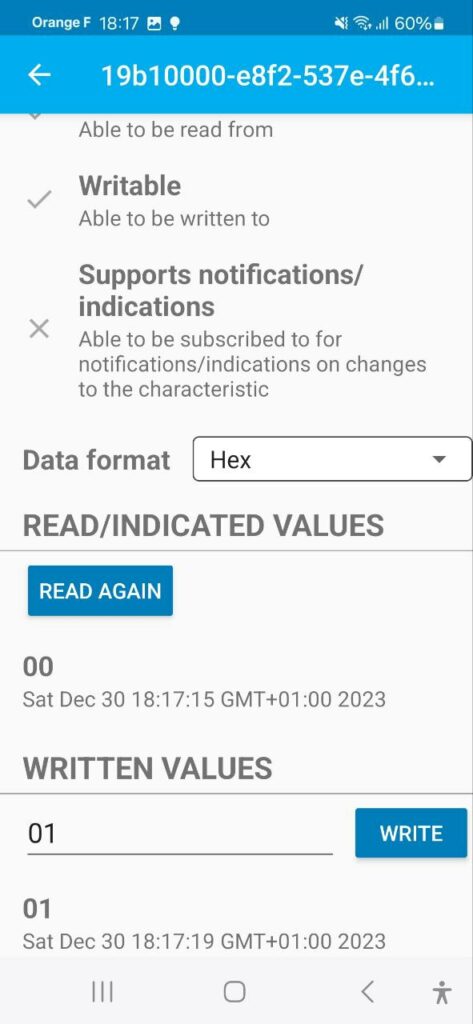
asyncio.run(main())It is also possible to control the state of the Arduino LED via an application on your Smartphone. Using the LightBlue application for example on Android it is possible to connect to the “LED” device and act on the state of the internal LED through writing the value 0x00 or 0x01 the characteristic of the service exposed :
Example 2: Transmitting the Arduino’s Internal CPU Temperature via BLE
For our second example, we will use BLE’s advertising mechanism. This mechanism is particularly suitable for the transmission of data by a sensor because it reduces power consumption.
In this example, the Arduino Nano ESP32 is a BLE device using this advertisement mechanism to send the internal temperature of the microcontroller. The Arduino will publish the temperature every minute for 2 seconds, and go to sleep between two emissions to limit energy consumption. The temperature will be sent in the first byte of the BLE device’s manufacturer data.
// Turns an Arduino Nano ESP32 into a Bluetooth® Low Energy peripheral.
// This BLE peripheral is advertising manufacturer data that contains
// internal temperature of the microcontroler.
// https://tutoduino.fr/
// Copyleft 2023
#include <ArduinoBLE.h>
#include "driver/temp_sensor.h"
void setup() {
  Serial.begin(9600);
  if (!BLE.begin()) {
    Serial.println("failed to initialize BLE!");
    while (1);
  }
}
void loop() {
  float cpu_temperature;
  uint8_t manufactData[] = { 0x01 };
  // read the internal temperature sensor
  temp_sensor_read_celsius(&cpu_temperature);
  manufactData[0] = uint8_t(cpu_temperature);
  // Build advertising data packet (temperature is first byte of manufacturer data)
  BLEAdvertisingData advData;
  advData.setLocalName("TEMPERATURE");
  // Set parameters for advertising packet
  advData.setManufacturerData(0x09A3, manufactData, sizeof(manufactData));
  // Copy set parameters in the actual advertising packet
  BLE.setAdvertisingData(advData);
  // advertise during 2 seconds
  BLE.advertise();
  delay(2000);
  BLE.stopAdvertise();
  // enter deep sleep for 1 minute
  esp_sleep_enable_timer_wakeup(60000000);
  esp_deep_sleep_start();
}
The following Python program can be run on a PC, it will display the internal temperature of the microcontroller contained in the first byte of the manufacturer_data published by the Arduino.
#!/usr/bin/python3
# -*- coding: utf8 -*-
# Copyleft https://tutoduino.fr/
import argparse
import asyncio
from bleak import BleakScanner
from bleak.backends.device import BLEDevice
from bleak.backends.scanner import AdvertisementData
def device_found(
device: BLEDevice, advertisement_data: AdvertisementData
):
"""Decode advertisement data"""
try:
""" Check Arduino manufacturer advertisement data (expect Arduino company ID 0x09A3) """
manuf_data = advertisement_data.manufacturer_data[0x09A3]
print('Temperature = {} ; RSSI = {}'.format(
manuf_data[0], advertisement_data.rssi))
except KeyError:
pass
async def main():
"""Scan for devices"""
scanner = BleakScanner(device_found)
while True:
await scanner.start()
await asyncio.sleep(1.0)
await scanner.stop()
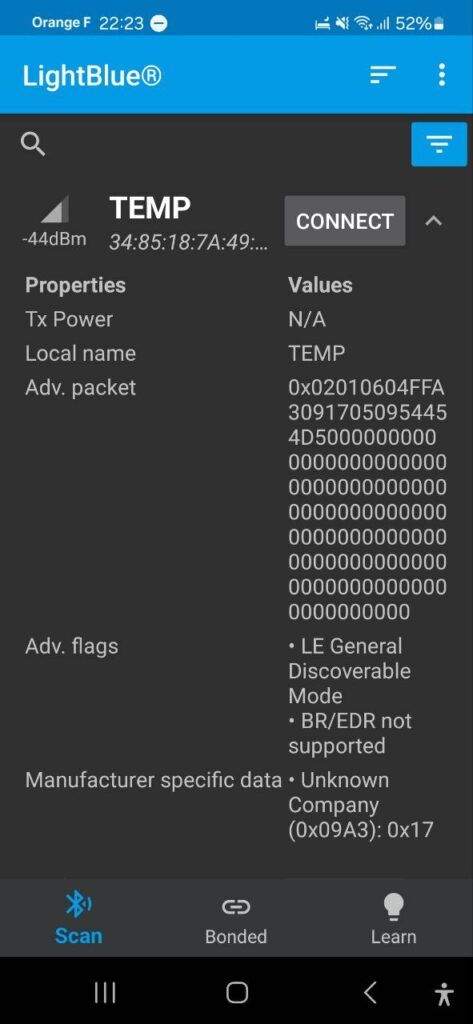
asyncio.run(main())As in the previous example, it will be possible to display the temperature on a Smartphone via the LightBlue application, for example on Android. In the screenshot below, the temperature of the microcontroller is indicated in the Manufacturer specific Data field, and has the value 0x17 or 23 °C.
Note: when the Arduino is asleep it is no longer possible to upload the code via the Arduino IDE. You must follow the following procedure to reset the bootloader and upload the sketch via the Esptool programmer: https://support.arduino.cc/hc/en-us/articles/9810414060188-Reset-the-Arduino-bootloader-on-the -Nano-ESP32
Example 3: Wifi and BLE used together
This example is based on my tutorial Create your first connected object (IoT) with Arduino Cloud platform and an Arduino Nano ESP32. The Arduino Nano ESP32 is connected to Arduino Cloud via Wifi. It is thus possible to control the state of the internal LED of the Arduino Nano ESP32 card from the Arduino Cloud Dashboard.
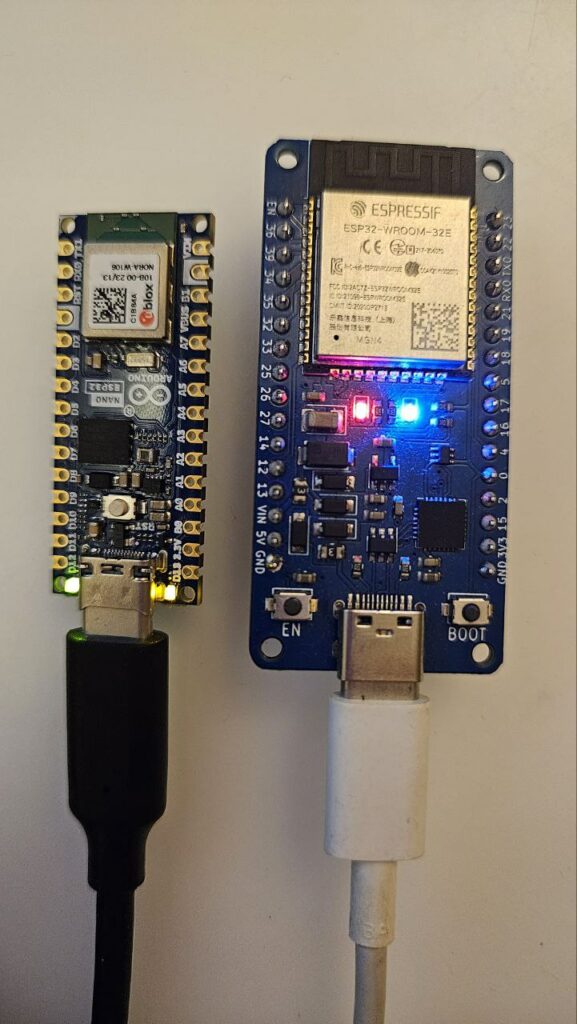
We are going to add BLE Central functionality to this Arduino Nano ESP32. The Arduino Nano ESP32 therefore has both a Wifi connection and a BLE connection active simultaneously.
The uPesy ESP32 Wroom card is programmed as in example 1. It is used as a BLE peripheral (BLE Peripheral) which exposes a service having as characteristic the state of the internal LED authorized in read/write. And it is our Arduino Nano ESP32 which will control the state of the internal LED of the uPesy ESP32 Wroom through the BLE link.

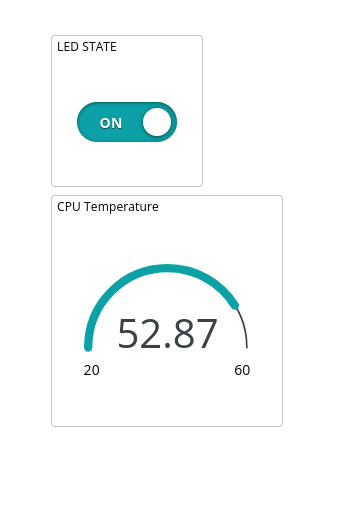
We will program the Arduino Nano ESP32 to turn on the internal LED of the uPesy ESP32 Wroom via BLE when its own internal LED is turned on via Arduino Cloud. So when we click on the LED STATE button from Arduino Cloud the internal LEDs of the 2 Arduino Nano ESP32 and uPesy ESP32 Wroom cards will light up.
The objective of this example is to show that the Arduino Nano ESP32 can use BLE while connected to Arduino Cloud via Wifi.
Here is the sketch of the Arduino Nano ESP32, it is not optimized but shows how to interleave the maintenance of BLE and Wifi connections. The thingProperties.h file is the one that is auto-generated by Arduino Cloud in my tutorial Create your first connected object (IoT) with the Arduino Cloud platform and an Arduino Nano ESP32:
// Exemple of basic IoT with Arduino Cloud
// https://tutoduino.fr/
// Copyleft 2023
#include "thingProperties.h"
#include "driver/temp_sensor.h"
#include <ArduinoBLE.h>
BLEService ledService("19b10000-e8f2-537e-4f6c-d104768a1214");  // Bluetooth® Low Energy LED Service
// Bluetooth® Low Energy LED Switch Characteristic - custom 128-bit UUID, read and writable by central
BLEByteCharacteristic switchCharacteristic("19b10000-e8f2-537e-4f6c-d104768a1214", BLERead | BLEWrite);
void initTempSensor() {
  temp_sensor_config_t temp_sensor = TSENS_CONFIG_DEFAULT();
  temp_sensor.dac_offset = TSENS_DAC_L2;  // TSENS_DAC_L2 is default; L4(-40°C ~ 20°C), L2(-10°C ~ 80°C), L1(20°C ~ 100°C), L0(50°C ~ 125°C)
  temp_sensor_set_config(temp_sensor);
  temp_sensor_start();
}
void setup() {
  // Initialize serial and wait for port to open:
  Serial.begin(9600);
  // This delay gives the chance to wait for a Serial Monitor without blocking if none is found
  delay(1500);
  // Defined in thingProperties.h
  initProperties();
  // Connect to Arduino IoT Cloud
  ArduinoCloud.begin(ArduinoIoTPreferredConnection);
  setDebugMessageLevel(2);
  ArduinoCloud.printDebugInfo();
  // set internal LED pin as output
  pinMode(LED_BUILTIN, OUTPUT);
  // initialize the internal temperature sensor
  initTempSensor();
  // initialize the Bluetooth® Low Energy hardware
  BLE.begin();
  // scan the LED peripheral
  BLE.scanForUuid("19b10000-e8f2-537e-4f6c-d104768a1214");
}
void loop() {
  float temp;
  temp_sensor_read_celsius(&temp);
  cpu_temperature = temp;
  ArduinoCloud.update();
  // check if a peripheral has been discovered
  BLEDevice peripheral = BLE.available();
  if (peripheral) {
    // stop scanning
    BLE.stopScan();
    // connect to peripheral and use its services to control its internal LED
    controlLed(peripheral);
    // if we exist controlLed function it means that peripheral is disconnected
    // we start scanning again
    BLE.scanForUuid("19b10000-e8f2-537e-4f6c-d104768a1214");
  }
}
void controlLed(BLEDevice peripheral) {
  // connect to the peripheral
  Serial.println("Connecting ...");
  if (peripheral.connect()) {
    Serial.println("Connected");
  } else {
    Serial.println("Failed to connect!");
    return;
  }
  // discover peripheral attributes
  Serial.println("Discovering attributes ...");
  if (peripheral.discoverAttributes()) {
    Serial.println("Attributes discovered");
  } else {
    Serial.println("Attribute discovery failed!");
    peripheral.disconnect();
    return;
  }
  // retrieve the LED characteristic
  BLECharacteristic ledCharacteristic = peripheral.characteristic("19b10000-e8f2-537e-4f6c-d104768a1214");
  if (!ledCharacteristic) {
    Serial.println("Peripheral does not have LED characteristic!");
    peripheral.disconnect();
    return;
  } else if (!ledCharacteristic.canWrite()) {
    Serial.println("Peripheral does not have a writable LED characteristic!");
    peripheral.disconnect();
    return;
  }
  // set LED characteristic while the peripheral is connected
  while (peripheral.connected()) {
    if (led_status == true) {
      ledCharacteristic.writeValue((byte)0x01);
    } else {
      ledCharacteristic.writeValue((byte)0x00);
    }
    // while the peripheral is connected, continue to update Arduino Cloud
    ArduinoCloud.update();
  }
  Serial.println("Peripheral disconnected");
}
/*
  Since LedStatus is READ_WRITE variable, onLedStatusChange() is
  executed every time a new value is received from IoT Cloud.
*/
void onLedStatusChange() {
  // Turn LED ON or OFF depending on led_status variable
  digitalWrite(LED_BUILTIN, led_status);
}
I hope this article will inspire you to go further with BLE. Do not hesitate to give a rating to this tutorial (stars below) and add a comment so that I can know your opinion and improve it if necessary.