
This tutorial shows how to configure Seeed Studio’s reSpeaker XMOS XVF3800—featuring the XIAO ESP32-S3 microcontroller and XMOS XVF3800 voice processor—as a voice assistant in Home Assistant using ESPHome.
Tested on a Raspberry Pi 4 Model B running Home Assistant OS 2025.12.3, this setup uses the open-source Vosk toolkit for offline voice-to-text functionality.
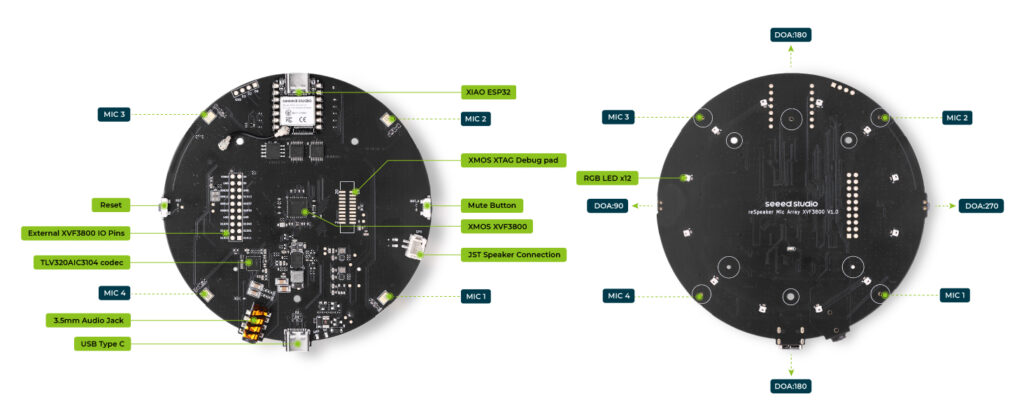
XMOS XVF3800 voice processor
The XMOS XVF3800 features cutting-edge algorithms like multi-adaptive beamforming, acoustic echo cancellation (AEC), de-reverberation, noise suppression, direction-of-arrival (DoA), and voice activity detection (VAD) for clear voice pickup in noisy environments.
ESP32-S3 microcontroller
The onboard XIAO ESP32-S3 delivers native Wi-Fi and Bluetooth connectivity, enabling seamless Home Assistant integration via ESPHome for voice-controlled smart home projects.
4-Mic array design
The reSpeaker integrates 4 MEMS microphones using Pulse-Density Modulation (PDM) signaling. PDM delivers high signal-to-noise ratio, exceptional sensitivity, low power consumption, robust resistance to RF interference, and a smooth frequency response.
AC3104 Low-Power audio codec
The TLV320AIC3104 is a low-power stereo audio codec from Texas Instruments featuring integrated DAC (Digital-to-Analog Converter), ADC (Analog-to-Digital Converter), Class-D amplifiers, and DSP processing.
The codec receives processed audio streams from XVF3800, performs final analog conversion/amplification, and drives the speaker.
I²C and I²S
Though I²C and I²S have similar names and are both serial protocols, they serve distinct purposes with different characteristics.
I²C (Inter-Integrated Circuit) is a multi-device serial protocol for intra-board communication between microcontrollers and peripherals like sensors.
I²S (Inter-Integrated Circuit Sound) is a point-to-point serial protocol for transmitting two-channel, uncompressed digital audio between components like DACs, ADCs, or processors.
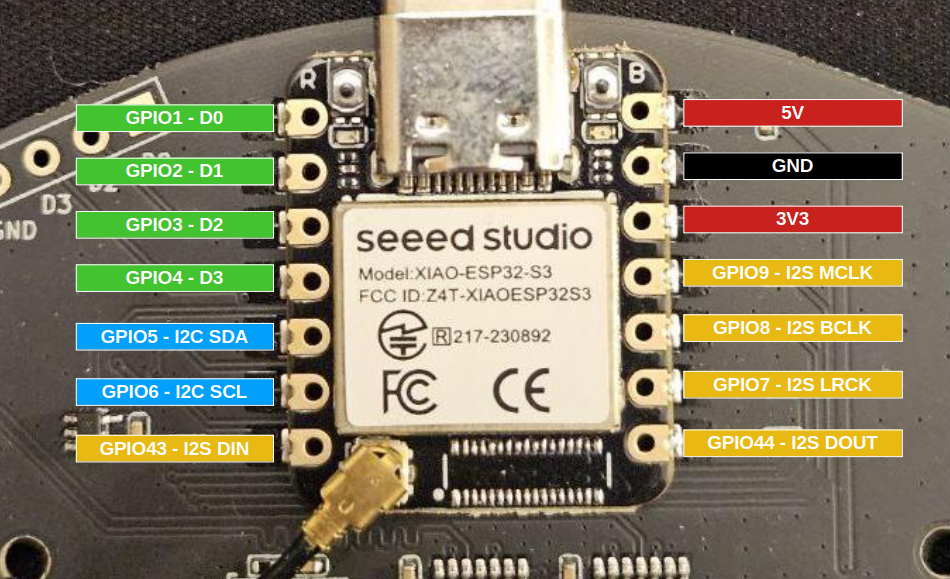
ESP32-S3 Pinout
On the ESP32-S3, the following pins are configured for I²C bus:
- I²C SDA: GPIO5
- I²C SCL: GPIO6
On the ESP32-S3, the following pins are configured for I²S bus:
- I²S LRCLK/WS (Left/Right Clock or Word Select) → GPIO7
- I²S BCLK/SK (Bit Clock or Serial Clock) → GPIO8
- I²S MCLK (Master Clock) → GPIO9
- I²S DIN (Serial Data In) → GPIO43
- I²S DOUT (Serial Data Out) → GPIO44
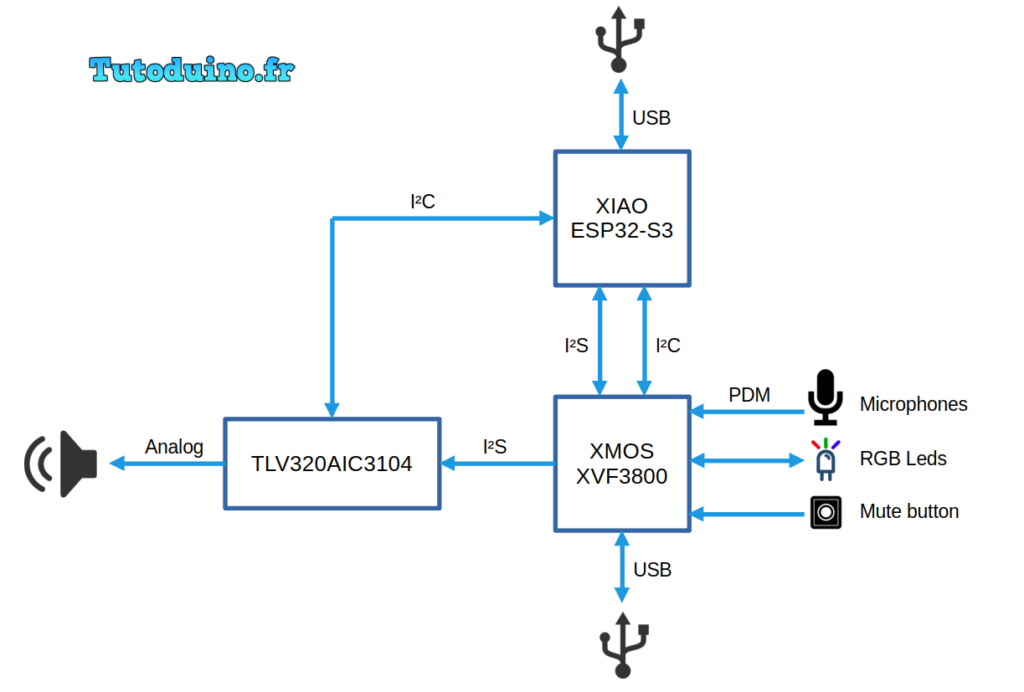
ReSpeaker schematic
XIAO ESP32-S3 connects to both the XVF3800 voice processor and TLV320AIC3104 codec via I²C for configuration and control.
- ESP32-S3 ↔ I²C : XVF3800 (configuration)
- ESP32-S3 ↔ I²C : AIC3104 (configuration)
XVF3800 connects to both ESP32-S3 and AIC3104 for digital audio streaming.
- ESP32-S3 ↔ I²S : XVF3800 (bi-directional audio)
- XVF3800 → I²S : AIC3104 (playback stream)
The 12 RGB LEDs are controlled by the XVF3800, and the ESP32‑S3 configures them via I²C commands sent to the XVF3800.
The 4 MEMS microphones transmit audio to the XVF3800 using pulse‑density modulation (PDM).
The mute button is directly connected to the XVF3800 GPI (General-Purpose Input) pin.
Both the ESP32-S3 and XVF3800 feature integrated USB connectivity.
XVF3800 firmware update
The XVF3800 mic array needs a 12.288 MHz Master Clock (MCLK) to work, but ESPHome (used in Home Assistant) can’t generate it due to API limits. An alternative is to modify XVF3800 firmware to make it act as the I²S master. So it can generate its own clocks without needing Master Clock from the ESP32. This is the purpose of the firmware provided by Seeed Studio, so the mic works properly with Home Assistant.
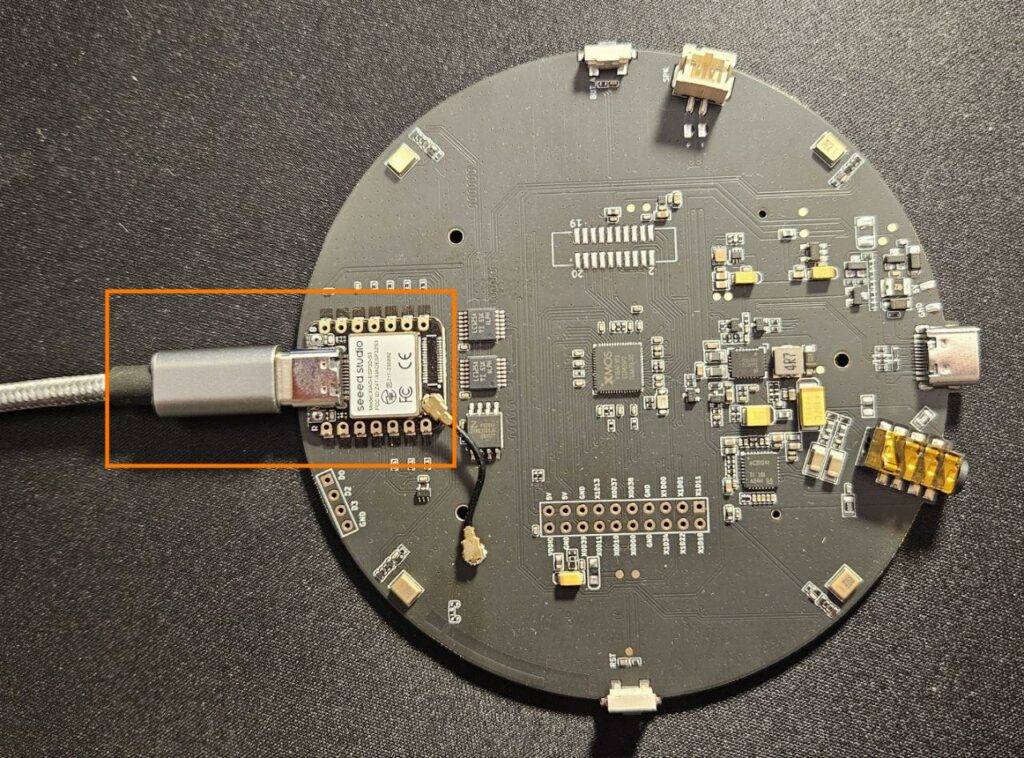
To upload XVF3800 firmware to the ReSpeaker, connect it to your computer using a USB cable plugged into the USB port opposite to ESP32-S3.

Put the ReSpeaker in safe mode :
- Power off the device completely.
- Press and hold the Mute button.
- While holding the mute button, reconnect the power.
The red LED will start blinking — this confirms the device is now in Safe Mode. You can now follow the procedure described on Seeed Studio website.
Under Linux, the procedure is straightforward:
sudo apt install dfu-util
sudo dfu-util -l
sudo dfu-util -R -e -a 1 -D /path-to-dfu-firmware.binIntegration into ESPHome
The first step is to integrate the ReSpeaker into ESPHome and to manually upload the initial ESPHome firmware into its ESP32-S3.
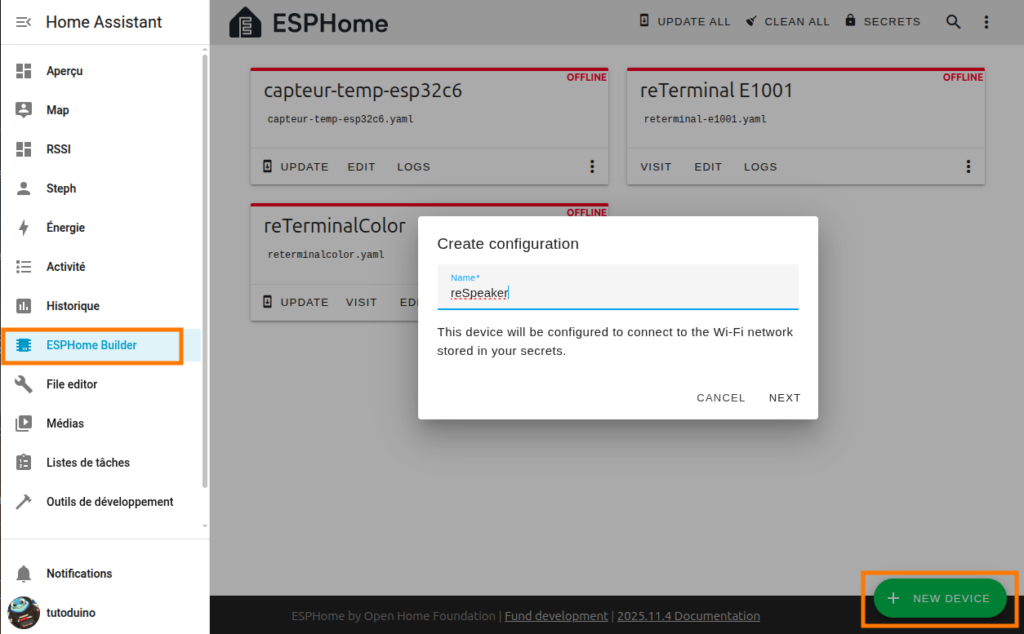
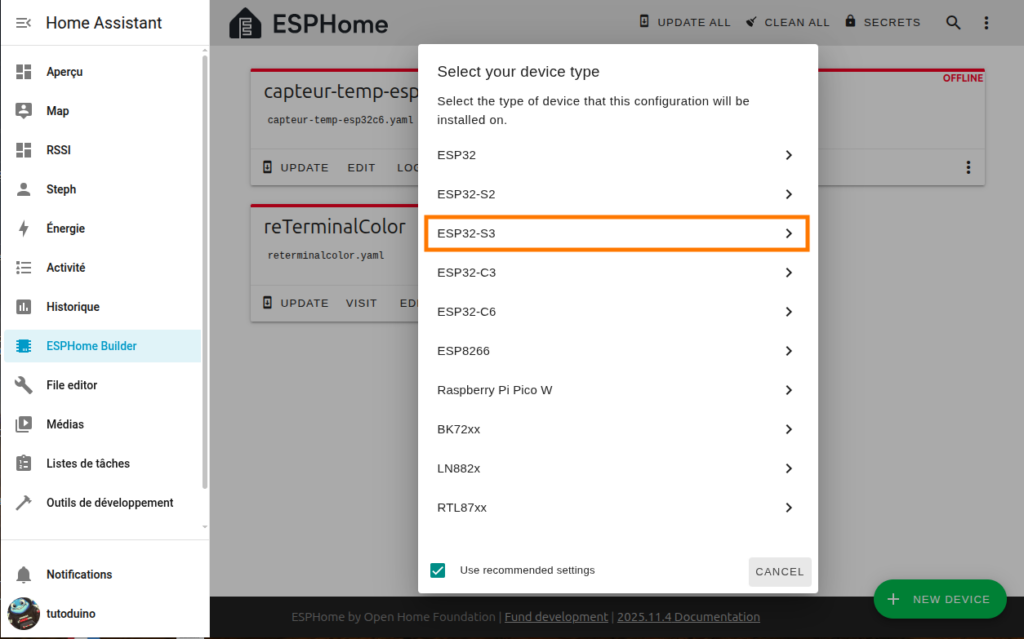
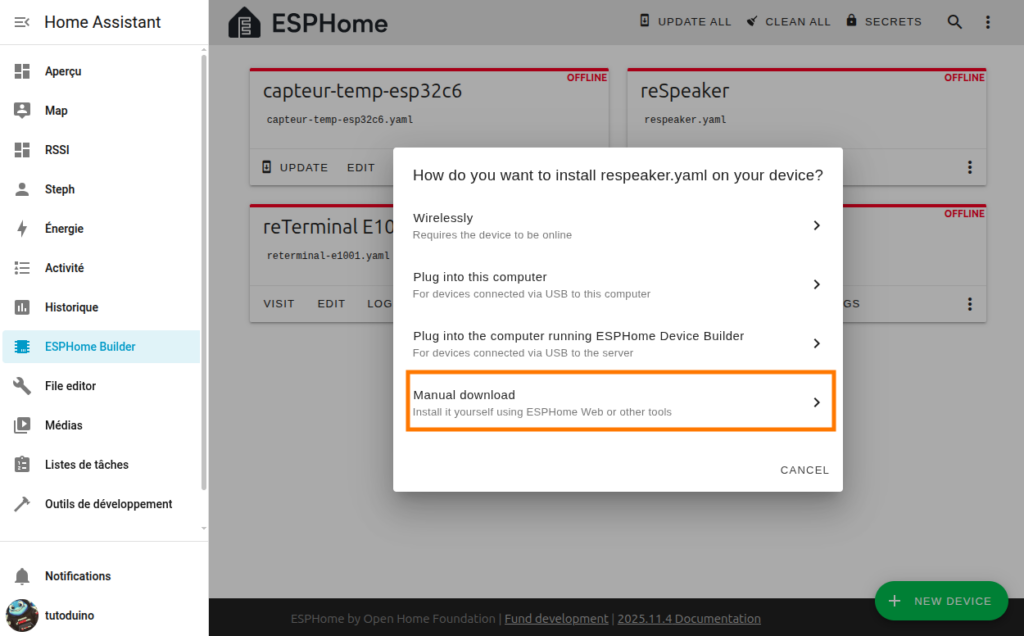
To upload ESPHome firmware to the ReSpeaker, connect it to your computer using a USB cable plugged into the USB port on the ESP32-S3 module.
Add Vosk speech regognition to Home Assistant
The voice assistant requires a speech recognition toolkit (Speech-To-Text, STT) to process voice commands received through the ReSpeaker. Vosk is an open‑source offline speech recognition toolkit that supports more than 20 languages and dialects. It is an excellent choice for Raspberry Pi‑based Home Assistant setups.
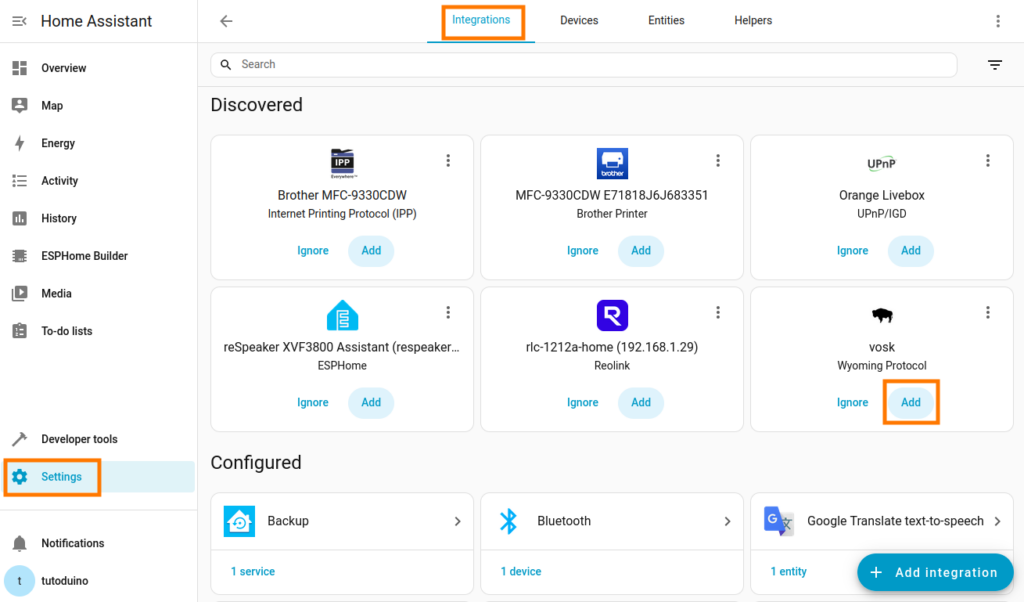
You have to install the Vosk add-on from this repository:
https://github.com/rhasspy/hassio-addonsTo do so, you must add this repository from the Repositories menu, accessible via the three‑dots menu in Settings → Add‑ons → Add‑on store.

Then install the vosk add-on:

And add vosk integration to Home Assistant:
Note: Whisper is another local Speech-To-Text option, but it has slower processing speed and is not suitable for Raspberry Pi 4B performance.
Add Piper Text-To-Speech to Home Assistant
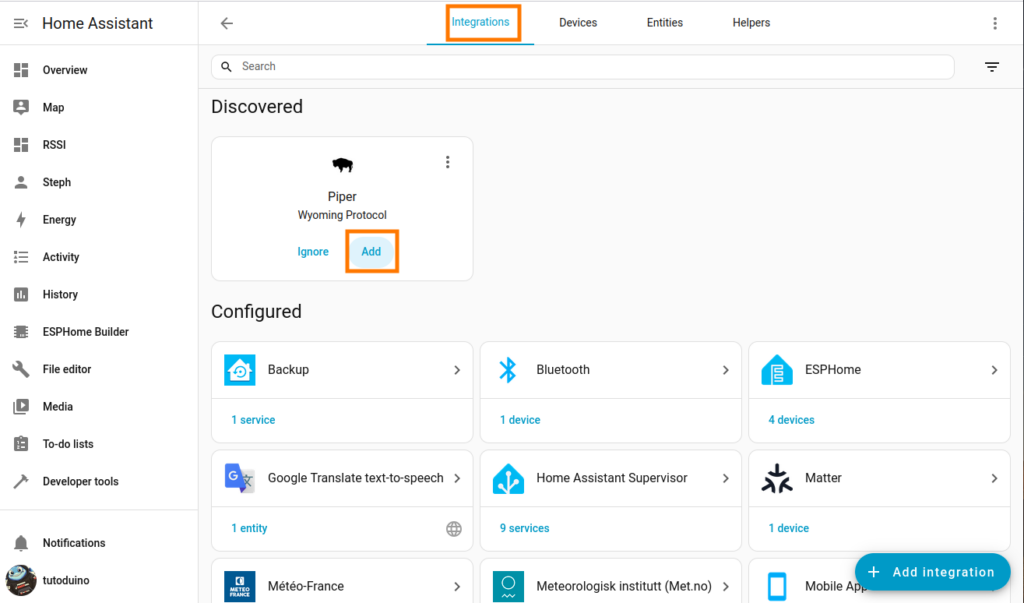
Vosk provides offline, local speech-to-text recognition. For text-to-speech, the default configuration uses the online Google translation service. If you prefer a fully local and offline assistant pipeline, you can install Piper as a text-to-speech add-on. It runs efficiently on a Raspberry Pi 4, offering excellent performance and low latency.

And add Piper integration to Home Assistant:
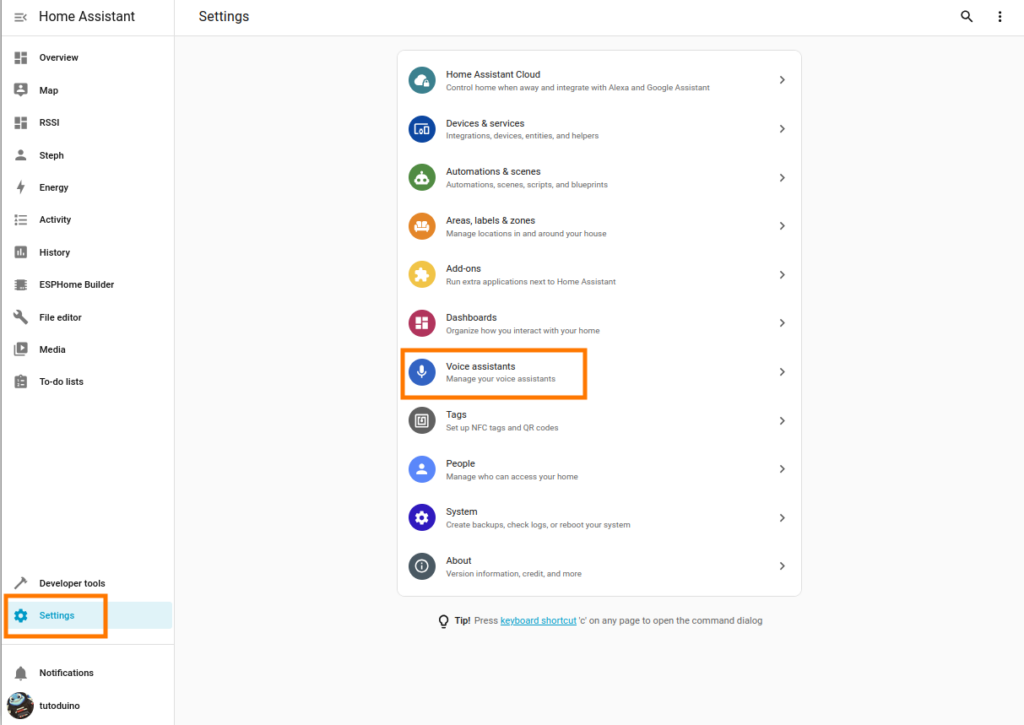
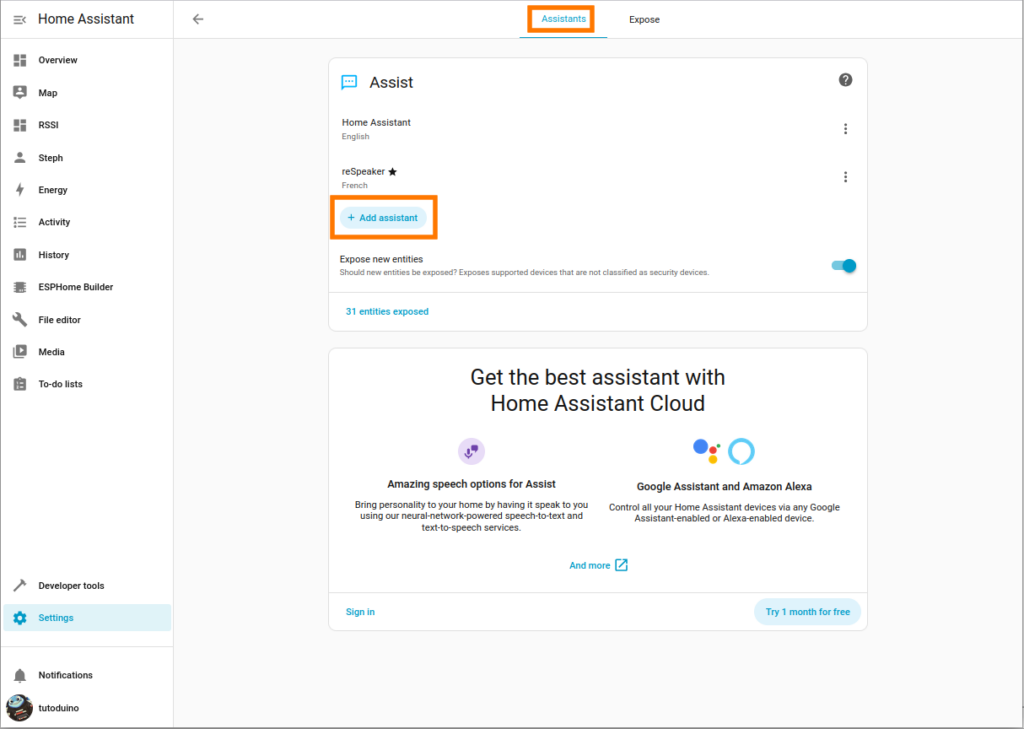
Add a voice assistant
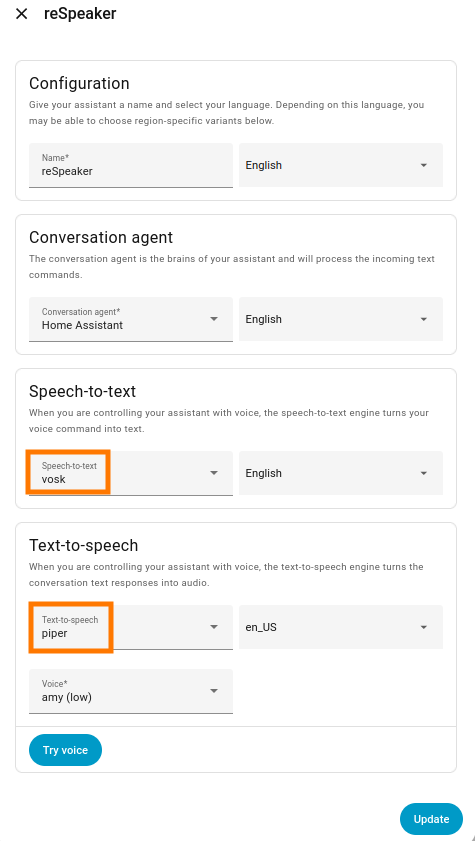
Add reSpeaker voice assistant using Vosk Speech-to-text and Piper Text-to-speech:
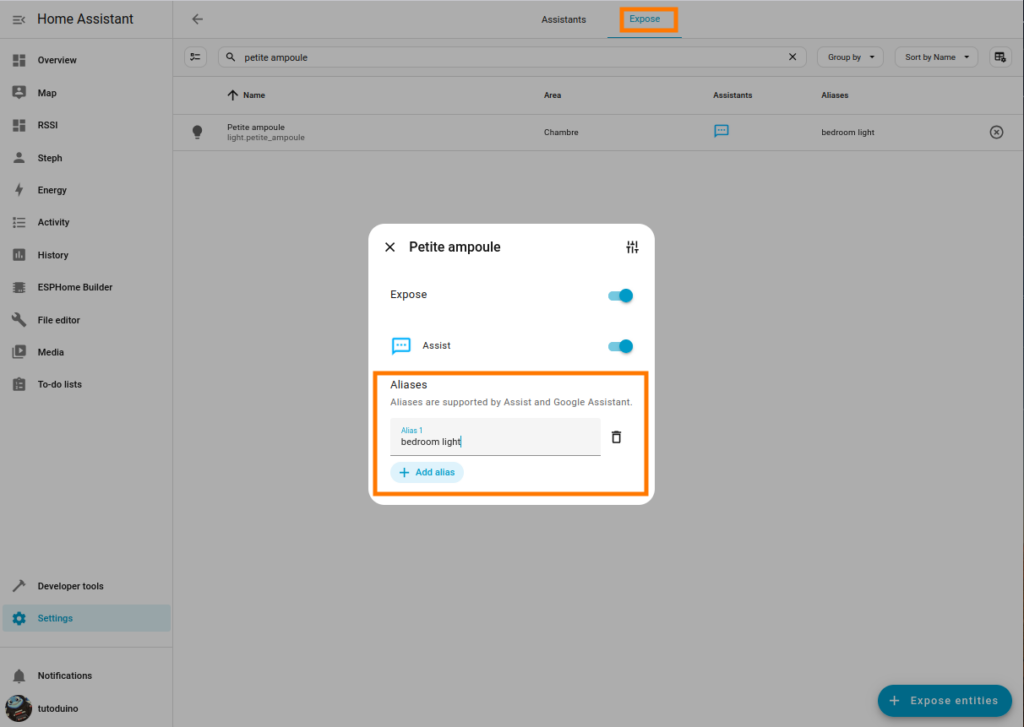
The list of entities exposed to voice assistant are configured in the Expose tab of the Voice assistants menu. I recommend you to define short aliases for the entities you want to control by voice, this will make the voice assistant much easier to use.
ESPHome configuration
The ESPHome YAML configuration required to enable the ReSpeaker XVF3800 as Home Assistant voice assistant is available in formatBCE GitHub repository.
Simply copy and paste this configuration into your ReSpeaker setup, then customize the API and OTA settings with the values you defined when creating the device (or stored in your secrets).
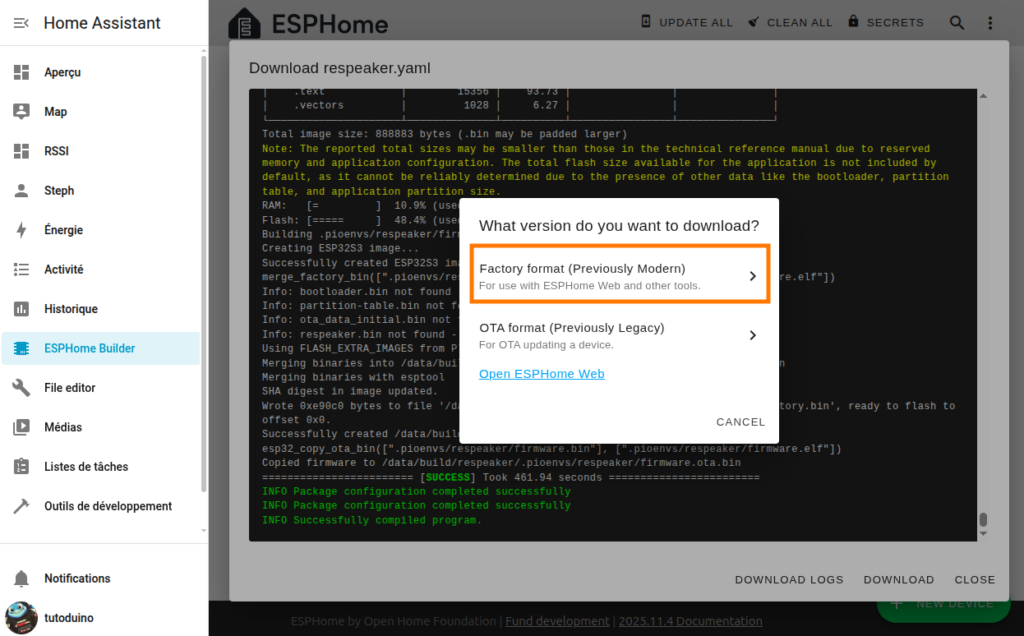
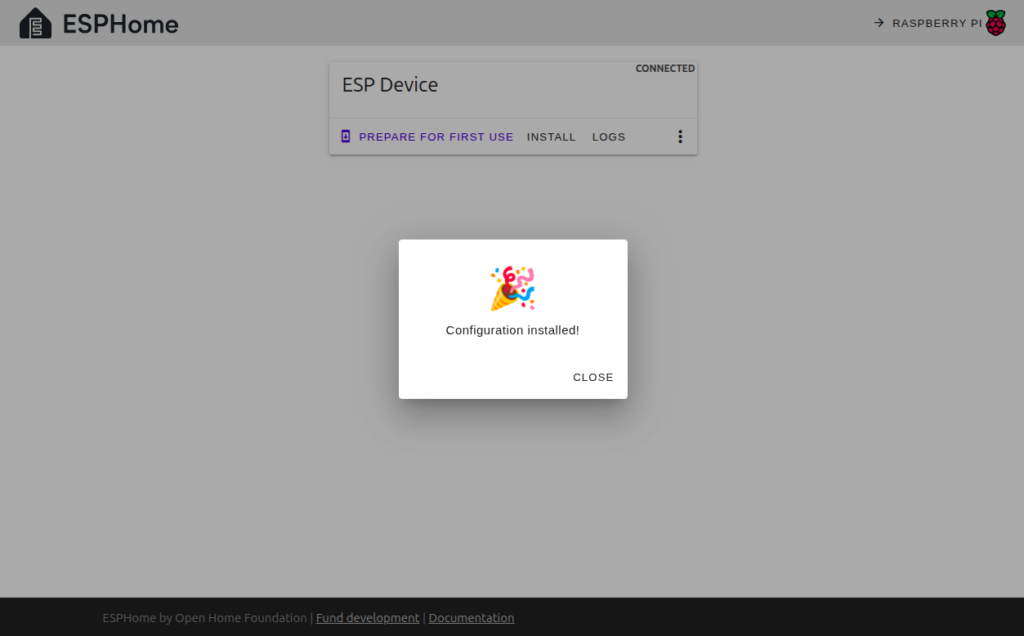
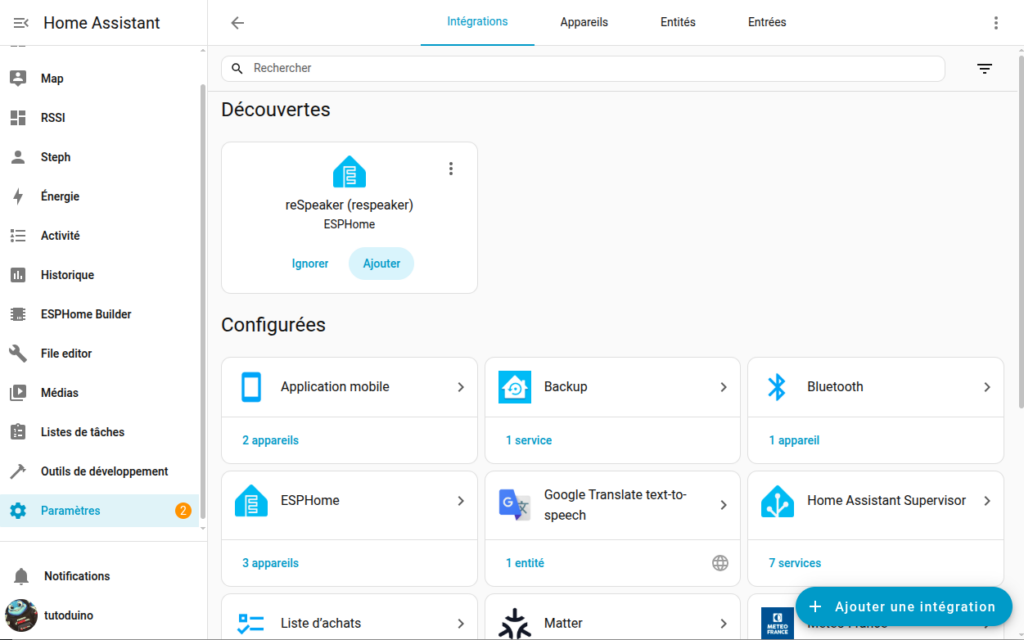
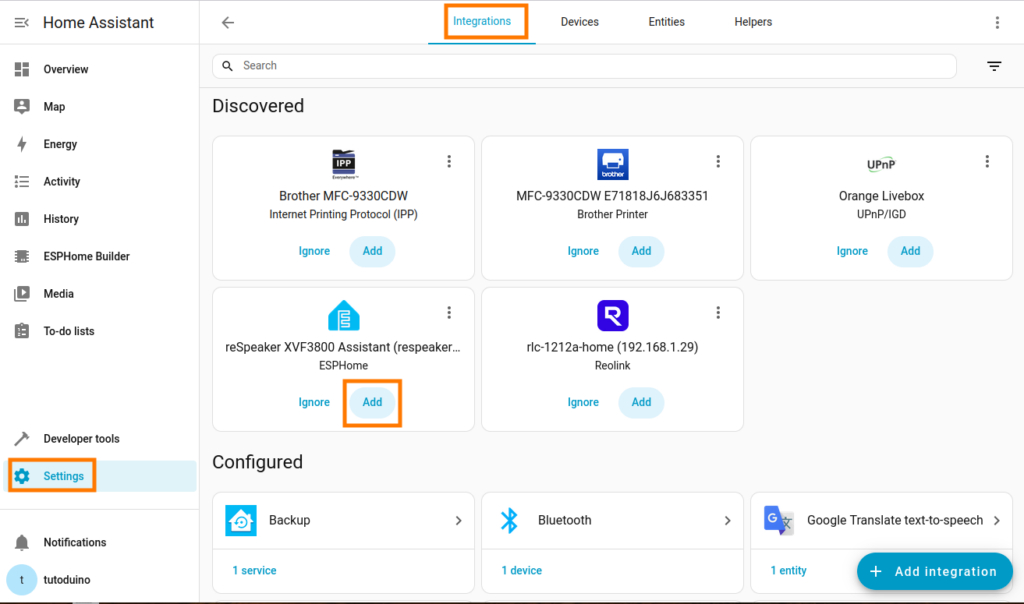
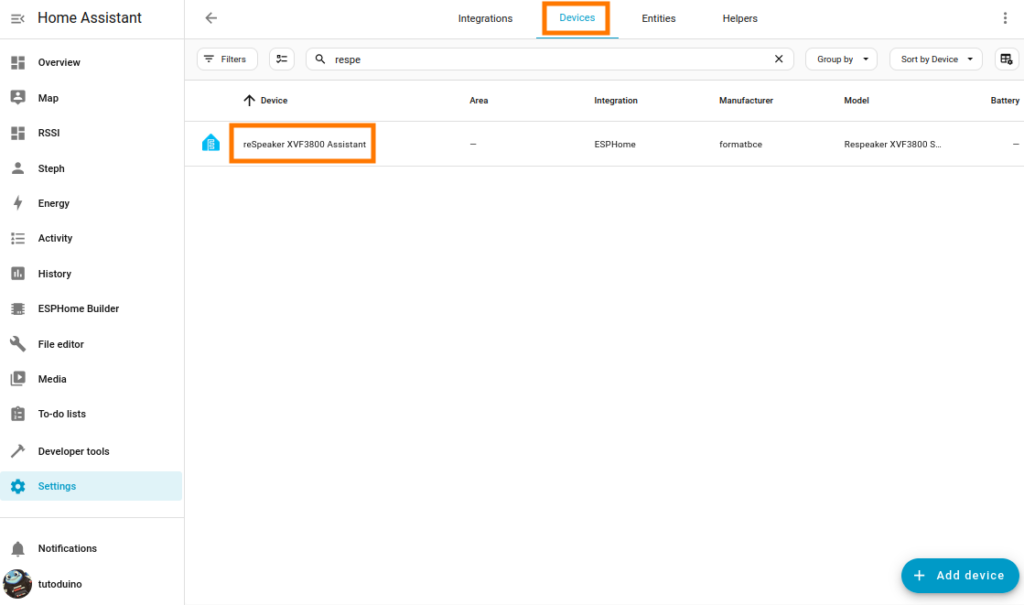
After compiling and uploading the configuration to the ReSpeaker for the first time (using ESPHome Web via the ESP32-S3’s USB port), add the ReSpeaker integration in Home Assistant. The device should then appear automatically in the list of available devices.
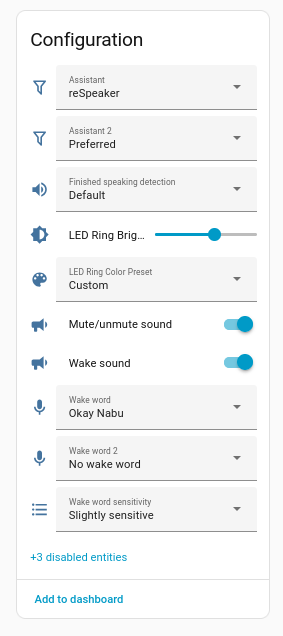
You have now to configure this new device. Select the voice assistant configuration you created for the ReSpeaker, then choose a wake word (for example, “Okay Nabu”). When the wake word is detected, the ReSpeaker wakes up and listens for your voice command.
Focus on LED management
The Respeaker XVF3800 ESPHome component provides a set_led_ring() method for precise control of its 12-LED ring.
  // Individual LED ring control (12 LEDs)
void set_led_ring(uint32_t *rgb_array);For each LED, color and brightness are encoded in a 32-bit value (4 bytes with 0x00RRGGBB format):
- Byte 3 (MSB, bits 24-31): 0x00 (unused/reserved)
- Byte 2 (bits 16-23): (RED component × brightness) & 0xFF
- Byte 1 (bits 8-15): (GREEN component × brightness) & 0xFF
- Byte 0 (LSB, bits 0-7): (BLUE component × brightness) & 0xFF
An interval triggers a script every 50ms to create smooth LED animations. The example below shows a rotating purple effect with cycling brightness on a 12-LED ring.
esphome:
  name: respeaker-xvf3800-tutorial
  friendly_name: ReSpeaker XVF3800 Tutorial
esp32:
  board: esp32-s3-devkitc-1
  framework:
    type: esp-idf
wifi:
  id: wifi_id
  ssid: !secret wifi_ssid
  password: !secret wifi_password
logger:
  level: DEBUG
api:
  id: api_id
  encryption:
    key: !secret api_key
ota:
  - platform: esphome
    id: ota_esphome
    password: !secret ota_password
i2c:
  - id: internal_i2c
    sda: GPIO5
    scl: GPIO6
    scan: true
    frequency: 100kHz
psram:
  mode: octal
  speed: 80MHz
globals:
  - id: led_brightness
    type: uint8_t
    restore_value: no
    initial_value: '0'
  - id: illuminated_led
    type: uint8_t
    restore_value: no
    initial_value: '0'

binary_sensor:
interval:
  - interval: 50ms
    id: led_animation_interval
    then:
      - lambda: |-
          id(update_led).execute();
script:
  - id: update_led
    then:
      - lambda: |-
          constexpr int NUM_LEDS = 12;
          uint32_t colors[NUM_LEDS];

          // Set all LEDs to black (0x00000000)
          for (int i = 0; i < NUM_LEDS; i++) {
            colors[i] = 0x00000000;
          }

          // Purple: high RED + BLUE, no GREEN. Use 0x00RRGGBB format
          uint8_t bright = (id(led_brightness)+0x30)%0xFF;
          colors[id(illuminated_led)] = (0x00 << 24) | (bright << 16) | (0x00 << 8) | bright;

          // LED ON position
          id(illuminated_led) = (id(illuminated_led) + 1) % NUM_LEDS;

          // Increase led brightness
          id(led_brightness)++;

          // Send led info to XVF3800 chip via I2C command
          id(respeaker).set_led_ring(colors);
external_components:
  - source:
      type: git
      url: https://github.com/formatBCE/Respeaker-XVF3800-ESPHome-integration
      ref: main
    components:
      - respeaker_xvf3800
      - aic3104
    refresh: 0s
respeaker_xvf3800:
  id: respeaker
  address: 0x2C
  dfu_version:
    name: "Firmware Version"
    update_interval: 120s
  led_beam_sensor:
    name: "Voice Beam Direction"
    id: beam_direction
    internal: true
  firmware:
    url: https://github.com/formatBCE/Respeaker-XVF3800-ESPHome-integration/raw/refs/heads/main/respeaker_xvf3800_i2s_master_dfu_firmware_v1.0.5_48k.bin
    version: "1.0.5"
    md5: be440ddef7d34571f01b74513005887f
ESP32-S3 configuration
The ESP-S3 micro-controller configuration of ReSpeaker XVF3800 is optimized for Home Assistant voice integration, real-time I²S audio streaming and flicker-free LED animations.
The configuration increases default 160MHz CPU to the maximum stable 240MHz. Memory is optimized for Micro-Wake-Word detection efficiency and enabling flash operations (OTA updates) without stalling execution – critical for continuous voice detection.
esp32:
  board: esp32-s3-devkitc-1
  cpu_frequency: 240MHz
  variant: esp32s3
  flash_size: 8MB
  framework:
    type: esp-idf
    version: recommended
    sdkconfig_options:
      CONFIG_ESP32S3_DATA_CACHE_64KB: "y"
      CONFIG_ESP32S3_DATA_CACHE_LINE_64B: "y"
      CONFIG_ESP32S3_INSTRUCTION_CACHE_32KB: "y"
      # Moves instructions and read only data from flash into PSRAM on boot.
      # Both enabled allows instructions to execute while a flash operation
      # is in progress without needing to be placed in IRAM.
      # Considerably speeds up mWW at the cost of using more PSRAM.
      CONFIG_SPIRAM_RODATA: "y"
      CONFIG_SPIRAM_FETCH_INSTRUCTIONS: "y"
      CONFIG_BT_ALLOCATION_FROM_SPIRAM_FIRST: "y"
      CONFIG_BT_BLE_DYNAMIC_ENV_MEMORY: "y"
      CONFIG_MBEDTLS_EXTERNAL_MEM_ALLOC: "y"
      CONFIG_MBEDTLS_SSL_PROTO_TLS1_3: "y"  # TLS1.3 support isn't enabled by default in IDF 5.1.5
Let’s test it!
Watch this complete ReSpeaker XVF3800 + Home Assistant demo showing:
- “Okay Nabu” wake word detection
- Beamforming LEDs pointing to speaker
- Real voice commands (“turn on lights”)
- Smooth LED feedback through all phases
Pretty nice guide – very helpfull – thanks a lot!