Encryption makes information unreadable to anyone who does not have the encryption key, thus ensuring its confidentiality.
Encryption of communications is widely recognized thanks to the famous padlock icon in your browser, which indicates the use of the secure HTTPS protocol. An attacker intercepting your exchanges will then be unable to read the content transmitted between your computer and the visited HTTP server.
But beyond encrypting communications, let’s explore why it is important to encrypt the Flash memory of a connected device.
Why encrypt the Flash memory of an IoT connected device?
The “brain” of an IoT (Internet of Things) connected device is a microcontroller, which stores its persistent data (program, Wi-Fi configuration, etc.) in flash memory. This type of memory retains data even without power.
A person with physical access to a connected device can therefore read the contents of this memory and extract secrets—crucial information for your network security (security certificates, application passwords, Wi-Fi passwords, etc.). It is therefore essential to encrypt this memory to make these secrets unreadable to an attacker. Specialized chips now exist for storing secrets (e.g., TPM).
Most consumer-grade connected devices, such as temperature sensors or video surveillance cameras, are not equipped with a TPM chip, and their flash memory is rarely encrypted. These devices are generally connected to a Wi-Fi network.
Wi-Fi communications are now relatively secure with a WPA2-PSK encryption key. However, an attacker with physical access to a connected device (a sensor in a factory, a camera in your garden) can easily extract this key from the device’s unencrypted flash memory.
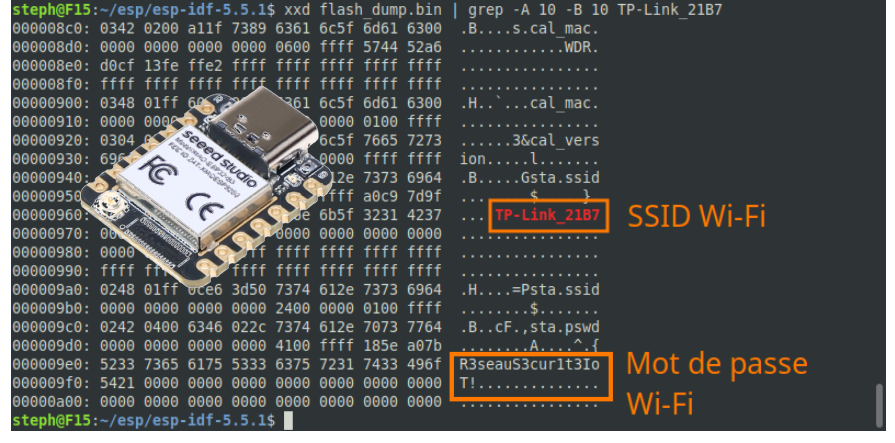
Here is a minimalist code example for a connected device based on an ESP32 microcontroller, which connects to the TP-Link_21B7 Wi-Fi network (SSID) with the password R3seauS3cur1t3IoT!:
// Example used to show how Wi-Fi password
// can be extracted from Flash memory
//
// https://tutoduino.fr/
#include <WiFi.h>
const char *ssid = "TP-Link_21B7";
const char *passphrase = "R3seauS3cur1t3IoT!";
void setup() {
  Serial.begin(115200);
  delay(100);
  WiFi.begin(ssid, passphrase);
  Serial.println();
  Serial.println();
  Serial.print("Waiting for WiFi... ");
  while (WiFi.status() != WL_CONNECTED) {
    delay(500);
    Serial.print(".");
  }
  Serial.println("");
  Serial.println("WiFi connected");
  Serial.print("IP address: ");
  Serial.println(WiFi.localIP());
}
void loop() {
  delay(1000);
}The Wi-Fi network name (SSID) and its password (passphrase) are constants that will be stored in the microcontroller’s flash memory.
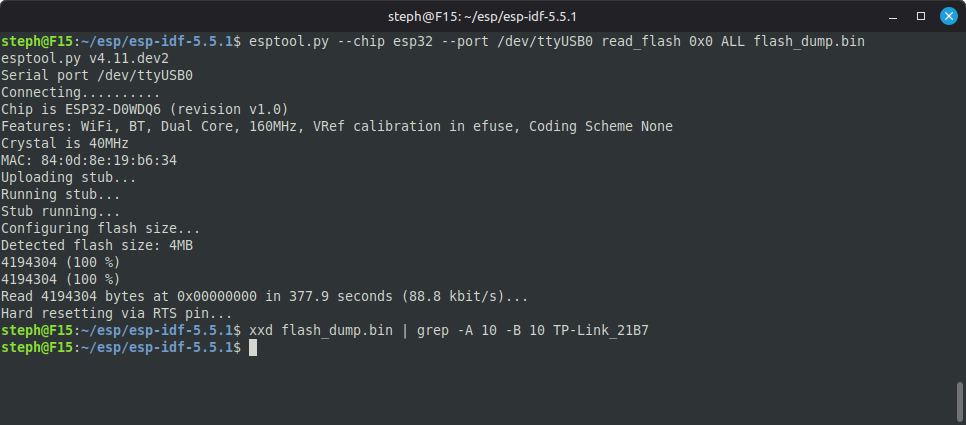
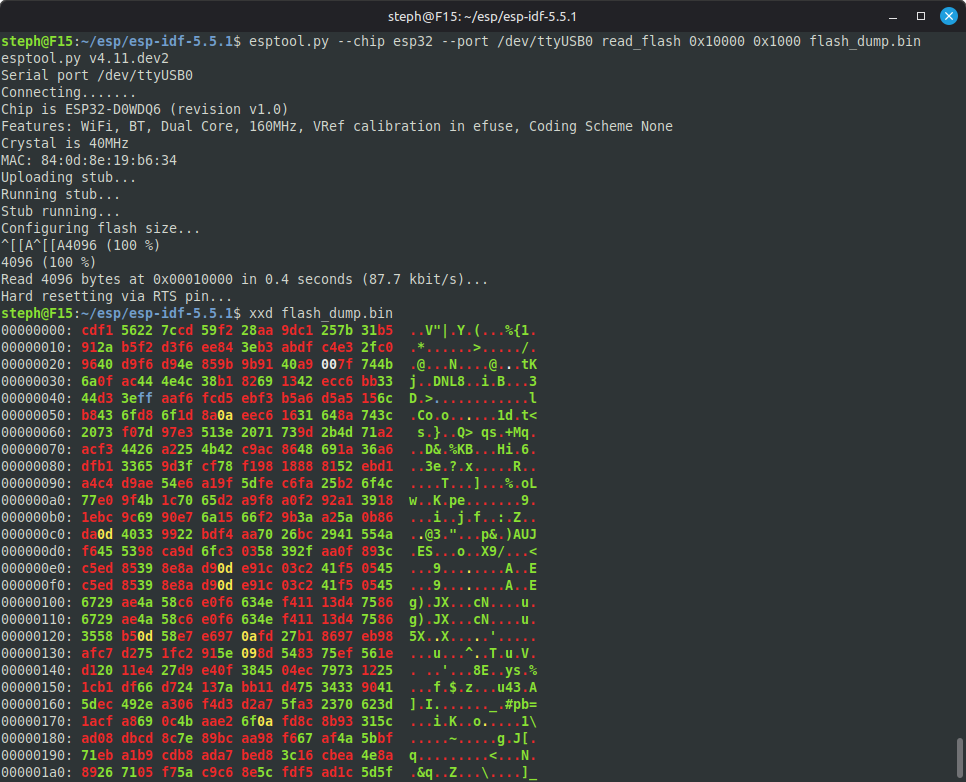
After connecting the device via its USB port to a Linux computer, it is trivial to extract the Wi-Fi credentials from its flash memory:

Here is an example illustrated in video:
How to encrypt Flash memory on an ESP32?
The ESP-IDF framework allows you to encrypt the flash memory of ESP32s with a relatively simple procedure.
Here are the main steps:
1. Generate an encryption key
You can either use the ESP32’s built‑in hardware encryption key (which is unique to each chip) or generate your own custom encryption key. Each approach has its own advantages and trade‑offs. In this tutorial, for learning purposes, I chose to generate my own encryption key.
Here is how to generate your own encryption key:
espsecure generate_flash_encryption_key my_key.binThis key has a size of 256 bits, which will allow you to encrypt your firmware with a good level of security. Note that this key will be required for all future firmware modifications to your connected device; it must be kept safe.
2. Burn the encryption key in an eFuse of the microcontroller
Your encryption key must be written to the ESP32. To ensure that the key remains fully confidential and cannot be read or modified afterward, the device uses the eFuse burning mechanism.
An eFuse (electronic fuse) is a hardware element built directly into the ESP32’s silicon. Unlike standard flash memory, eFuse is one-time programmable (OTP) — once a bit is set, it can never be changed or erased. This makes the operation permanent and irreversible.
The flash encryption key will be stored in eFuse BLOCK1.
espefuse --port /dev/ttyUSB0 burn_key flash_encryption my_key.binHere is the result of this command if everything goes well:
steph@F15:~/esp/esp-idf-5.5.1$ espefuse --port /dev/ttyUSB0 burn_key flash_encryption my_key.bin
espefuse v4.11.dev2
Connecting.....
Detecting chip type... ESP32
=== Run "burn_key" command ===
Sensitive data will be hidden (see --show-sensitive-info)
Burn keys to blocks:
 - BLOCK1 -> [?? ?? ?? ?? ?? ?? ?? ?? ?? ?? ?? ?? ?? ?? ?? ??
 ?? ?? ?? ?? ?? ?? ?? ?? ?? ?? ?? ?? ?? ?? ?? ??]
	Reversing the byte order
	Disabling read to key block
	Disabling write to key block
Burn keys in efuse blocks.
The key block will be read and write protected (no further changes or
readback)
Check all blocks for burn...
idx, BLOCK_NAME,          Conclusion
[00] BLOCK0               is not empty
	(written ): 0x0000000400000000000014380000b00000a5840d8e19b63400000000
	(to write): 0x00000000000000000000000000000000000000000000000000010080
	(coding scheme = NONE)
[01] BLOCK1               is empty, will burn the new
value
.
This is an irreversible operation!
Type 'BURN' (all capitals) to continue.
BURN
BURN BLOCK1  - OK (write block == read block)
BURN BLOCK0  - OK (all write block bits are set)
Reading updated efuses...
Successful
Your 256-bit encryption key is stored in fuse BLOCK1 and is read/write protected.
We can verify that we have no read access the encryption key afterwards:
espefuse --port /dev/ttyUSB0 summaryReturns question marks for BLOCK1, the encryption key is correctly read protected.
BLOCK1 (BLOCK1)                                    Flash encryption key
   = ?? ?? ?? ?? ?? ?? ?? ?? ?? ?? ?? ?? ?? ?? ?? ?? ?? ?? ?? ?? ?? ?? ?? ?? ?? ?? ?? ?? ?? ?? ?? ?? -/-
3. Enable Flash Encryption in the Microcontroller
Two specific eFuses must be burned to enable Flash encryption:
- FLASH_CRYPT_CNT: This counter limits the number of attempts to enable encryption, preventing unauthorized resets. Its value must be odd to enable encryption.
- FLASH_CRYPT_CONFIG: This sets the encryption parameters. A value of 0x0F enables AES-256 encryption for all data stored in Flash memory (including the bootloader, application, and user data).
espefuse --port /dev/ttyUSB0 burn_efuse FLASH_CRYPT_CNT 1
espefuse --port /dev/ttyUSB0 burn_efuse FLASH_CRYPT_CONFIG 0x0FLet us check eFuse values at this step:
espefuse --port /dev/ttyUSB0 summaryFLASH_CRYPT_CNT is set to 1 and FLASH_CRYPT_CONFIG is set to 0xf, it looks correct.
Flash fuses:
FLASH_CRYPT_CNT (BLOCK0)                           Flash encryption is enabled if this field has an o = 1 R/W (0b0000001)
                                                   dd number of bits set
FLASH_CRYPT_CONFIG (BLOCK0)                        Flash encryption config (key tweak bits)           = 15 R/W (0xf)
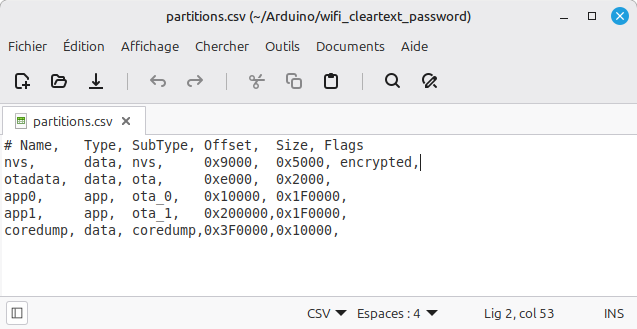
4. Enable NVS Partition Encryption
The NVS (Non-Volatile Storage) partition is a special partition on the flash memory. Its main role is to store persistent configuration data that must survive a reboot or power outage. The NVS partition must be encrypted to protect sensitive data such as passwords.
Encrypting the NVS partition is done as follows in the Arduino IDE:
- Select the “Custom” partition scheme
- Create the “partitions.csv” file in the directory where your sketch is stored on your computer
- Configure the desired partition scheme in CSV format within this file
- Add the “encrypted” flag for the NVS partition
- Compile the program in the Arduino IDE (it may be helpful to delete the Arduino cache directory beforehand).
5. Encrypt the firmware
After compiling the program under the Arduino IDE, you need to export the generated binary files.

This places all the necessary files in the build subdirectory of the directory where your Arduino sketch is stored.
The flash_args file contains the names of the files that need to be encrypted and the offset at which they should then be flashed into the ESP32’s memory.
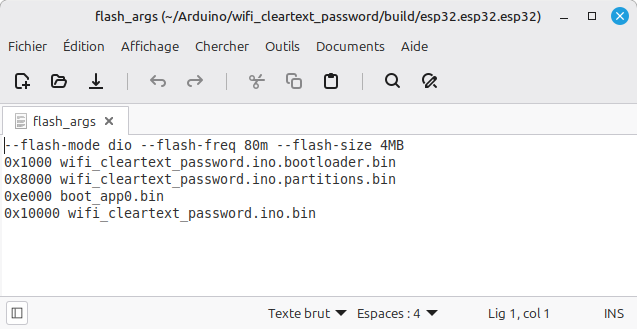
Encrypt all these binary files with your encryption key, specifying their address in Flash memory as a parameter.
$ espsecure encrypt_flash_data \
  --keyfile my_key.bin \
  --address 0x1000 \
  --output bootloader_enc.bin \
  bootloader.bin
$ espsecure encrypt_flash_data \
  --keyfile my_key.bin \
  --address 0x8000 \
  --output partitions_enc.bin \
  partitions.bin

$ espsecure encrypt_flash_data \
  --keyfile my_key.bin \
  --address 0xe000 \
  --output boot_app0_enc.bin \
  boot_app0.bin

$ espsecure encrypt_flash_data \
  --keyfile my_key.bin \
  --address 0x10000 \
  --output firmware_enc.bin \
firmware.bin 6. Flash the encrypted firmware into the ESP32’s flash memory
Flash all the encrypted binaries from the previous step into the ESP32’s flash memory:
esptool --chip esp32 --port /dev/ttyUSB0 \
  write_flash \
  0x1000  bootloader_enc.bin \
  0x8000  partitions_enc.bin \
  0xe000  boot_app0_enc.bin \
0x10000 firmware_enc.binEncryption ensures data confidentiality!
By repeating the procedure from the beginning of this tutorial, it becomes impossible to extract the data in plain text from the Flash memory.
The firmware is also encrypted, making it impossible to reverse engineer:
Conclusion
Flash memory encryption ensures the confidentiality of the data it stores and provides numerous benefits in terms of the cybersecurity of your IoT connected device:
✅ Encrypted bootloader
- Prevents malicious code from executing at startup.
- Protects against bootloader modification attacks (e.g., malware injection).
- Ensures the integrity of the boot process.
✅ Protected application
- Renders the code unreadable without the encryption key.
- Prevents reverse engineering to steal intellectual property.
- Secures sensitive algorithms (e.g., communication protocols, business logic).
✅ Unrecoverable Wi-Fi password
- Prevents password recovery even with physical access to memory.
- Reduces the risk of network hacking through credential extraction.
- Protects the confidentiality of data transmitted over the network.
✅ Firmware cloning is impossible without the encryption key
- Prevents unauthorized firmware duplication (anti-counterfeiting protection).
- Guarantees hardware authenticity (only legitimate devices can function).
- Protects revenue and reputation by preventing illegal copies.
In summary: Flash memory encryption enhances security, protects intellectual property, and reduces the risk of hacking or counterfeiting. A must for connected devices! 🔒