In this tutorial, I explain how to build a Matter over Wi-Fi dimmable light using a Seeed Studio XIAO ESP32-C5 module and a COB LED Driver, controlled by Home Assistant. The brightness of the COB LED is adjustable directly from the Home Assistant interface.
What you will need:
- Seeed Studio XIAO ESP32-C5
- Seeed Studio COB LED Driver
- Raspberry Pi running Home Assistant OS
- Linux development machine
This tutorial is designed for a Linux development machine. If you are using Windows or macOS, the steps are mostly identical — refer to the Espressif getting started guide for platform-specific instructions.
Overview
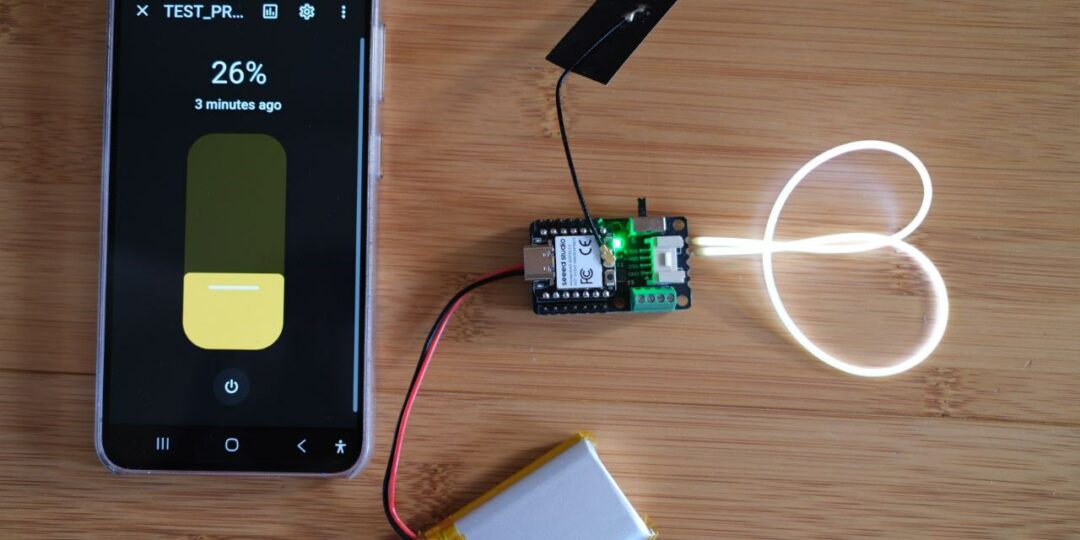
The XIAO ESP32-C5 exposes a Matter dimmable light endpoint. Commissioning is performed over BLE using the Home Assistant companion app on your smartphone. Once commissioned, the device communicates with Home Assistant over Wi-Fi using the Matter protocol — no BLE is required after the initial setup.
The COB LED brightness is controlled by the ESP32-C5 LEDC peripheral (PWM) on GPIO25, which corresponds to the D2 pin of the XIAO ESP32-C5.
If you want to learn more about the Matter protocol and the commissioning process, refer to my dedicated Matter tutorial.
To learn more about COB LED, check my previous article introducing COB LED Driver Board.
Install Espressif’s Matter SDK
As of March 2026, Matter development with the Espressif SDK requires ESP-IDF v5.5.3.
1. Install ESP-IDF
mkdir ~/esp
cd ~/esp
git clone --branch v5.5.3 --recursive https://github.com/espressif/esp-idf.git
cd esp-idf
./install.sh
source ./export.sh2. Install ESP-MATTER
cd ~/esp
git clone --depth 1 https://github.com/espressif/esp-matter.git
cd esp-matter
git submodule update --init --depth 1
cd ./connectedhomeip/connectedhomeip
./scripts/checkout_submodules.py --platform esp32 linux --shallow
cd ~/esp/esp-matter
./install.sh
source ./export.shThe source ./export.sh commands must be run in every new terminal session, otherwise the build will fail with cryptic errors.
source ~/esp/esp-idf/export.sh
source ~/esp/esp-matter/export.sh3. Install dimmable light example for XIAO ESP32-C5
I created a ready-to-use example for XIAO ESP32-C5, available on my GitHub at https://github.com/tutoduino/esp-matter-xiao-esp32c5-cob-led.
Clone this repository and run the install script to copy the example and device profile into your esp-matter directory:
git clone https://github.com/tutoduino/esp-matter-xiao-esp32c5-cob-led.git
cd esp-matter-xiao-esp32c5-cob-led
bash install.shBy default, the script assumes esp-matter is installed in ~/esp/esp-matter. If not, you can specify a custom path:
bash install.sh you_custom_path_to_esp-matterThe key difference with light example for esp32c5 designed for the DevKit is the use of gpio led type instead of ws2812.
The key difference from the esp32c5 DevKit light example is the LED type: gpio (LEDC/PWM) is used instead of ws2812, since the COB LED Driver uses a single-channel PWM signal rather than an RGB addressable LED.
This new device Hardware Abstraction Layer is configured in esp_matter_device.cmake located in newly created folder ~/esp/esp-matter/device_hal/device/xiao_esp32c5/
cmake_minimum_required(VERSION 3.5)
if (NOT ("${IDF_TARGET}" STREQUAL "esp32c5" ))
    message(FATAL_ERROR "please set esp32c5 as the IDF_TARGET using 'idf.py set-target esp32c5'")
endif()
SET(device_type     xiao_esp32c5)
SET(led_type        gpio)
SET(button_type     iot)
SET(extra_components_dirs_append "$ENV{ESP_MATTER_DEVICE_PATH}/../../led_driver"
                                 "$ENV{ESP_MATTER_DEVICE_PATH}/../../button_driver/iot_button")
The COB LED is connected to the D2 pin of the COB LED Driver board, which maps to GPIO25 on the XIAO ESP32-C5. It must be configured in device.c in the same folder.
// Copyright 2021 Espressif Systems (Shanghai) CO LTD
//
// Licensed under the Apache License, Version 2.0 (the "License");
// you may not use this file except in compliance with the License.
// You may obtain a copy of the License at
//     http://www.apache.org/licenses/LICENSE-2.0
//
// Unless required by applicable law or agreed to in writing, software
// distributed under the License is distributed on an "AS IS" BASIS,
// WITHOUT WARRANTIES OR CONDITIONS OF ANY KIND, either express or implied.
// See the License for the specific language governing permissions and
// limitations under the License
#include <esp_log.h>
#include <iot_button.h>
#include <button_gpio.h>
#include <driver/gpio.h>
#include <led_driver.h>
#define LED_GPIO_PIN GPIO_NUM_25
#define LED_CHANNEL 0 /* LEDC_CHANNEL_0 */
#define BUTTON_GPIO_PIN GPIO_NUM_28
led_driver_config_t led_driver_get_config()
{
    led_driver_config_t config = {
        .gpio = LED_GPIO_PIN,
        .channel = LED_CHANNEL,
        /* The COB LED Driver uses an active-low PWM signal:
           the LED turns on when the GPIO is low (duty cycle = 0)
           and turns off when the GPIO is high (duty cycle = 255).
           output_invert = true corrects this so that a higher
           brightness value in Home Assistant produces a brighter LED. */
        .output_invert = true,
    };
    return config;
}
button_gpio_config_t button_driver_get_config()
{
    button_gpio_config_t config = {
        .gpio_num = BUTTON_GPIO_PIN,
        .active_level = 0,
    };
    return config;
}Build and flash
Connect the XIAO ESP32-C5 to your computer via USB, then navigate to the example directory and build:
cd ~/esp/esp-matter/examples/cob_led_matter_example_xiao_esp32c5
idf.py fullclean
idf.py set-target esp32c5
idf.py buildOnce the build succeeds, flash the firmware and open the serial monitor:
idf.py flash monitorGenerate the Matter commissioning QR code
At first boot, the monitor will display the following line, meaning the device is ready to be commissioned:
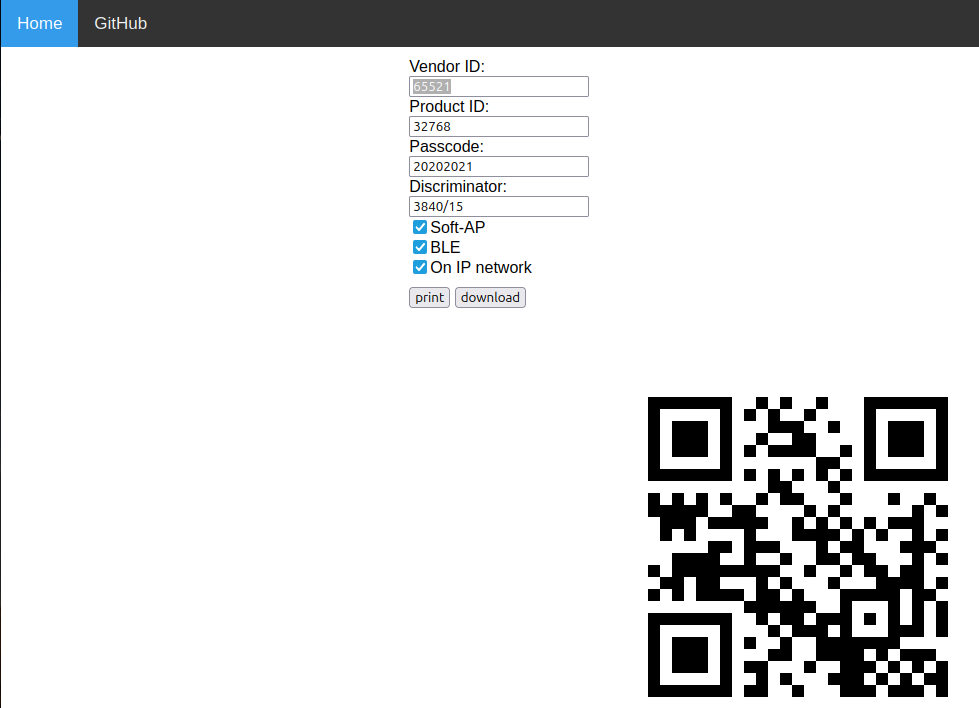
Advertise commission parameter vendorID=65521 productID=32768 discriminator=3840/15 cm=1 cp=0 jf=0The commissioning parameters displayed in the log have the following meaning:
- vendorID — identifies the manufacturer of the device. The default value
65521(0xFFF1) is a test vendor ID provided by the Matter specification for development purposes. A real commercial product would use a vendor ID assigned by the CSA (Connectivity Standards Alliance). - productID — identifies the specific product from the vendor. The default value
32768(0x8000) is a test product ID used for development. - discriminator — a 12-bit value used to distinguish your device from other Matter devices during commissioning. Useful when multiple devices are advertising at the same time.
- passcode — the PIN code used to authenticate the commissioning session. The default value
20202021is hardcoded in the esp-matter example code and is the same for every device built from this example. This is acceptable for development and personal use, but a real commercial product must use a unique random passcode per device, stored in a secure partition of the flash — otherwise anyone with the default passcode could commission your device without your knowledge.
Use this information to generate the Matter QR code at the following address:
https://thekuwayama.github.io/matter_qrcode_generator
You can use the QR-Code in the following picture, the commissioning parameters should be the same for you if you use the exact same firmware without any modification and no custom passcode has been set.
Control from Home Assistant
Once you have the Matter commissioning QR code, add the device to Home Assistant. Refer to the chapter Adding a new Matter device to Home Assistant in my previous Matter tutorial for a step-by-step guide on this procedure.
Once commissioned, the device appears in Home Assistant as a dimmable light. You can control:
- the on/off state using the toggle button
- the brightness using the slider (0% to 100%)
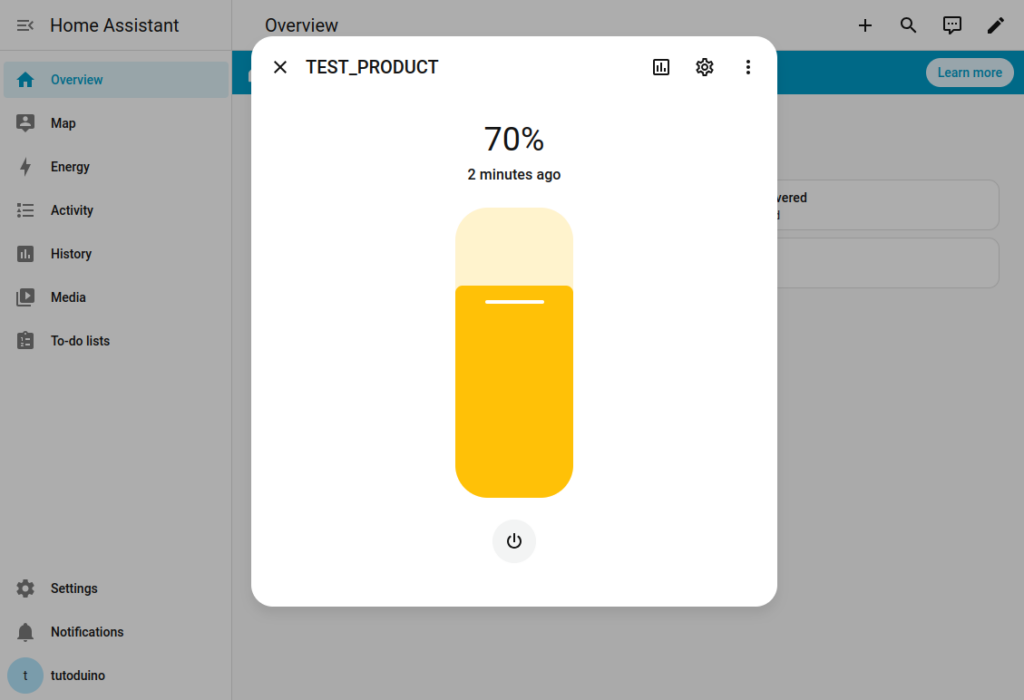
Changes are reflected instantly on the COB LED.
Button and factory reset
The XIAO ESP32-C5 boot button (GPIO28) is registered as a Matter action button in the firmware. It supports two behaviors depending on how long it is pressed:
- Short press — toggles the COB LED on/off, identical to using the toggle button in Home Assistant.
- Long press (5 seconds) — triggers a factory reset. All Matter commissioning data (fabrics, network credentials) is erased from flash and the device reboots in commissioning mode, ready to be paired again.
Note that the factory reset only erases Matter commissioning data. The firmware itself is not affected — you do not need to reflash the device.
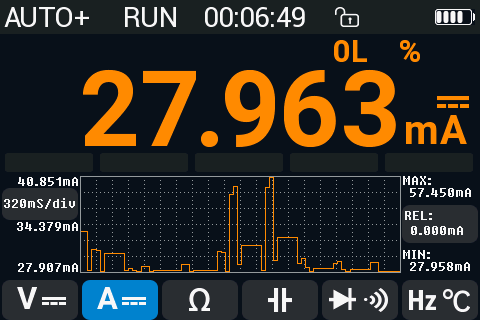
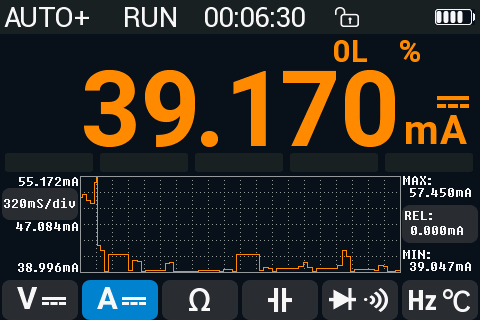
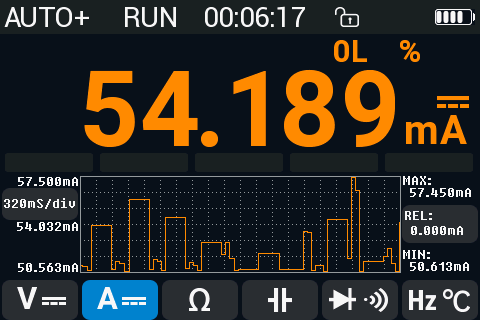
Power consumption
Battery-powered, the device (ESP32C5 + COB LED) draws 27 mA with the COB LED off, 39 mA at 50% LED brightness, and 54 mA at full brightness. With a 2500 mAh battery, this translates to approximately 65 hours of continuous autonomy — though real-world usage will vary depending on brightness settings and duty cycle. For a device of this kind, I would not consider battery power a suitable long-term solution.
I hope you enjoyed this article, please feel free to leave a comment and rate it by clicking on the stars below.
Hi, wouldn’t it be better to use a ESP32-H2 and use Matter over Thread? As this can be used in a light sleep mode and so the battery usage is very low when the led is off. I’m looking into making a similar solution as I want to make a battery powered table lamp that you can control and dim via Matter over Thread and can last for some time with a slightly bigger battery that I can put in the lamp base
looking good! How is the battery live? How long can it daily shine?
Added some power consumption information in the tutorial